Contents

User guide

This guide will show you how our groundbreaking methodology allows you to learn, practice, and perfect your skills entirely without needing a physical instrument.

1. How BtH works

Welcome to a new way of interacting with music. Think of BtH as an editor for your music. Just as you can select a single letter in a word to change or study it, BtH lets you select a single musical Moment — a tiny, digital slice of the song. By breaking music into these small pieces, the app gives you total control to see, hear, and practice every note at your own pace.

1.1 What a Movement is

A Movement is the central working unit of the BtH app. Everything you do — view, filter, practice, analyze, or perform — happens within the context of a Movement.

Generally, a movement in music refers to a well-defined part of a larger composition or to the entire composition itself. Movements in BtH are similarly organized, but now as structured systems of data that connect:
  • Pitch.
  • Rhythm.
  • Performance parameters.
  • Visual representation.
  • Keyboard interaction.

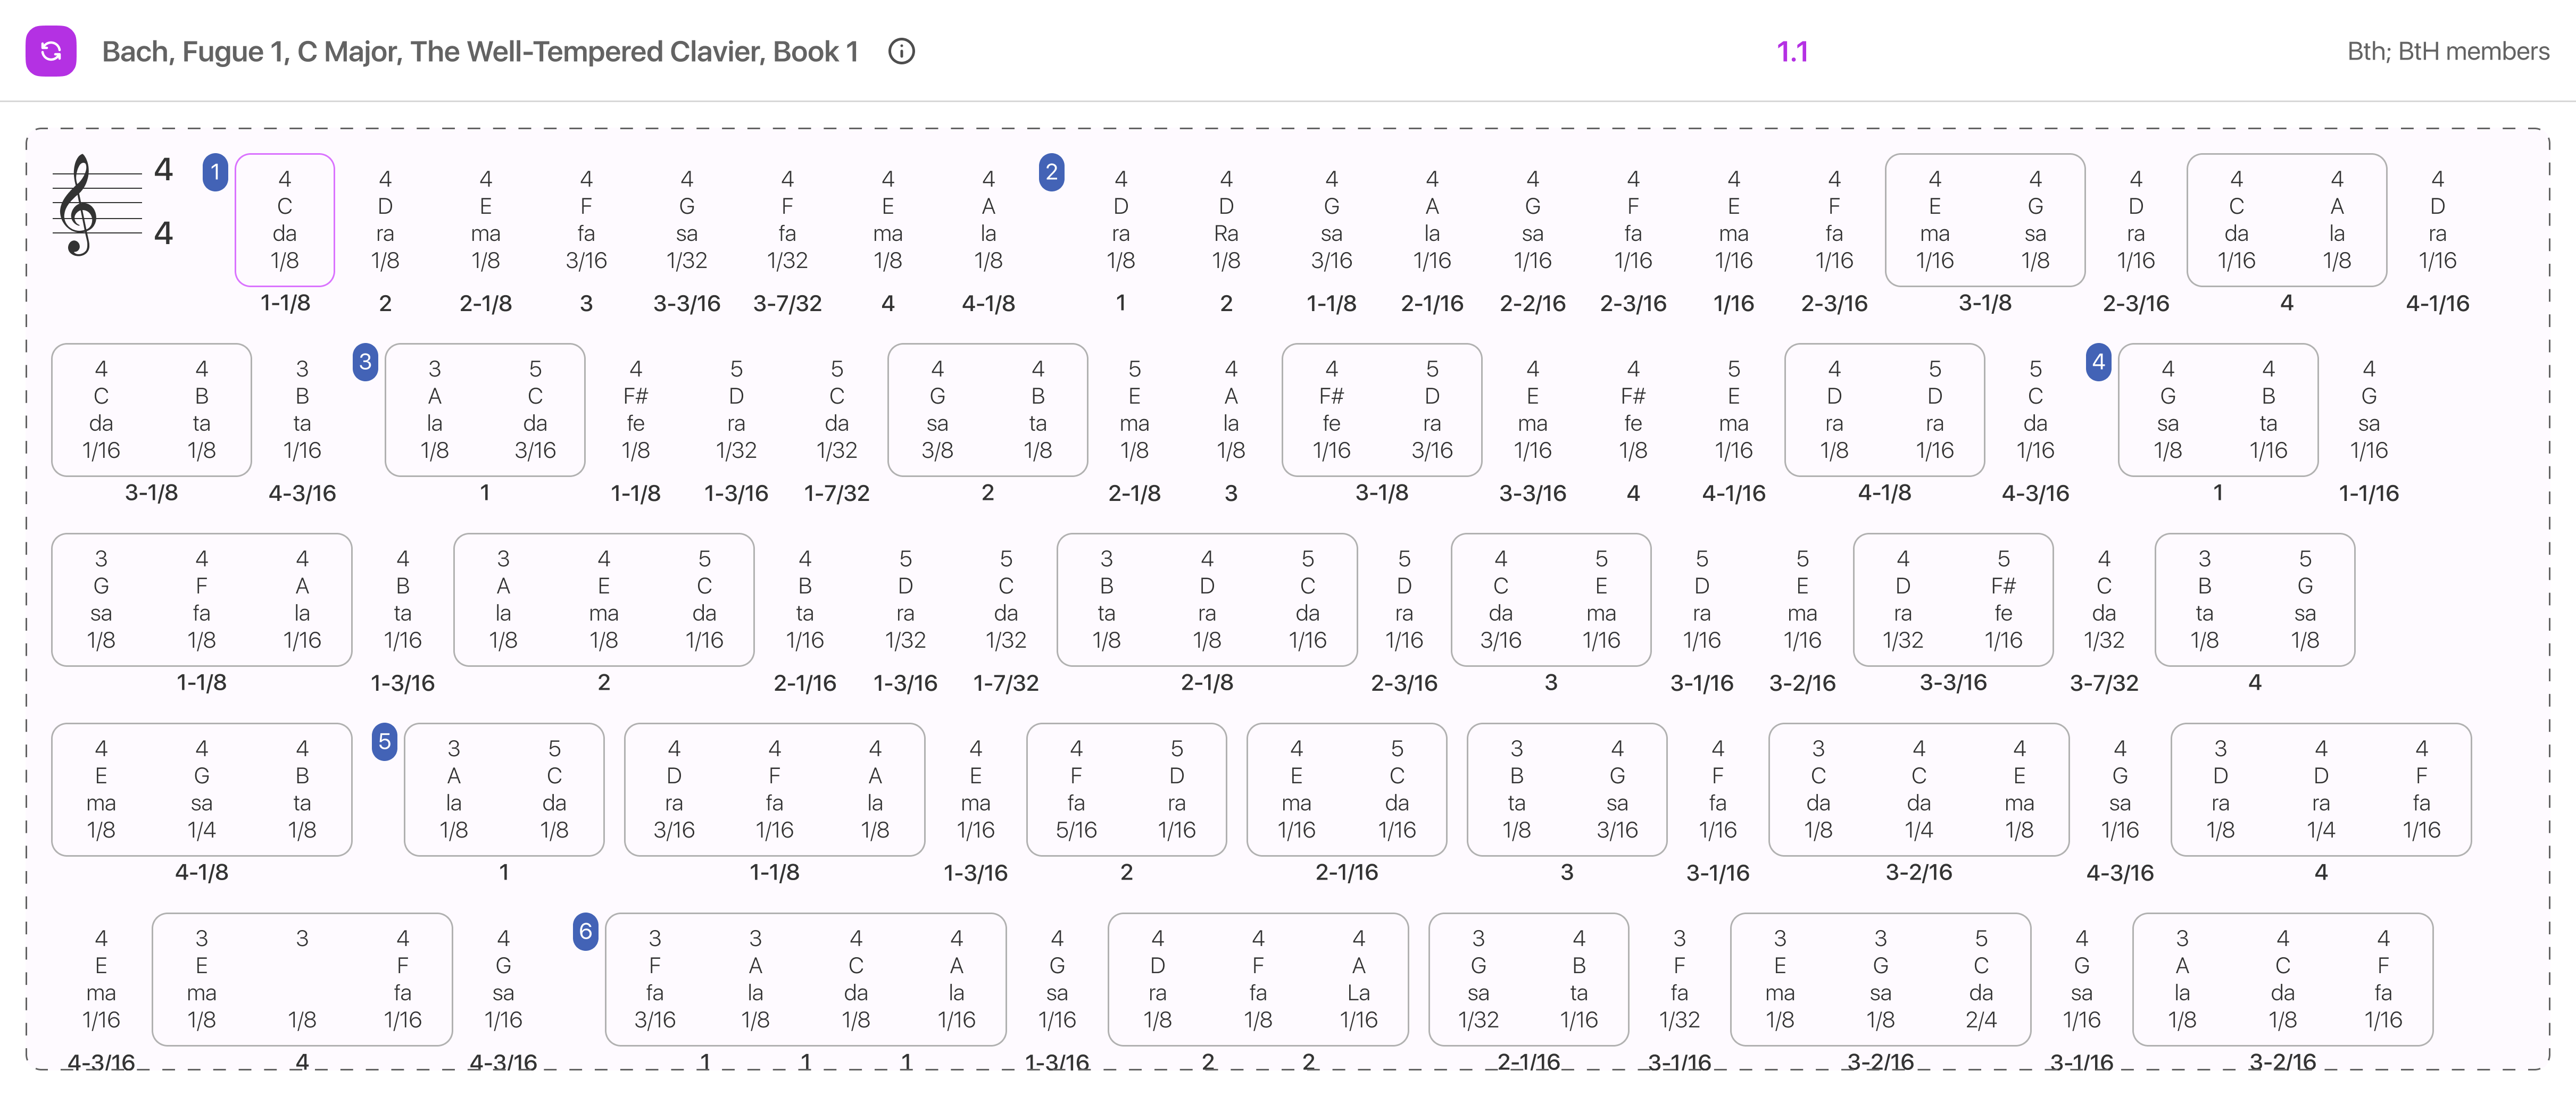
When you open a Movement from the BtH Library, its presentation in standard notation is transformed into Momenta notation. By organizing standard notation into parallel lines of related text, this readability of Momenta forms the basis for detailed study and interactive playback using the BtH toolset. BtH tools emphasize the following:

  • Learn to “read music” faster
  • Watch and listen to piano music unfold
  • Express the unfolding yourself
  • Practice deliberately.
  • Isolate specific musical parameters.
  • Analyze musical layers.
  • Connect notation with keyboard interaction.

1.1.1 Key characteristics of a Movement 

1.1.2 How Movements are organized

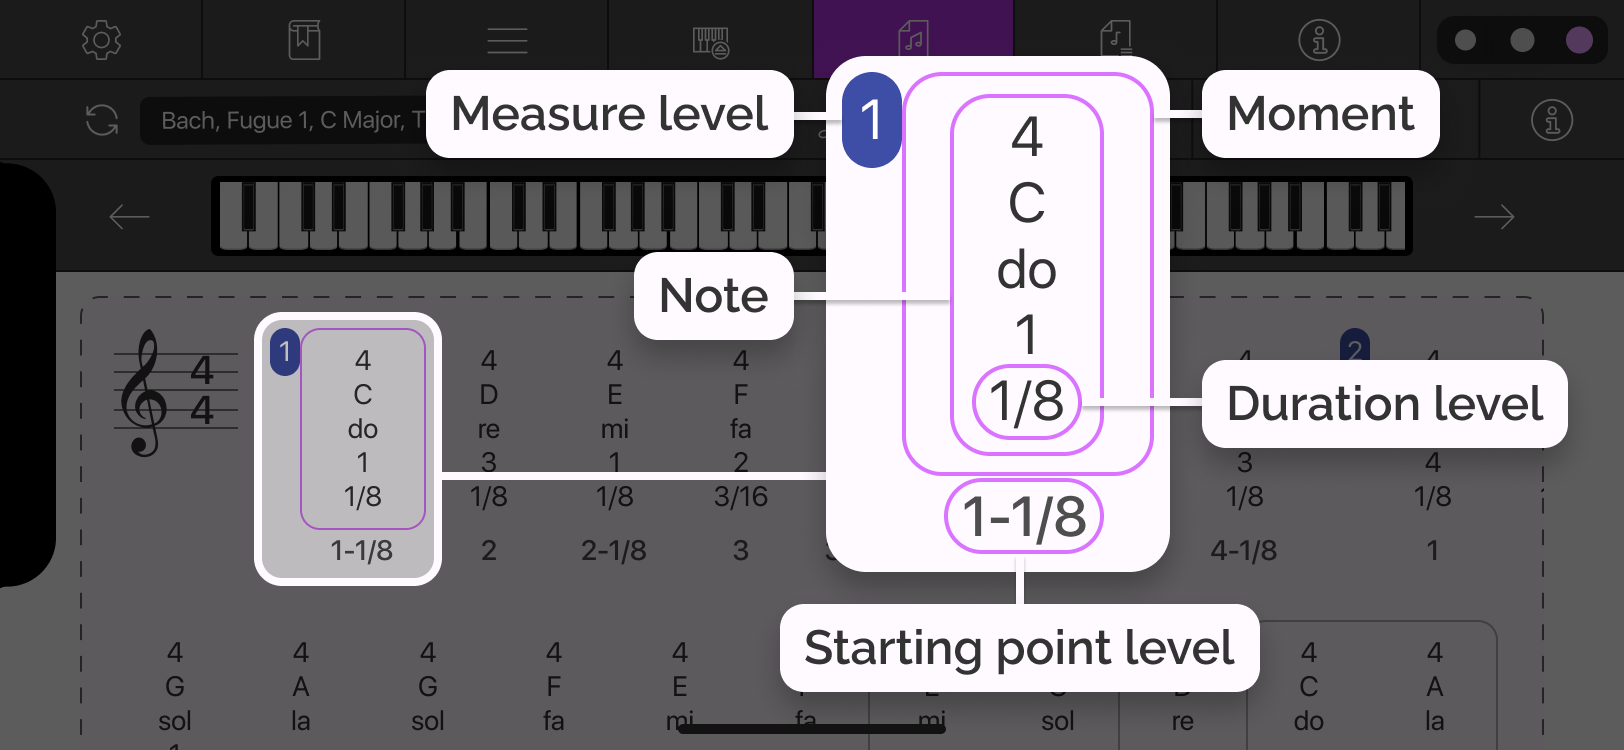
Each Movement in BtH is structured in a clear hierarchical way. It is organized into measures, moments, and notes, which together form the musical flow over time.

Measures

Just like in standard sheet music, a measure (or bar) organizes a Movement into regular rhythmic units. Each of these units spans a particular length of time determined by the current tempo and the number of beats in the measure’s controlling Time Signature (e.g. 4/4 or 12/16).

Such complications of rhythm are always very clearly shown in Momenta notation. Measures generally contain a series of moments placed by the composer directly on or very precisely within the beats defined for the measure.

In Momenta notation, you always know instantly which beat a moment sounds on or within by examining the values in the starting-point Level. Each value consists of a moment’s beat # and its offset within that beat # (if any).

Moments

A moment represents a vertical slice of musical time. It includes all notes that sound at the same time. Moments:

  • Define what happens at a specific point in time.
  • Can contain one note or multiple notes.
  • Are the core unit of playback focus.
  • Move sequentially during automatic playback.

When multiple notes belong to the same Moment, they form a multi-note Moment, visually recognizable as a grouped structure.

Notes

A note is a single musical sound within a moment. Notes are the smallest structural unit of a Movement, but they always exist inside moments.

Levels

In Momenta notation, a Level represents a specific musical property of a note or moment. Each Level defines one dimension of musical information.

The Levels listed below form the Default Leveling used in BtH v1.0. This is just the foundation of a much broader and more flexible system that will expand over time.

Default levels:

  1. Time Signature: defines rhythmic grouping (e.g., 3/4, 4/4).
  2. Key Signature: defines tonal center (sharps/flats).
  3. Measure: divides the Movement into sequentially numbered bars.
  4. Register: indicates a note’s octave (0-8).
  5. Note: note’s name.
  6. Solfege: syllables for singing notes.
  7. Fingering: suggests finger to use for sounding a note at the piano.
  8. Duration: defines how long a note is to be sounded.
  9. Volume: loudness of note (1-128).
  10. Voice: separates notes into musical lines by name e.g. soprano, alto, tenor, bass
  11. Starting Point: defines the exact time position of a Moment.

Looking Ahead

The Default Leveling is only the starting point. Future updates will introduce a wide range of additional Levels, such as:

  • Phrasing
  • Inflection
  • Metronome
  • General Direction
  • Pedaling
  • Figured Bass
  • Dynamics
  • Comment

These will be organized in a Levels Dictionary, allowing you to create custom Level sets and apply them to any Movement - giving you far greater control and expressive flexibility.

Summary: the structure of a Movement

To see the...

Whole piece

Rhythmic bars

One or more notes sounded at the same time

Individual sounds

Specific details

Look at the...

Movement

Measures

Moments

Notes

Levels

1.2 The modes of the app

At any time, BtH runs in one of three modes: PLAY, READ-ONLY, and REPORT. These define how you interact with the Movement and what tools are available.

You can switch between modes using the mode buttons located in the center of the Toolbar.

1.2.1 The PLAY mode — your performance space

The PLAY mode is designed for performing and auto-playback of the current Movement. In this mode, you work directly with interactive pianos and real-time playback.

The PLAY mode includes two sub-modes:

  •  Play Express: An advanced playback environment optimized for speed and responsiveness. It visually connects Movement structure with the piano keyboard and supports both automatic and manual playback.
  • Playground: A free-play piano environment. You can tap or click piano keys to produce sound immediately, like on a real piano, without following a Movement.

By default, when the PLAY mode is opened, you are in Play Express.

1.2.2 The READ-ONLY mode — your study space

The READ-ONLY mode presents the Movement as a structured Momenta document. In this mode:

The READ-ONLY mode is ideal for studying, understanding, and learning a Movement.
1.2.3 The REPORT mode — your precision practice space

The REPORT mode allows you to create filtered versions of a Movement. In this mode:

  • You apply filters using Level values.
  • The system generates a derived view (report).
  • Only notes and moments matching the selected criteria remain visible.
  • Playback follows the filtered structure.

The REPORT mode is designed for focused analysis and structured practice.

Summary: which mode should you choose?

If you want to...

Perform and interact in real-time

View and understand the structure

Filter and isolate specific parts

Use this mode:

PLAY

READ-ONLY

REPORT

1.3 The pianos & playback model

BtH connects musical structure with keyboard interaction through three on-line pianos named: Playground, Play Momenta, and Play Express. Each piano represents a different way of interacting with a Movement.

The pianos are not just visual keyboards. They define how sound, focus, and structure are synchronized.

1.3.1 Playground Piano

The Playground piano is a free-play keyboard. It is designed for exploration and independent practice. It allows you to:

  • Tap or click keys to produce sound immediately.
  • Play melodies or chords.
  • Experiment with sound without following a Movement.

Available in: the PLAY mode → Playground.

1.3.2 Play Momenta Piano

The Play Momenta piano is a structured playback piano connected to the Momenta panel. This piano is designed to help you understand how the Movement unfolds in Momenta notation.

It reproduces the Movement sequentially, Moment by Moment. During playback:

  • Focus shifts across moments.
  • Sound is produced according to Level values describing moments and their note(s)
  • Corresponding keys on the Play Momenta piano are highlighted.

Available in: the READ-ONLY and REPORT modes.

Note: Play Momenta prioritizes structural clarity over high-speed performance. At higher tempos, playback performance may depend on device hardware.

1.3.3 Play Express Piano

The Play Express piano is an advanced, performance-oriented playback environment. It visually integrates Movement structure directly around the piano keyboard.

During playback:

  • Keys are highlighted.
  • Note-related Level values appear above and below the corresponding keys.
  • Sound, focus, and visuals remain tightly synchronized.

Play Express is optimized for responsiveness and supports higher tempo ranges (up to 208 BPM).

Available in: the PLAY mode → the Play Express mode.

1.3.4 Playback types

Both Play Momenta and Play Express support two playback approaches:

  • Automatic playback: The app plays at a set tempo (BPM).
  • Manual playback: Step-by-step navigation controlled by the user. You control the pace step-by-step. This is perfect for "rubato" practice, where you want to control the timing of each Moment yourself.

Summary: which piano and playback should you use?

If you want to...

Explore and play freely

Study the score sequentially

Perform with visual guides

Use this piano:

Playground Piano

Play Momenta Piano

Play Express Piano

Playback options:

Free play

Automatic or Manual

Automatic or Manual

Appendix 1

Momenta notation

11.   What is claimed is:

 1.  A method of expressing a musical work written in

standard notational form, comprising: 


 ... displaying values for at least one of the plurality of levels of

 the musical moment, the values of each level displayed

 horizontally with respect to one another, the values for

 one musical moment displayed horizontally with

 respect to the values for the consecutive musical

 Moment.

​​​US Patent No 7,576,280 (section 11.1)

2. Interface overview

The BtH interface is designed to keep the Movement at the center of your workspace. Each panel on the screen has a specific role in helping you view, analyze, or perform your music.

2.1 Toolbar

The Toolbar is your main control hub. It is always visible at the top of the screen and automatically adapts based on which mode you are currently using. The Toolbar`s appearance differs slightly across MAC and iPad.

From here, you can:

  • Access Settings: Configure your account, piano, and language.
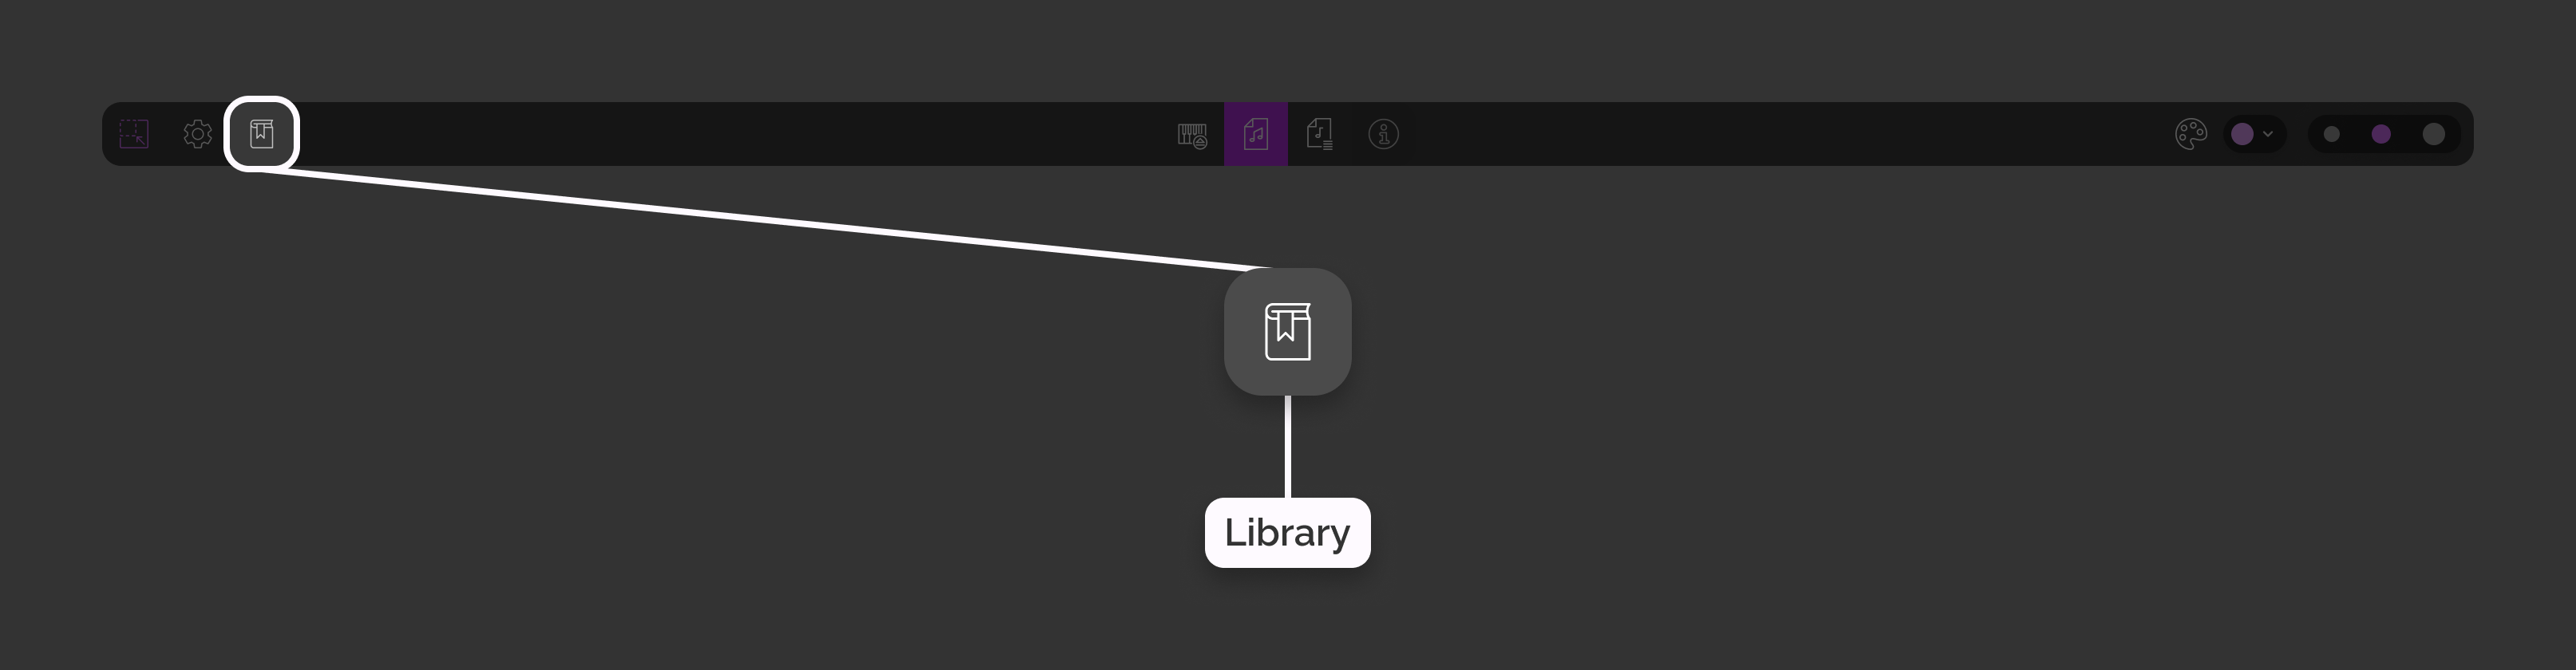
  • Open the Library: Browse and select your music.
  • Switch modes: Move between PLAY, READ-ONLY, and REPORT.
  • Adjust the view: Change the scale (zoom Level) and background color of the Momenta panel.

The center of the Toolbar contains mode controls.

PLAY mode is divided into Play Ground and Play Express workspaces. The buttons to switch workspace are positioned on the right side of the Toolbar in PLAY mode.

Controls for view adjustment are likewise positioned toward the right side of the Toolbar.

2.2 Library

The Library is your digital repertoire hub. It serves as the primary entry point for opening Movements or for simply exploring them by listening to their opening measures. 

You can access the Library from the Toolbar in any mode (PLAY, READ-ONLY, or REPORT).
2.2.1 How Library is organized

To make it easy to find what you’re looking for, the Library uses a simple "folder" system that drills down from a particular composer to a specific movement drawn from one of the composer’s published compositions:

  1. Composer: last name, first name.
  2. Work: choose by name a specific composition of the composer.
  3. Edition. choose the version of the composition by choosing a specific Publisher and Editor.
  4. Movement. choose the specific piece of music for play or study within BtH.

Each Movement entry in the Library includes an interactive Play icon. This feature generates an audio preview of a Movement’s first two measures, which is very useful when trying to keep straight the form of complicated, multi-Movement piano compositions. 

2.3 The Momenta panel

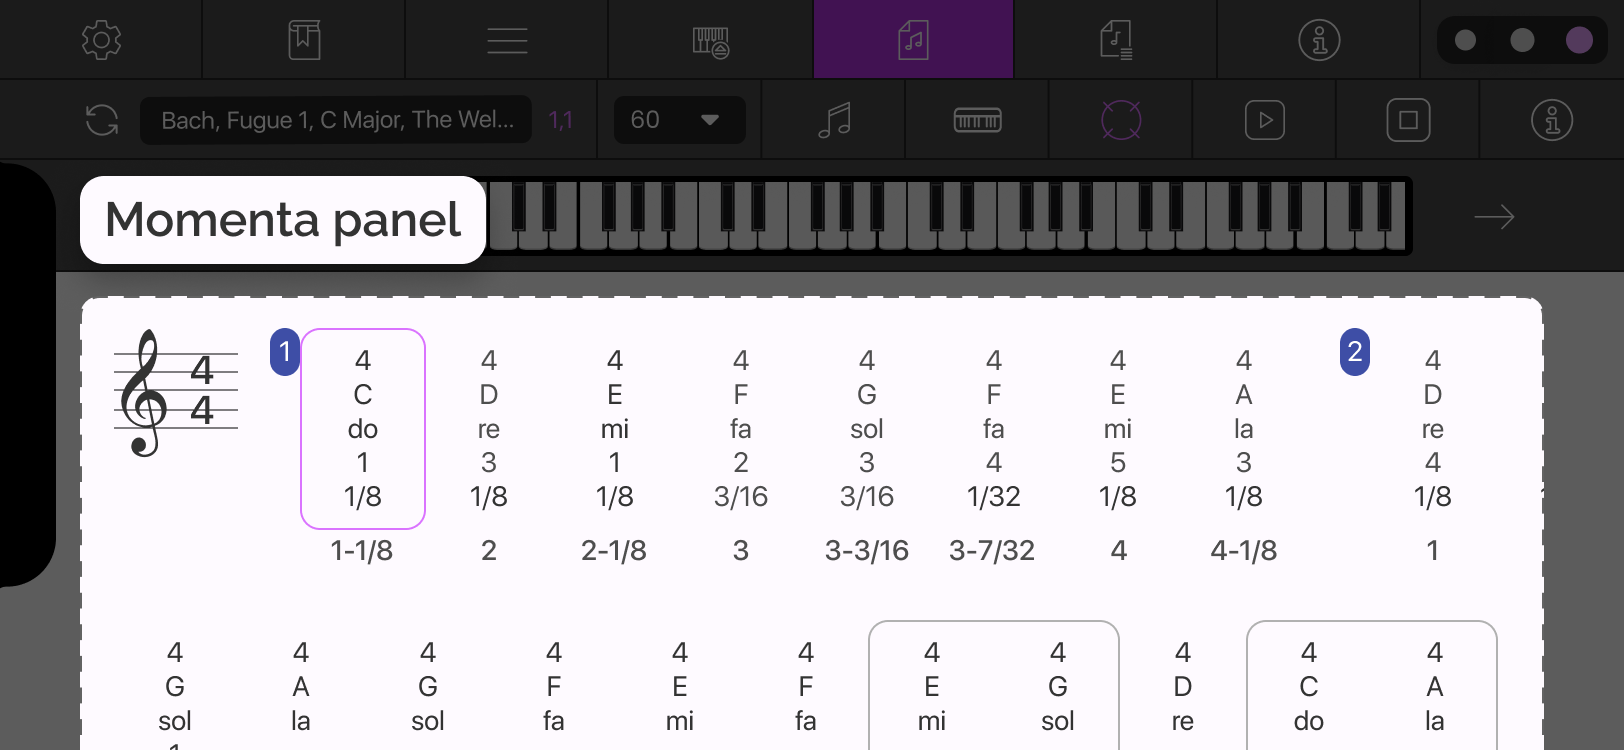
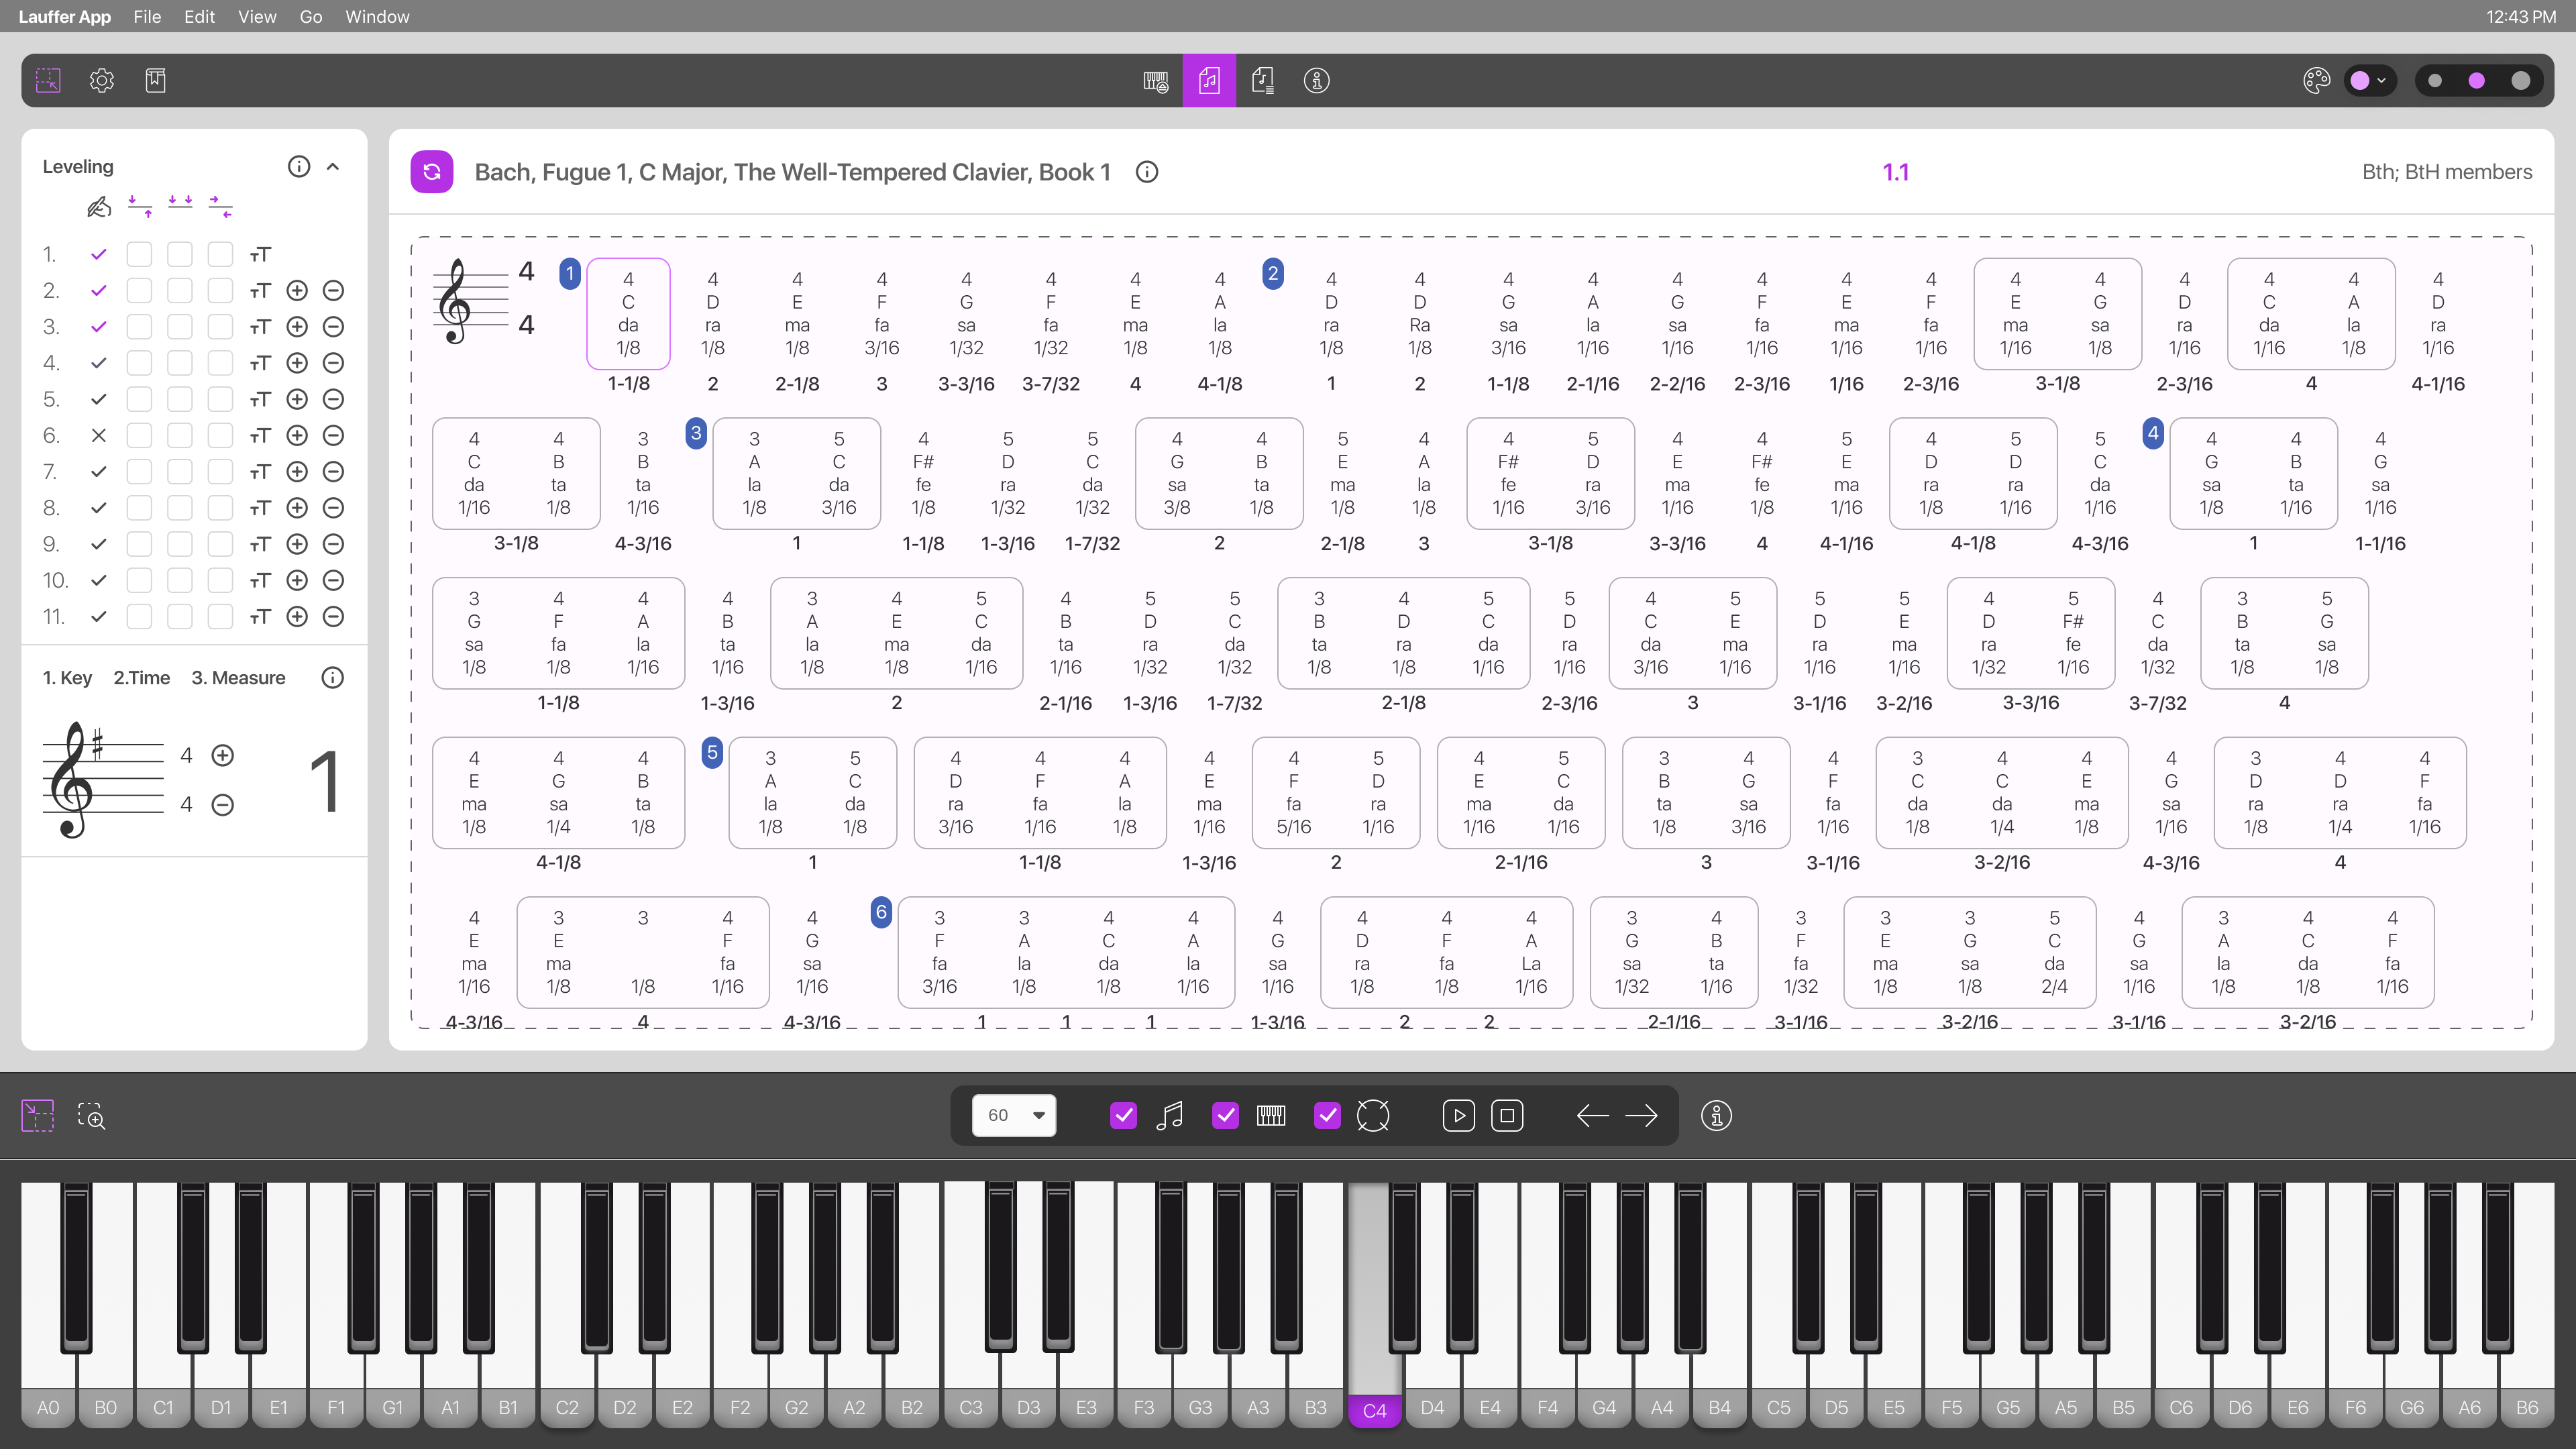
The Momenta panel is your primary workspace. This is where your Movement is displayed in Momenta notation, visualizing every measure, Moment, and Note in a single, interactive score.

Available in: the READ-ONLY and REPORT modes.

2.3.1 How the Momenta panel is organized

The Momenta panel displays the music as a precise, time-ordered sequence of musical moments. The layout reflects the Time Signature and the actual structural organization of the piece:

  • Measures (horizontal): As in standard notation, the music is divided into structured segments (bars) that flow from left to right. In Momenta notation, however, all measures are always very clearly numbered (see the measure Level).
  • Moments (vertical): Inside each measure, the music is organized into vertical "slices" of time. A moment includes all the notes to be sounded together. How long each note sounds depends on each note’s defined duration (See duration Level).
  • Notes (internal): Each note exists within a moment. If several notes are played together, they form a multi-note moment. Because multi-note moments paint their contained notes horizontally, sorted low to high by pitch to reflect the geometry of our hands playing a piano, a Momenta “stream” can be visually as just a series of different hand positions following gracefully one upon the other.
  • Levels (rows): Every note is aligned within structured rows of data called Levels. These rows provide specific details like fingering, note name, or note volume.

2.3.2 The header of the Momenta panel

The header of the Momenta panel identifies the Movement currently on display directly below. It also contains a navigation control for fast, random positioning within the current Movement other than manually scrolling. The header includes:

  • Movement name
    • Right side: composer name, movement name.
    • Left side: movement edition (publisher, editor name(s)).
  • Go-to indicator
    • Displays the “address” of the currently-focused moment (measure #, moment # within measure).
    • Click/Tap the indicator for measure and moment pick-lists that enable fast point-to-point navigation with the Momenta panel.
  • Refresh control
    • Recalculates and adjusts layout positioning inside the Momenta panel when needed.

In PLAY→ Play Express mode, the Go-to indicator is positioned in the middle of the Toolbar, next to the mode buttons.

2.3.3 How the Momenta panel behaves

  • Move & zoom: scroll easily through long Movements and adjust the scale of its content (small to large) to fit your screen and visual preference.
  • Set Moment-Focus: click/tap any moment to highlight it and its content or drag to select a variable size “moment-stream” for repetitive play and study.
  • Smart filtering: in REPORT mode, filtered notes and any resulting empty moments disappear, but measure numbers stay visible so you don't get lost.

2.4 The Leveling panel

The Leveling panel is the control center for the musical data currently on display in your Momenta panel. It allows you to choose exactly which data Levels (like Fingering, Volume, or Note) are visible and what display-style any individual level’s data is to be rendered in (e.g. different fonts and colors).

Available in: the READ-ONLY and REPORT modes.

2.4.1 How the Leveling panel is organized

It consists of two sub-sections: Leveling Table and Toolbox.

Leveling Table

The Leveling Table and its various settings determine the moment architecture used by BtH to manage and represent all moments in the current Movement. To keep the layout clear, each Level occupies its own numbered row in the table, corresponding to the top-down ordering of data levels rendered in the Momenta panel.

Each row includes visual control elements that allow you to:

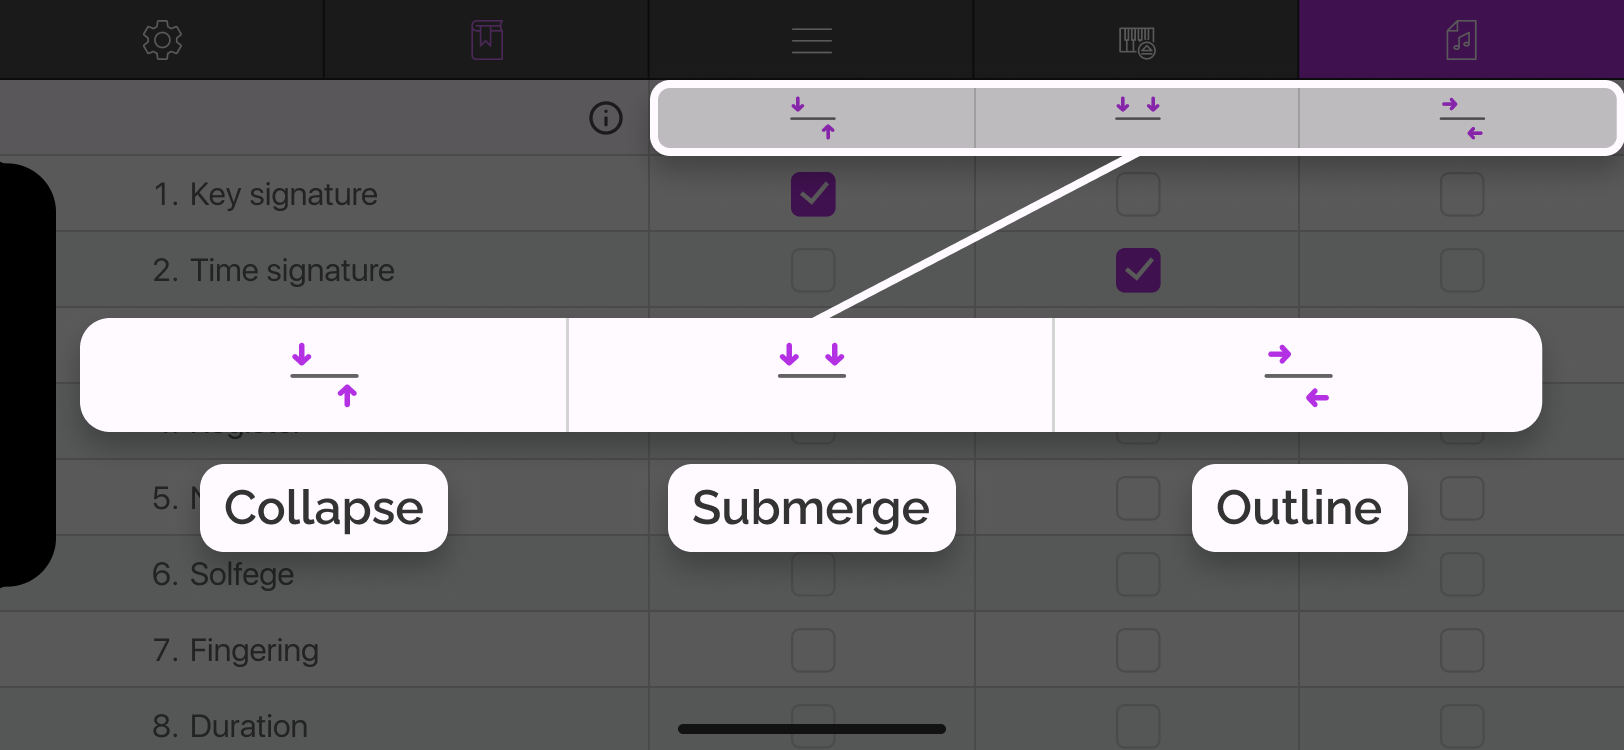
  • Collapse, submerge, or outline a Level to change its visibility.
  • Include or exclude specific Levels from appearing in the toolbox.
  • Adjust appearance settings like the color, font, style, and height.

Any changes you make here are applied consistently across the entire Movement, giving you a clean and customized view of your music.

Toolbox

The Toolbox is a dynamic interaction area that provides contextual details about your music’s data. It is highly adaptive, automatically updating its content based on the specific Movement you have selected, the mode you are in, and any active filters you have applied. This ensures that the tools you see are always relevant to the music currently on your screen.

The function of the Toolbox changes depending on your current mode:

  • In the READ-ONLY mode: It acts as an information hub, reflecting specific details and data related to the Levels you are viewing.
  • In the REPORT mode: It serves as your filtering center, displaying all available values for selectable Levels so you can use them as parameters to customize your report.

For filtering logic and report behavior, see:

2.4.2 How the Leveling panel behaves

  • Show & hide: Use the Toolbar to collapse the entire panel when you need more screen space, or restore it instantly to adjust your settings.
  • Independent view: You can collapse the Leveling Table specifically to hide the settings rows while keeping the Toolbox visible for filtering. In REPORT mode Levels in the Toolbox can also be collapsed to focus on filtering by certain parameters.
  • Filter sync: The panel automatically synchronizes with the REPORT mode, updating your view in real-time as you apply or remove filters.

2.5 The Piano panel

The Piano panel is the interactive keyboard at the bottom of your screen. It acts as the visual and auditory center for every piano environment in BtH, showing you exactly which notes are being played, focused, or triggered.

Available in: the PLAY, READ-ONLY, and REPORT modes.

2.5.1 What you see on the Piano

The Piano panel displays:

  • A full piano keyboard: A complete visual representation of the piano's range, serving as a familiar reference for all musical tasks.
  • Dynamic highlighting: Keys light up as the music progresses, allowing you to track the flow of a performance or study session visually, at any tempo of your choosing
  • Interactive response: In Play Ground mode the interface reacts instantly to your input, providing immediate visual/audio feedback for every tap or click.

The keyboard is designed to reflect every state of your workspace. Its primary function in v1.0 (see BtH v2.0 for its use as input-device for creating your own movements) is the sounding and silencing of notes in-synch with the appropriate piano keys lowering and rising, whether the notes are being played automatically by the app, triggered manually by you, or simply selected and focused for closer study. The ideal here is to make one feel, or at least imagine, they are sitting in front of an actual piano using the BtH UI alone.

In READ-ONLY and REPORT mode there is a Resize piano button in the top left corner of the Piano panel. It lets you adjust the size of piano keys to your preference.

2.5.2 How Piano behaves

The keyboard’s behavior and sound output change depending on which "Piano" is currently active:

  • Playground Piano: Keys produce sound immediately when tapped or clicked — ideal for exploring the keyboard and testing ideas.
  • Play Momenta Piano: Keys highlight in perfect synchronization with structured, Momenta-based playback.
  • Play Express Piano: Keys highlight while specific note-related Levels (like Fingering or Volume) appear around them as the music plays.

2.6 The Player panel

The Player panel is the central command center for music reproduction. It allows you to control exactly how a Movement is played — whether you want the app to play it automatically or you want to navigate through the notes manually.

Available in: the PLAY, READ-ONLY, and REPORT modes. Its position may vary slightly depending on the selected mode, but it is always located near the Piano panel.

The Player panel on the iPad looks slightly different.

2.6.1 Core function

The Player panel manages the essential mechanics of your session:

  • Automatic playback for continuous listening or performance.
  • Manual step-by-step navigation for step-by-step study.
  • Playback tempo (BPM) settings.
  • Playback visualization and sound settings.

2.6.2 How the Player panel is organized

To provide precise control over your music, the panel is organized into five primary functional areas:

Focus controller ( Play Express )

This controller indicates whether the system is navigating by Moments (vertical slices of time) or individual notes. This setting determines how the manual arrows and automatic playback behave.

Tempo controller

This is a BPM selector (ranging from 20–208 BPM) that defines the speed for all automatic playback. It does not affect manual navigation speed.

Playback settings

The Player panel includes checkboxes that control playback behavior.

  • For Play Momenta: Sound, Piano highlighting, and Focus shifting.
  • For Play Express: Sound and Dancing Levels.

These settings affect both automatic and manual playback.

Playback controls

The Player panel includes:

  • Play
  • Pause
  • Stop

Playback starts from the currently focused note or Moment in READ-ONLY and REPORT mode. In Play Express the beginning point of the playback is defined by the selected Section to play.

Manual navigation controls

In addition to automatic playback controls, the Player panel includes:

  • Right arrow: Moves focus to the next Moment or note.
  • Left arrow: Moves focus to the previous Moment or note.

These controls are available in all modes and support manual step-by-step navigation.

2.6.3 How the Player panel behaves

The Player panel stays in constant communication with your workspace to ensure a seamless experience:

  • The panel automatically syncs with your current Focus in the Momenta panel and the Active Piano selection.
  • Deleted paragraph
  • While you can use the on-screen buttons, the panel also supports manual navigation via the physical arrow keys on your keyboard (where available).

2.7 The Play Express panels

In the PLAY mode (Play Express), additional panels are available to control how playback behaves and how information is displayed around the piano. These panels allow you to:

  • Control which musical data is visualized around the keyboard.
  • Define what part of the Movement will be played automatically.
  • Monitor the current position and structural values during playback.

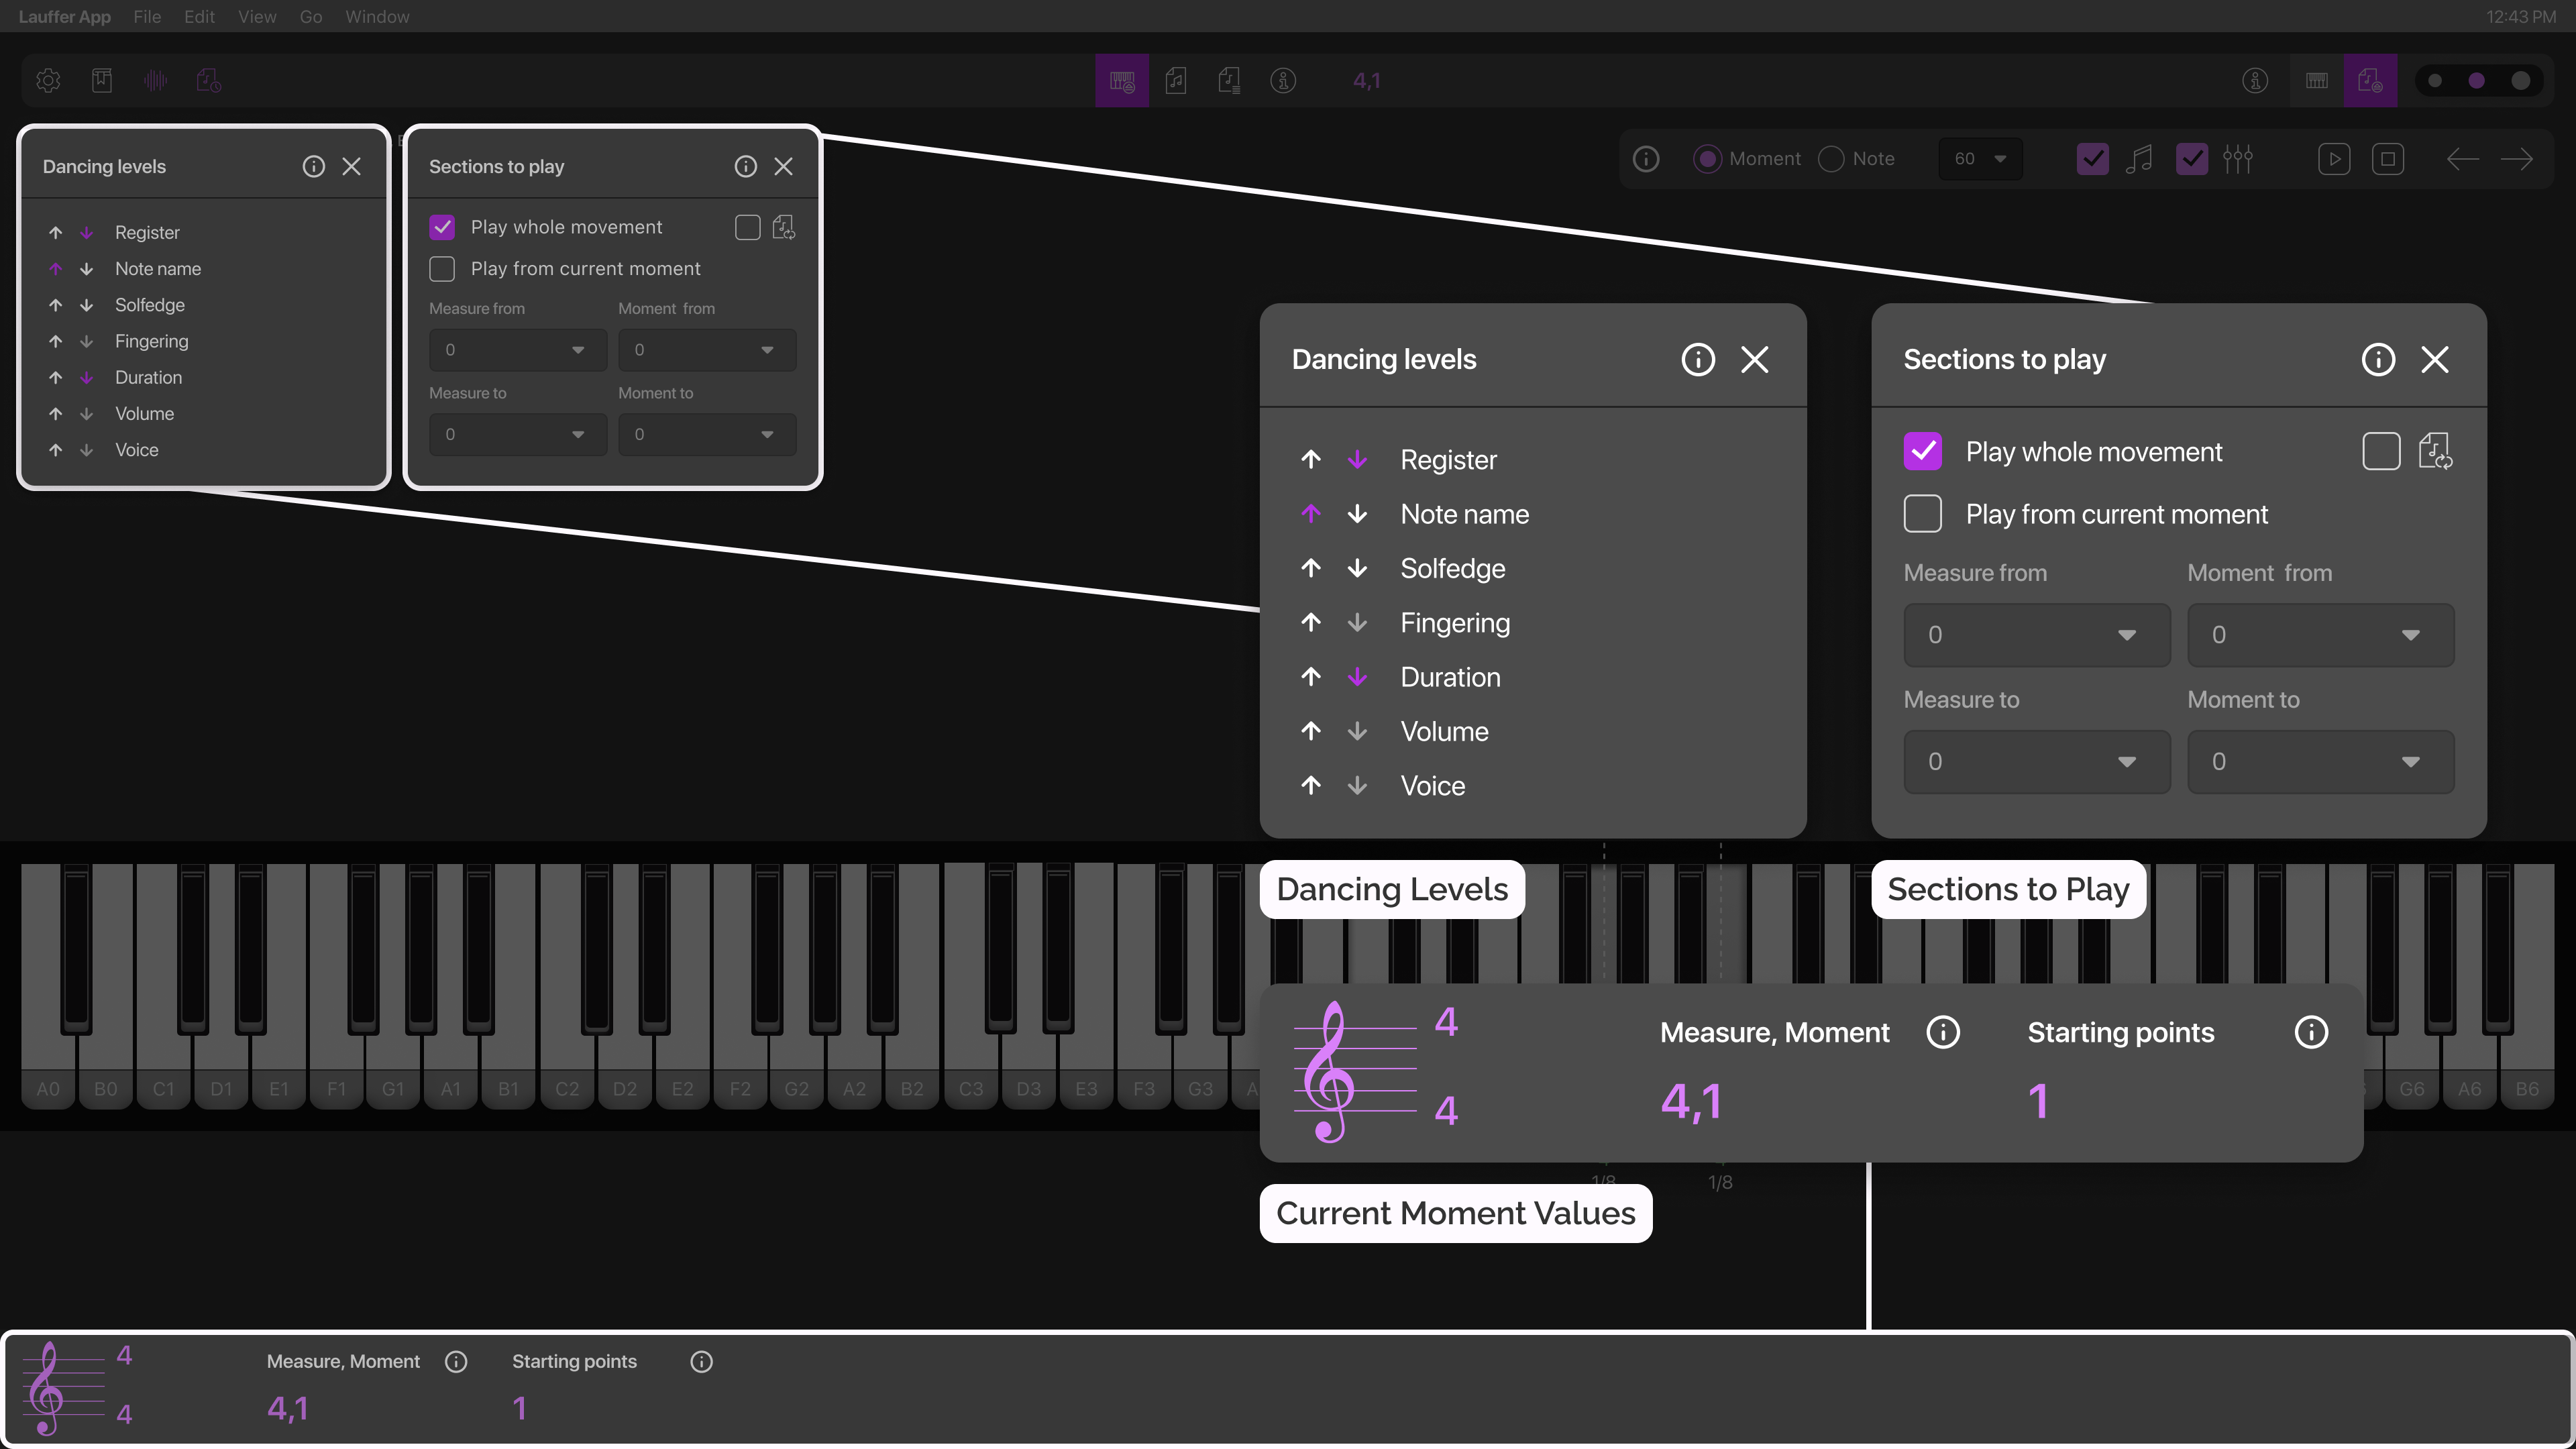
Play Express includes three dedicated panels: the Dancing Levels panel, the Sections to Play panel, the Current Moment Values panel.

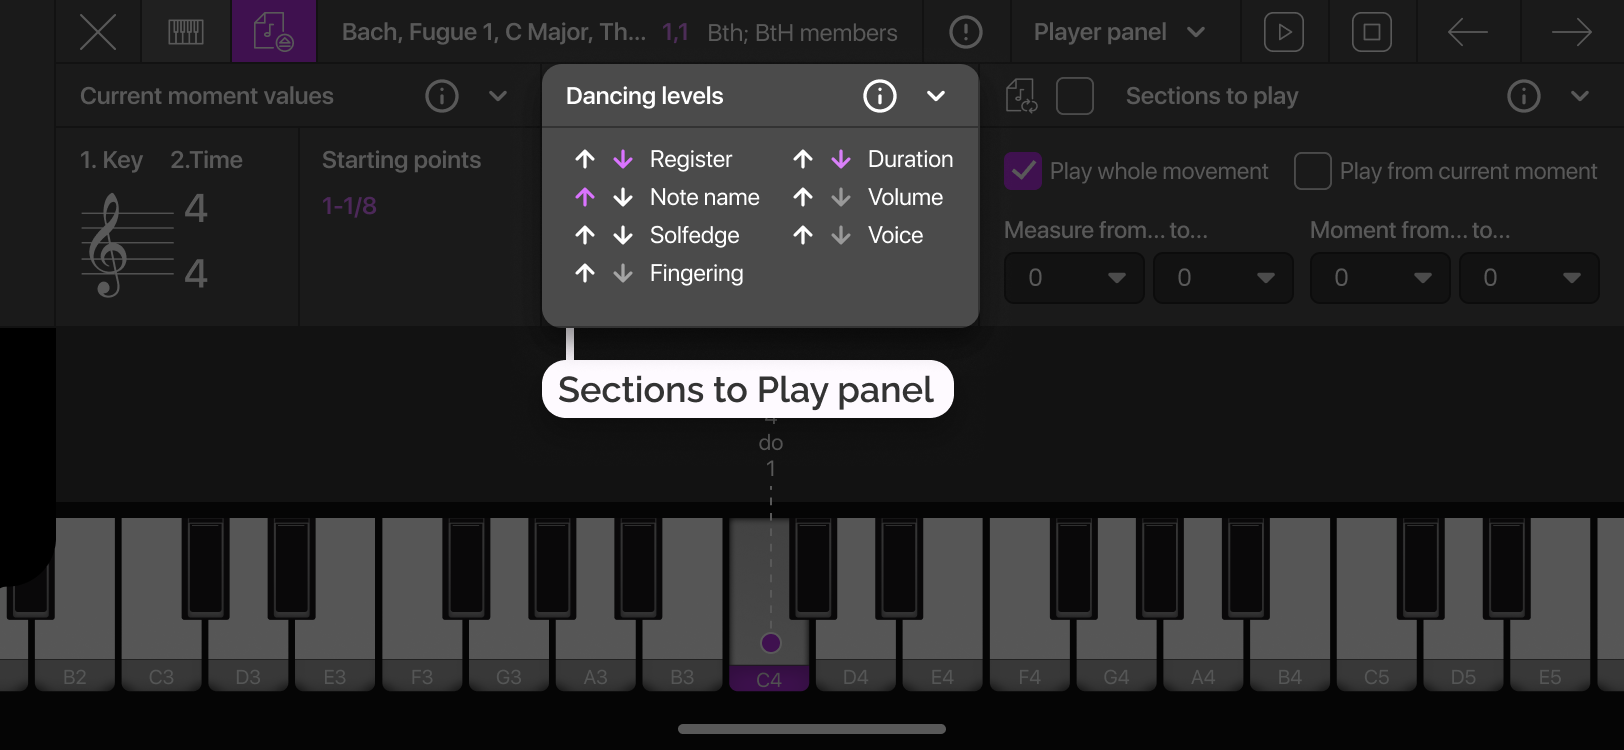
2.7.1 The Dancing Levels panel

This panel controls which note-related information is displayed visually above or below the piano keys during playback.

 You can select from seven different musical parameters:

  • Register
  • Note name
  • Solfege
  • Fingering
  • Duration
  • Volume
  • Voice

You can assign up to three Levels above the keys and three Levels below them. This creates a direct visual link between your hand position and the musical data as the notes "dance" on the screen.

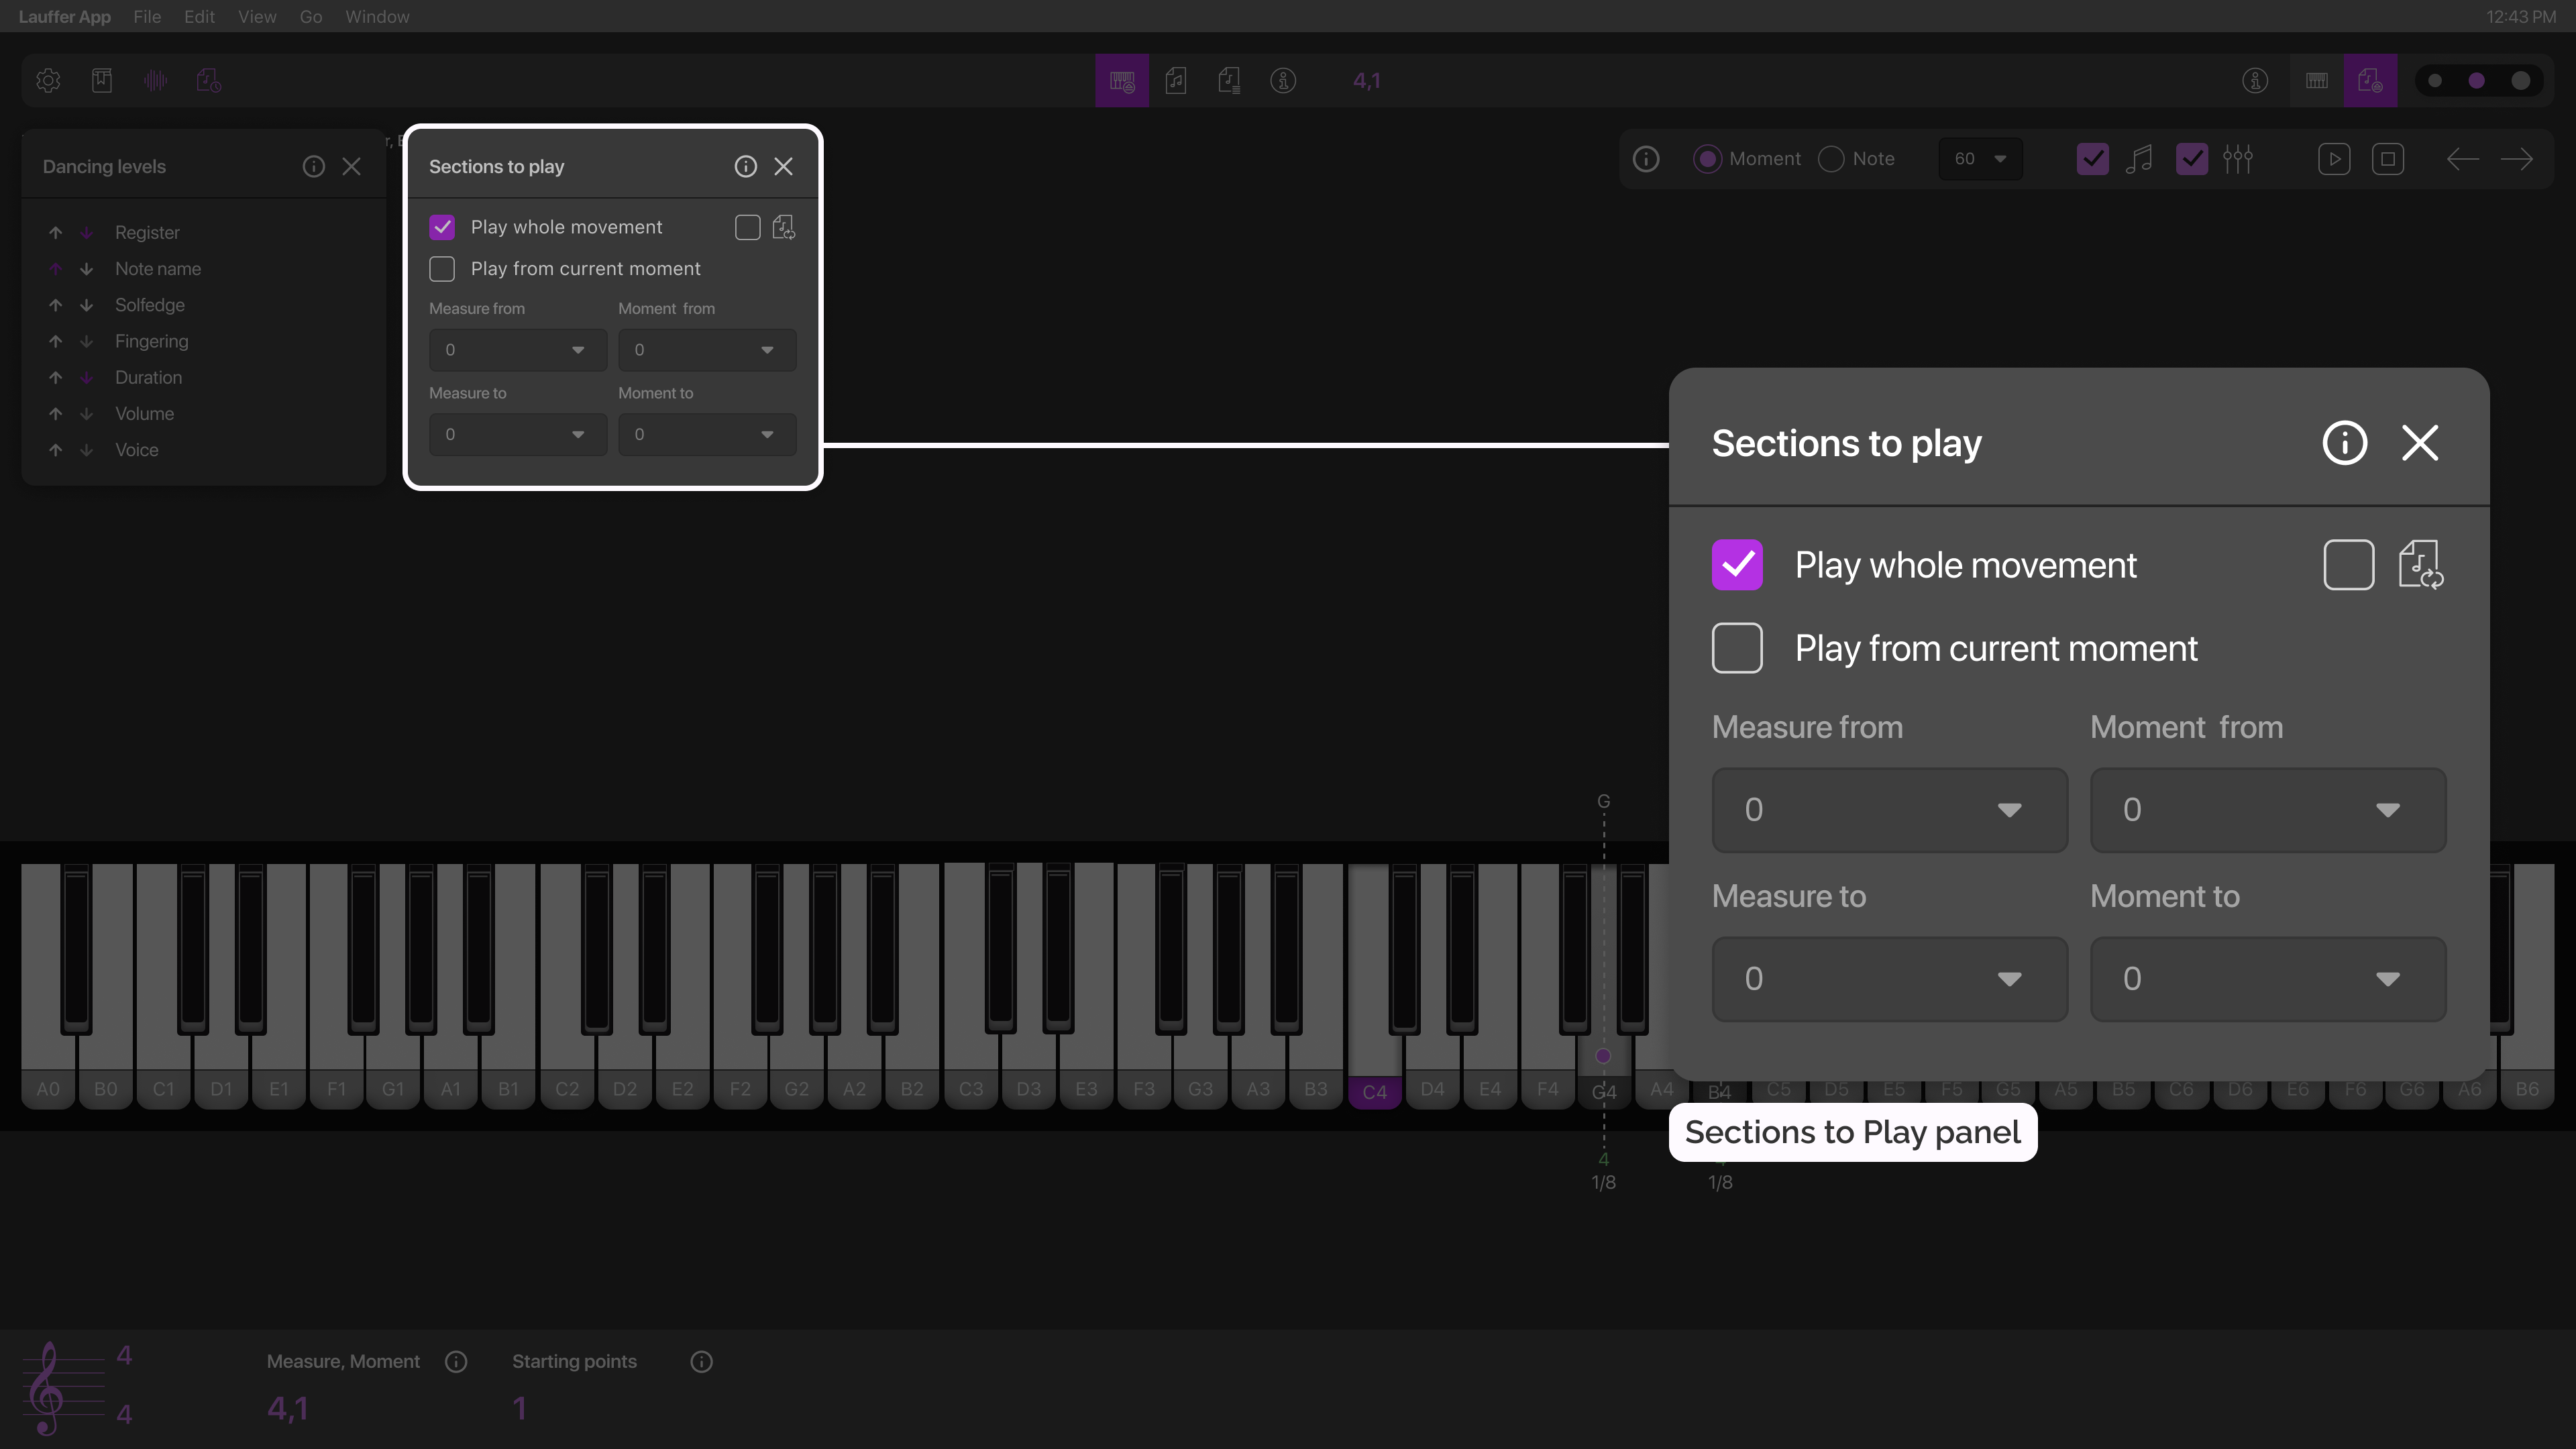
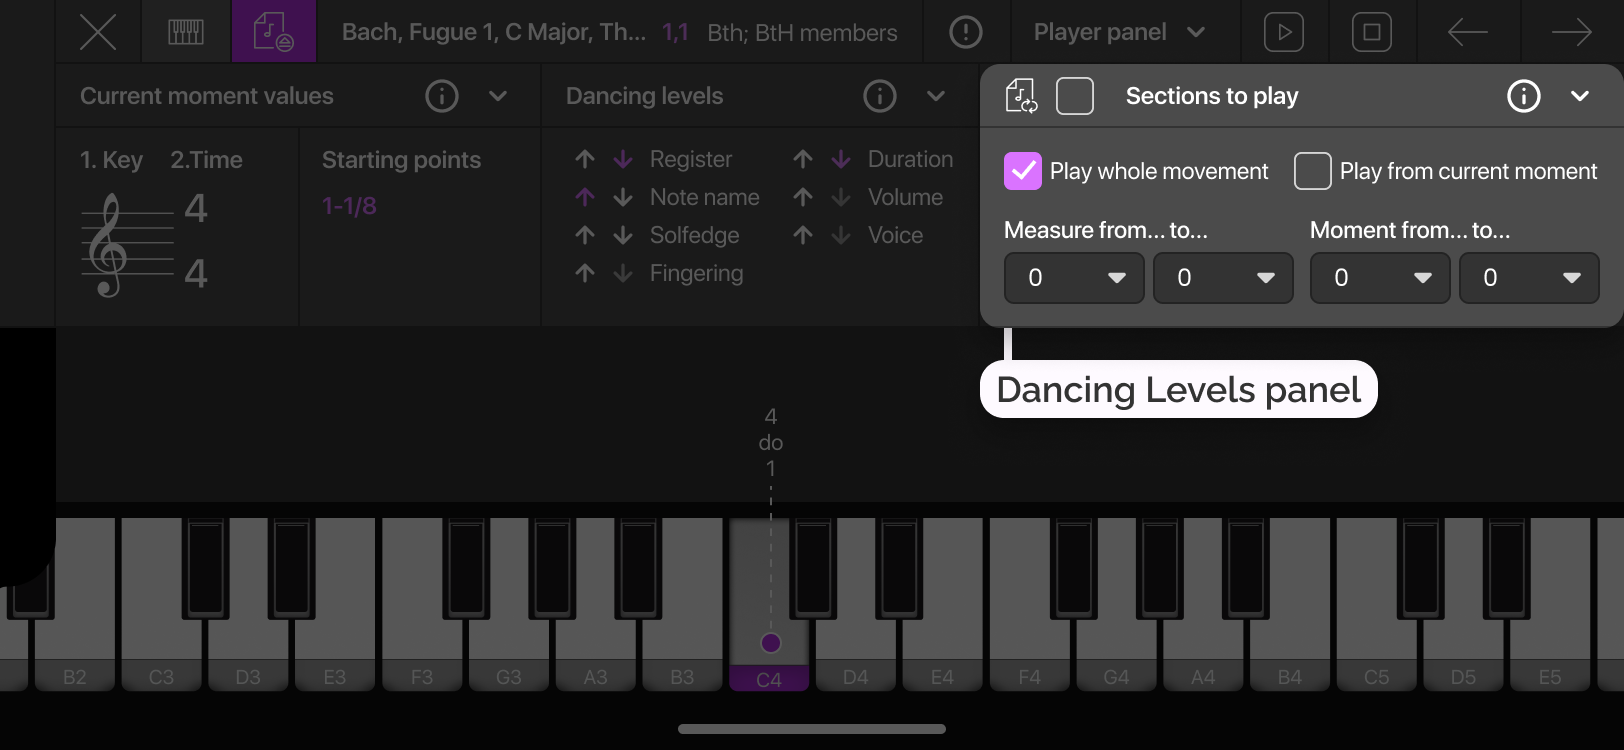
2.7.2 The Sections to Play panel

The Sections to Play panel defines the playback range for automatic playback in Play Express. It allows you to control which part of the Movement will be played.

It provides three primary playback range options:

  • Play the whole Movement.
  • Play from the currently focused Moment.
  • Play a defined Moment–measure sequence.

The panel also includes a Play Loop option, which enables repeated playback of the selected range. If you are coming from the Canned REPORT mode, this panel automatically synchronizes its range to match your filtered notes.

2.7.3 The Current Moment Values panel

This panel acts as a real-time monitor, providing structural orientation so you don't have to scan the full score during playback.

It displays key information about the Moment that is currently focused or being played:

  • Current Key Signature.
  • Current Time Signature.
  • Current measure–Moment position.
  • Moment Starting Point values.

Because musical durations often overlap, the panel can display multiple Moment Starting Points simultaneously, using a visual hierarchy that highlights the currently focused Moment while subduing others to maintain clarity. This consolidated view is particularly effective during high-speed playback, allowing you to stay structurally oriented at a glance without the need to constantly scan the full Movement for your position.

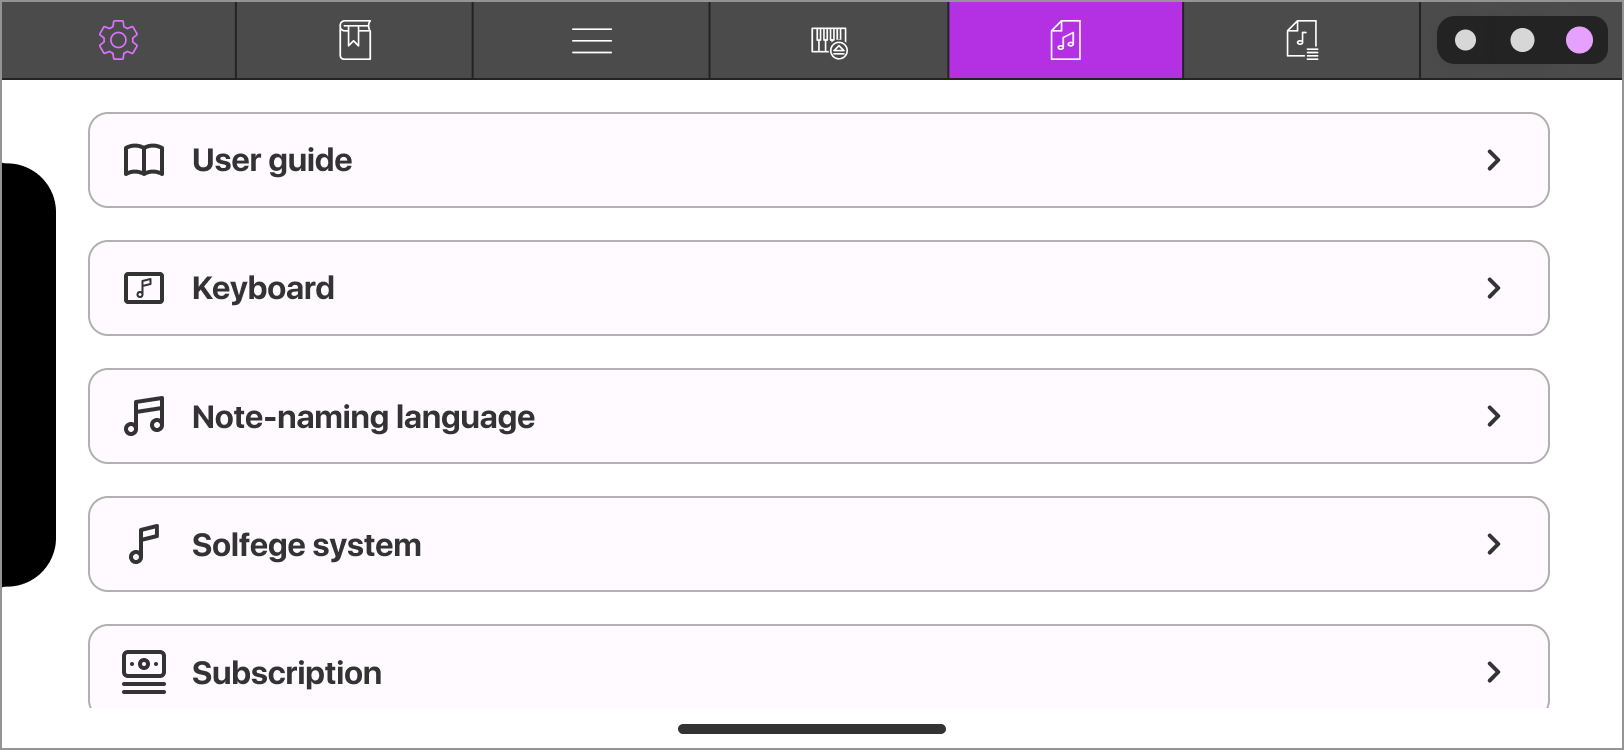
3. Settings

Accessed via the Toolbar, the Settings modal is where you customize the application’s behavior, visual theme, and account preferences. To apply your changes and return to the workspace, simply click Done.

3.1 Keyboard

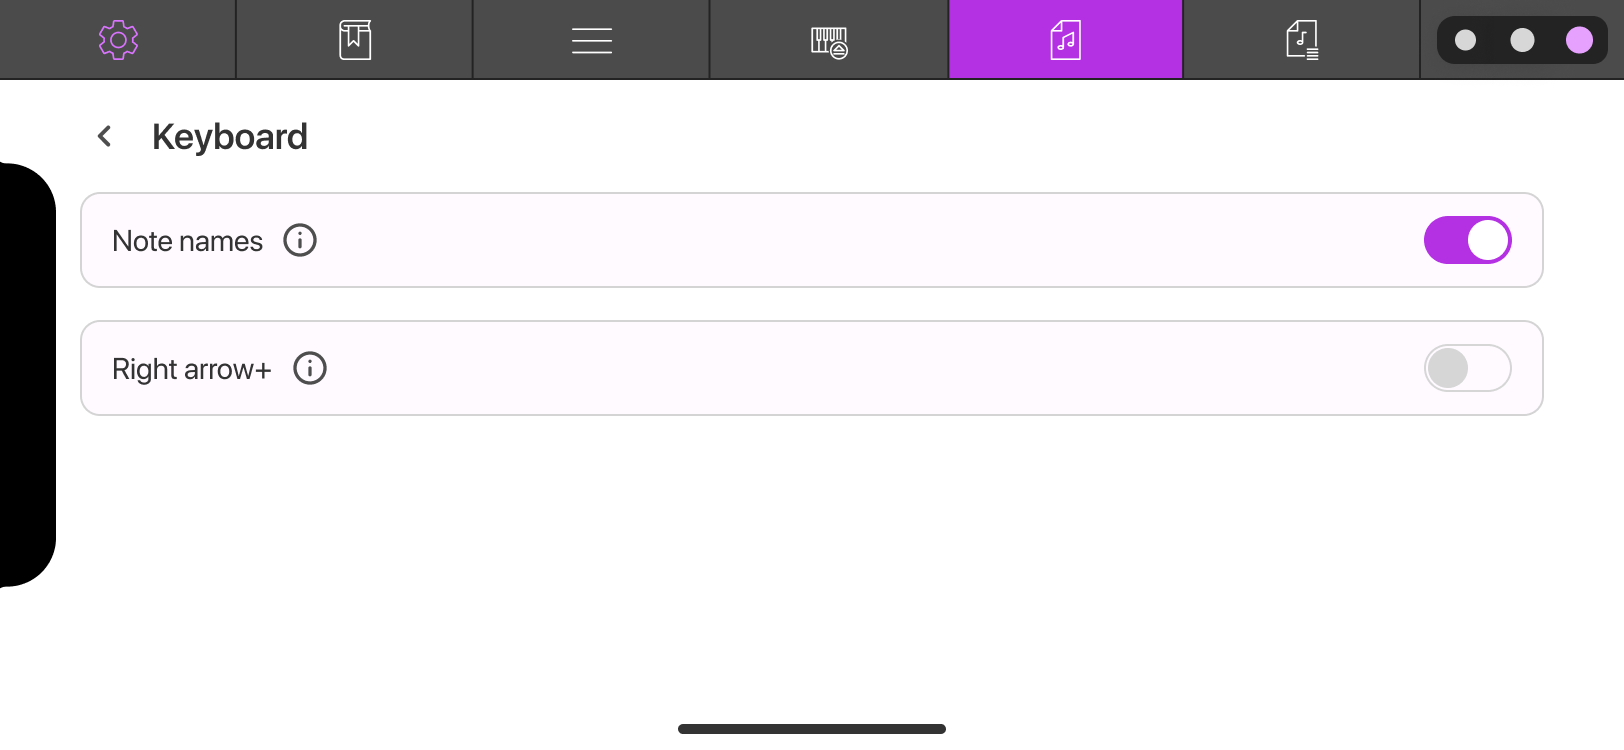
The Keyboard tab controls how the Piano keyboard behaves and is displayed. It includes two toggles: Note names and Right Arrow+.

3.1.1 Note names

Choose whether note names appear at the front of the keyboard's white keys.

  • When the toggle is enabled, notes appear in the format: {note-name} sub {note register} e.g. A⁴, C⁵, etc.
  • When the toggle is disabled, only the register number is displayed for the first note of each octave.

This setting affects only the keyboard display.

3.1.2 Right Arrow+

Toggle how sustained notes are handled during manual playback.

To play the current Movement on either the Play Express or Play Momenta keyboards, the best tool in either case is the computer keyboard itself. Advance from one moment to the next using not only the <Right Arrow> key as if you were advancing through individual characters in an email; but feel free to use any Alpha-Numeric key as well as <Space Bar>. All these keystrokes advance the music forward, moment by moment, but now according to your wishes, timings, and gestures.

To navigate forward, moment by moment, use any of the following keystrokes:

  • <Right Arrow> key
  • All alphabetic keys (A–Z)
  • All numeric keys (0-9)
  • <Space Bar>

The right-arrow+ toggle is disabled by default. This means each keystroke just described triggers the following events:

  1. Silence the current moment completely, regardless of note durations
  2. Raise all piano keys originally lowered by the current moment
  3. Sound the next moment in sequence
  4. Lower piano keys dictated by the next moment
  5. The next moment is now the current moment

If the right-arrow+ toggle is enabled, all keystrokes trigger the same events except that step 1) will silence a particular note’s sustaining sound only if the (note duration + current moment’s starting-point) is less than or equal to the (starting-point of the next moment)

Many times but not always, depending on the Movement, manually navigating with right-arrow+ enabled can lead to a more accurate and realistic playback experience, both aurally and visually. (try the effects of this toggle navigating Bach’s Prelude 1, Book 1, Well-Tempered Clavier)

3.2 Note-naming language

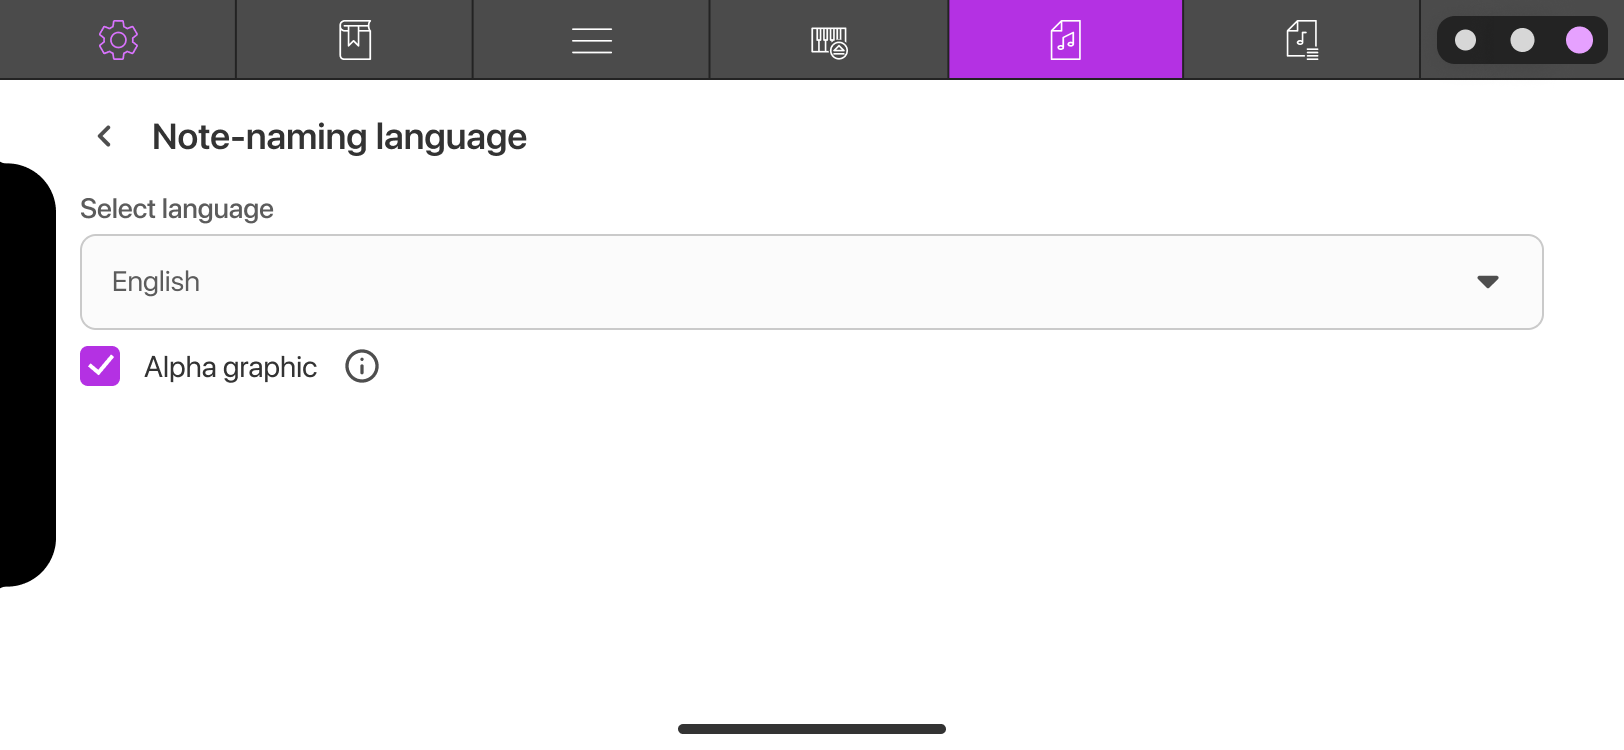
This tab lets you customize how notes are labeled across the Momenta panel.

3.2.1 Note-naming language

Select the language used for note names. Your available options:

  • English
  • German
  • Russian
  • French

3.2.2 The Alpha-graphic mode

Toggle how accidentals are displayed with the Alpha-Graphic checkbox. Keep in mind, it does not change the Movement structure or pitch values.

  • When enabled, accidentals are shown in symbolic form: A#, Bb.
  • When disabled, accidentals are written in full text: A Sharp, B Flat.

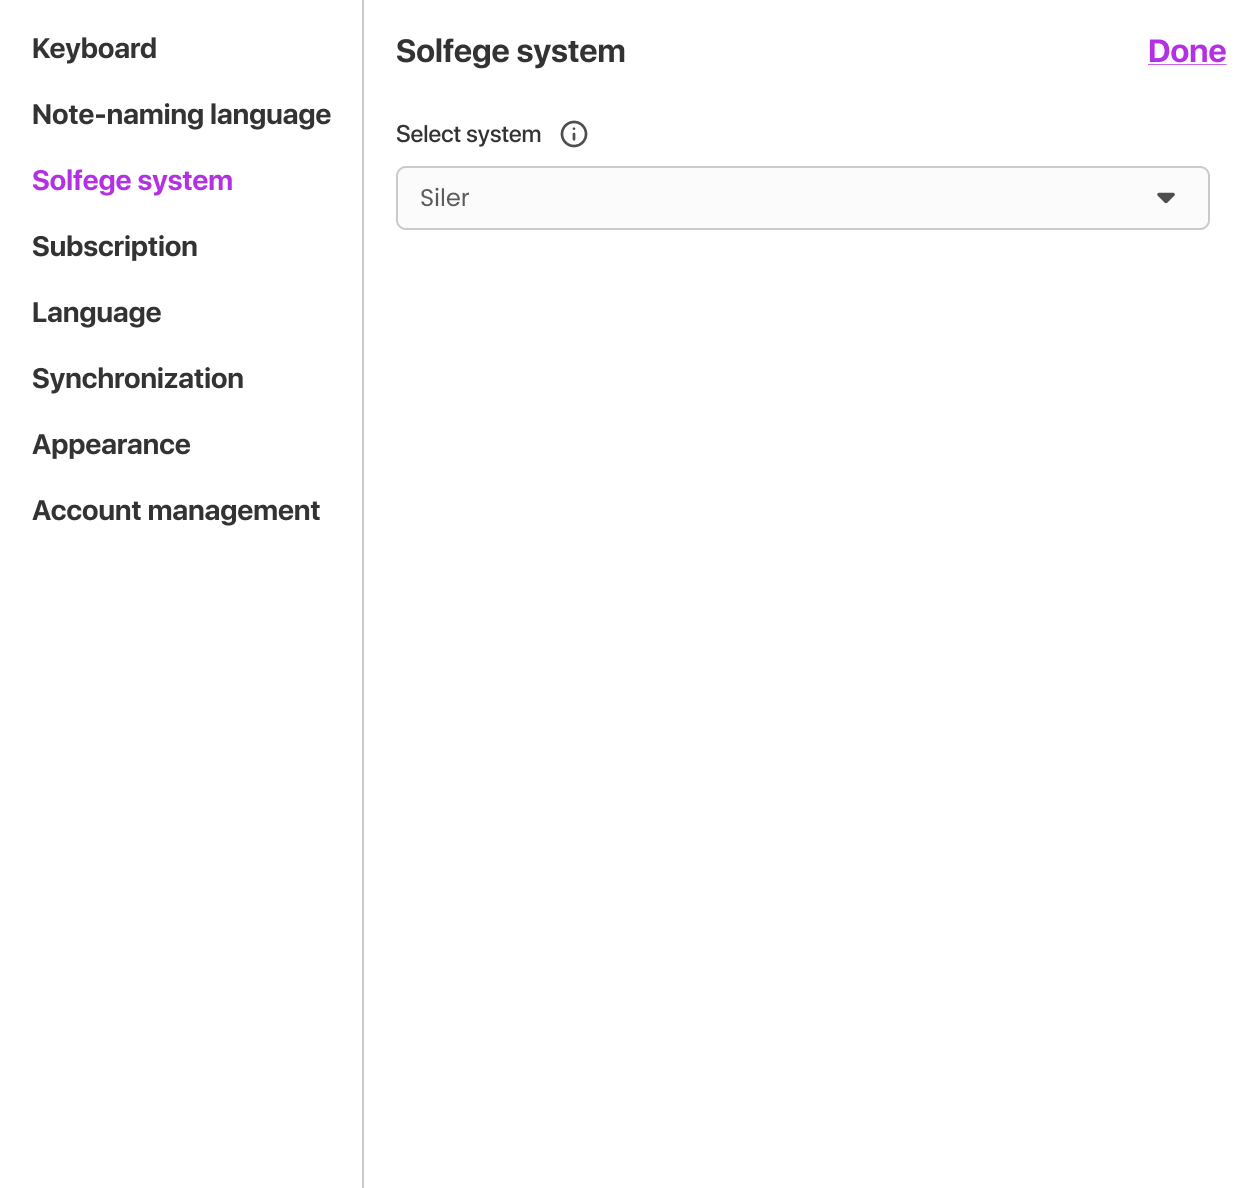
3.3 Solfege system

Choose your preferred solfege naming convention. You can switch between the Classic and Siler systems. This adjustment only updates the names displayed in the Solfege Level and does not change any musical data.

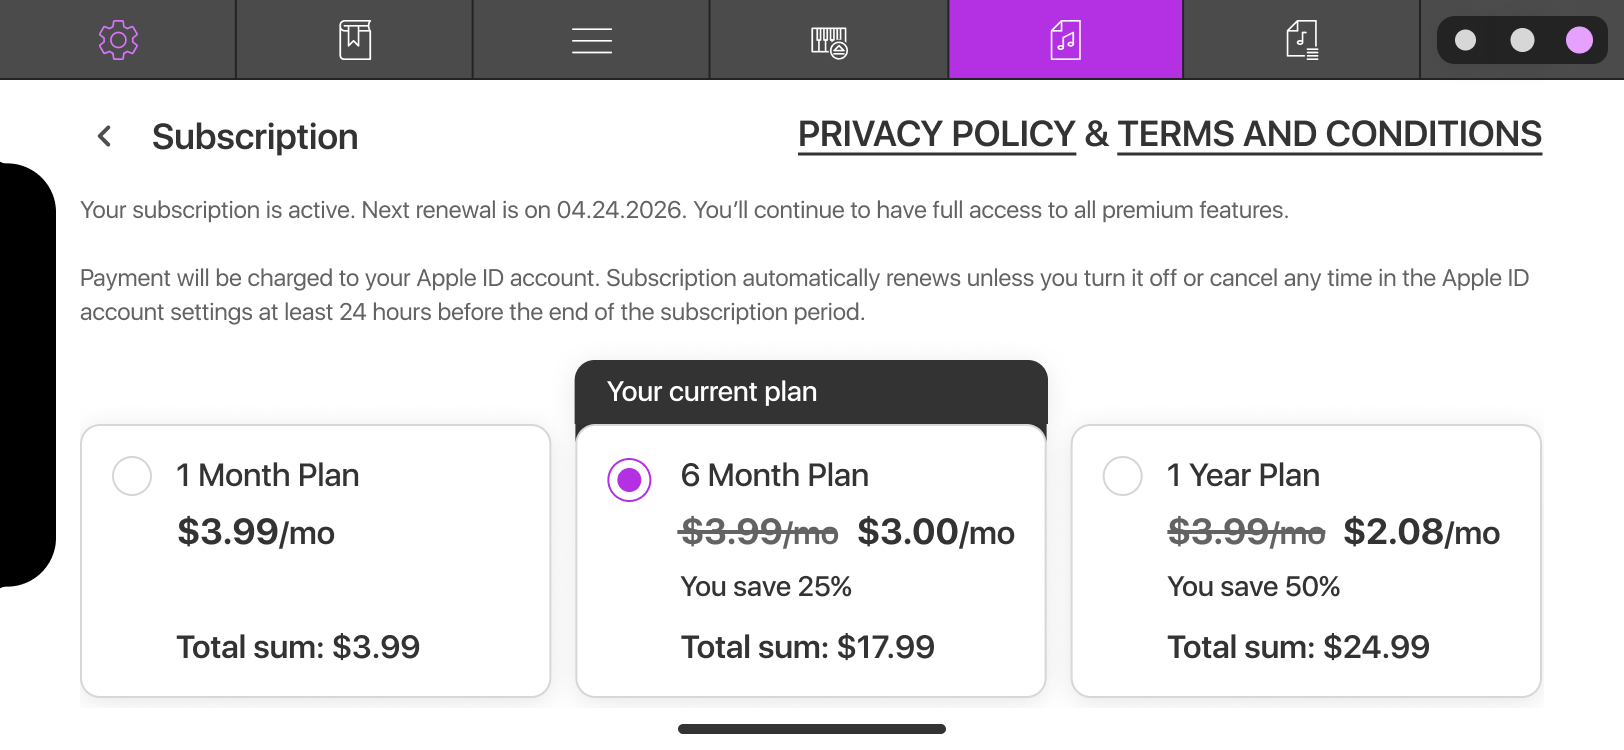
3.4 Subscription

Manage your access and plan details here:

  • View your current subscription status
  • Access subscription management options
    • Switch to another plan
    • Restore purchases
    • Cancel subscription

This tab also hosts Privacy Policy & Terms of Conditions document.

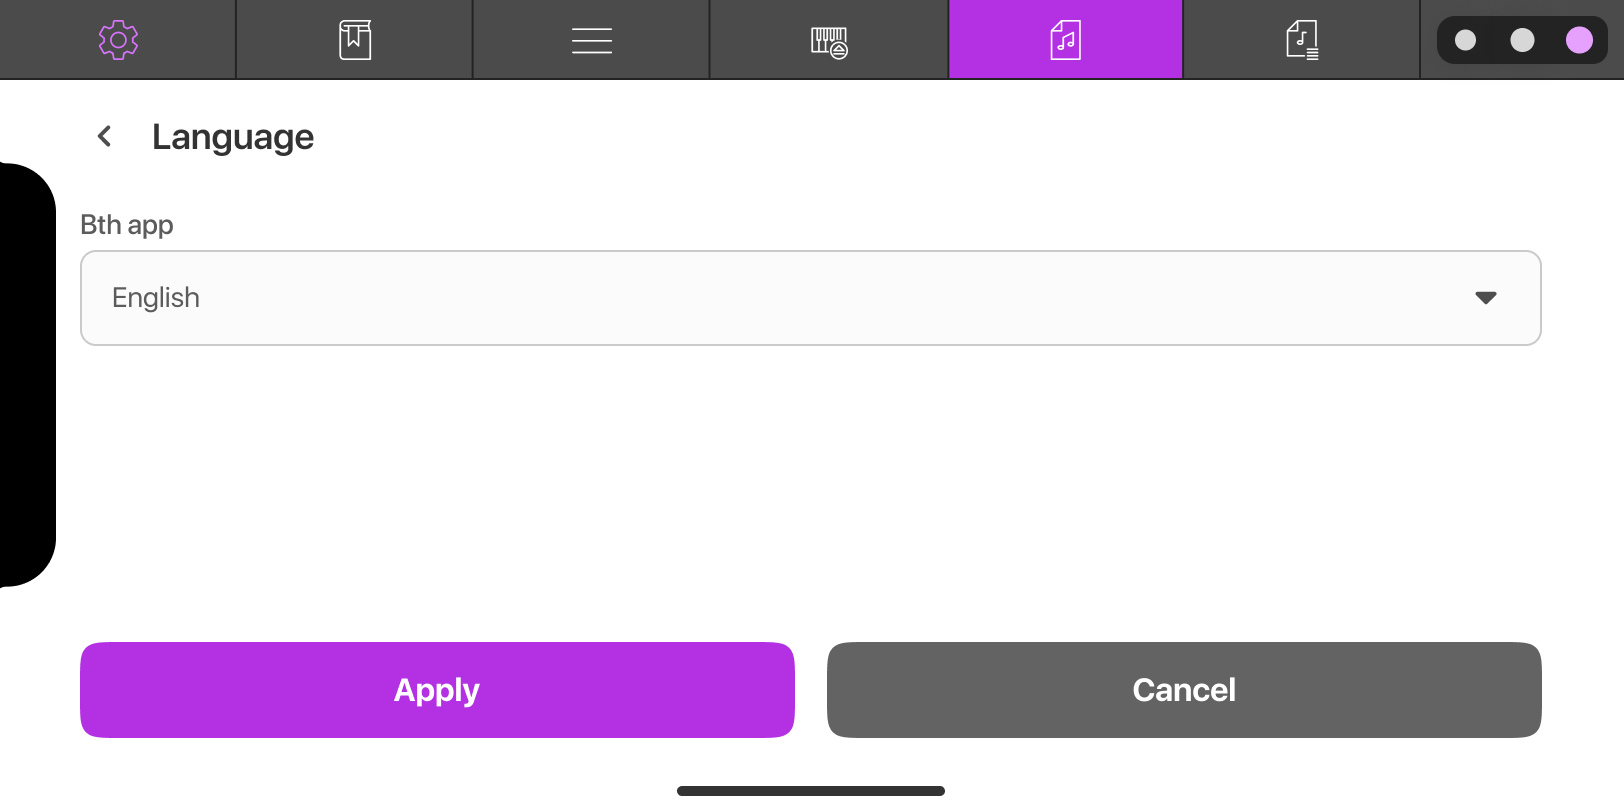
3.5 Language

Select one of the interface languages of the application:

  • English
  • German
  • Russian
  • French
  • Italian
  • Chinese

This updates all menus, buttons, and system messages throughout the app. But you totally can have a French interface with English note names (C, D, E), for example.

3.6 Password

The Password tab allows you to change or restore your BtH account password. This password is device-specific and is required for logging into the app on that exact device.

Full password change workflow is described in the Account section.

3.7 Synchronization

Control how the app syncs server data with your device .

It includes:

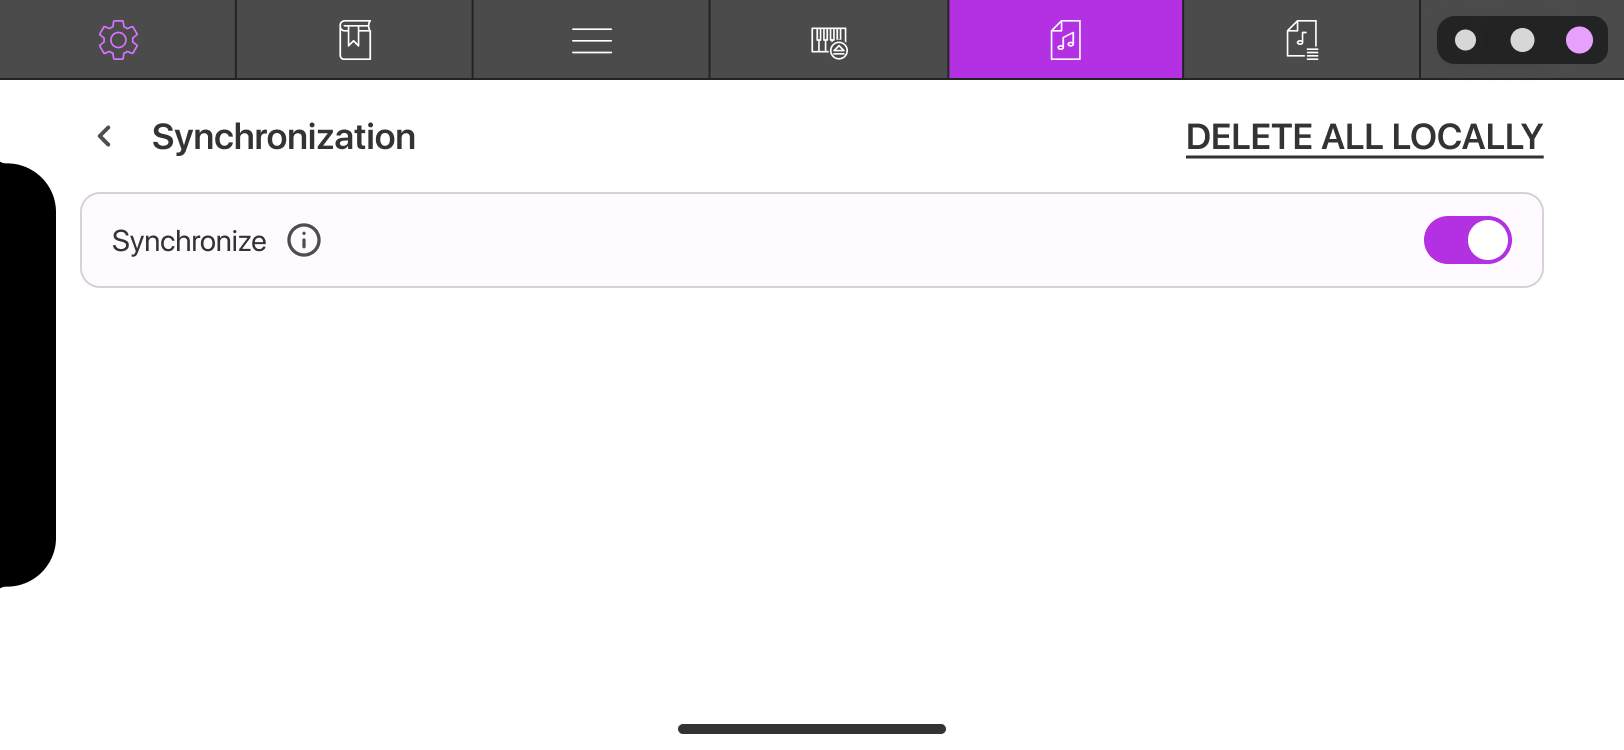
  • A toggle to enable or disable synchronization:.When on, all Library updates are automatically uploaded to your device allowing access to movements offline.
  • A button to delete all locally stored data: Deleting local data removes all Movement data stored on the device but does not delete the account. You are still able to access the whole Library online.

For operation details, see:

5. Synchronization & offline-first mode

3.8 Appearance

Choose a visual theme that suits your environment: 

  • System
  • Light
  • Dark

The app automatically adjusts text and icon colors to ensure everything remains easy to read regardless of the theme.

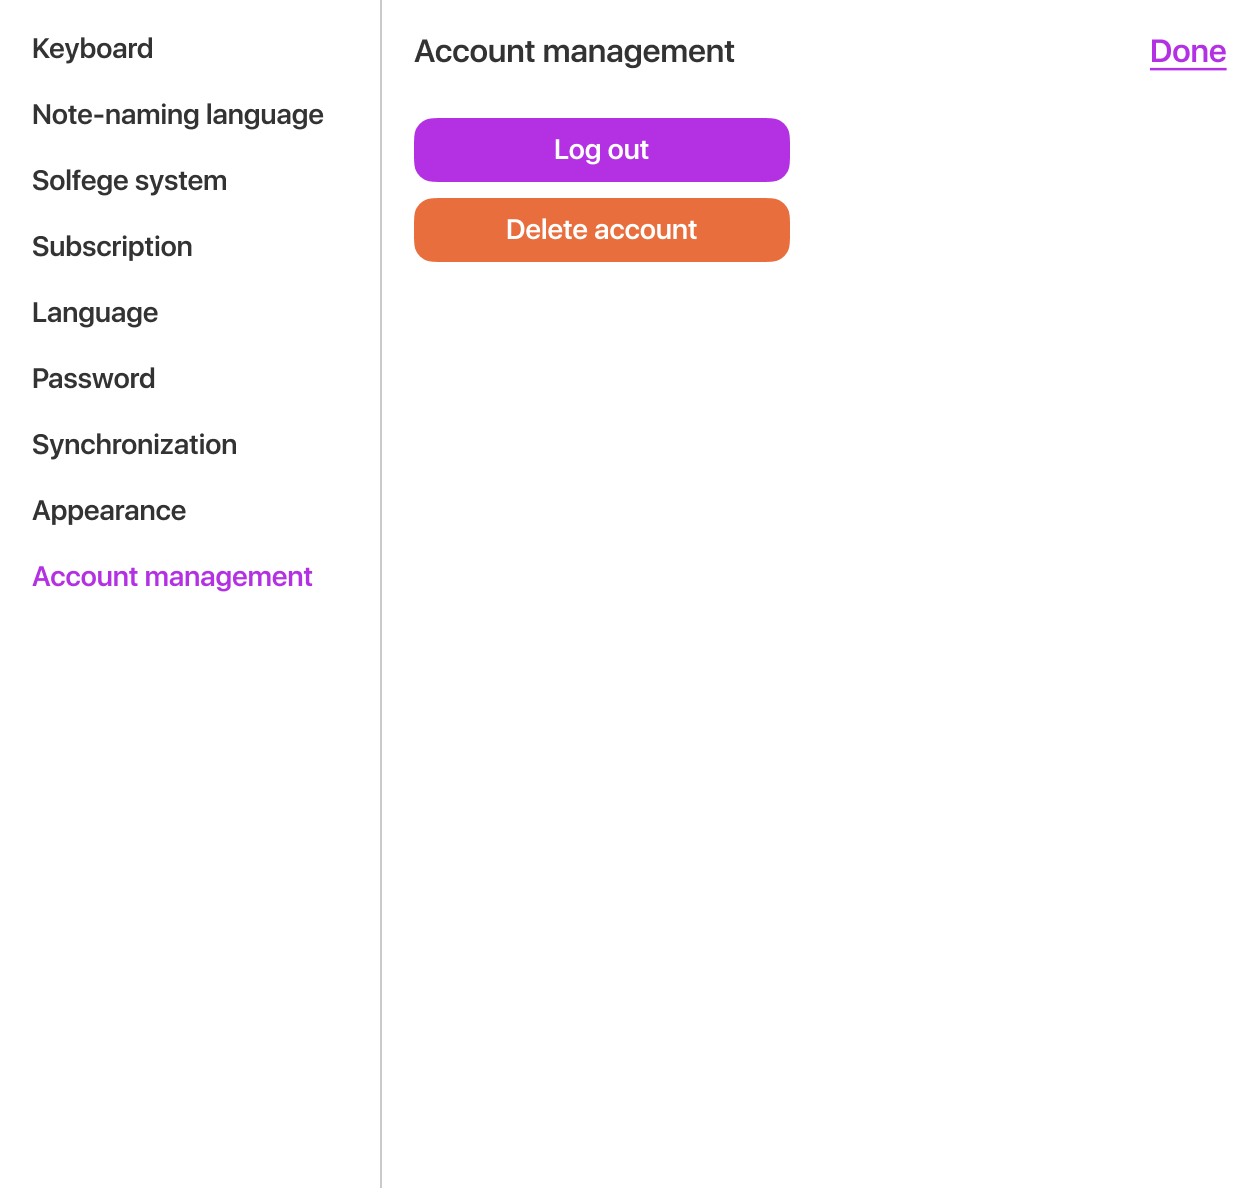
3.9 Account management

Secure your session or manage your personal data using these high-level account tools:

  • Log out of your account: You end the current session.
  • Delete your account: You delete the account permanently with all personal data removed. You’ll be logged out automatically.

Full workflows are described in the Account section.

4. Movement-related use cases

This section is your guide to interacting with the music. Whether you are navigating a complex score, filtering specific voices, or customizing your practice environment, these workflows will help you get the most out of BtH.

4.1 Opening & accessing a Movement

4.1.1 Open a Movement from the Library

Accessible: All modes.

To start working with a Movement, open it from the Library.

Steps

  1. Open the Library.
  2. Find the Movement you want.
  3. Tap or click the Movement name.

What happens next

  • The Movement loads into the Momenta panel.
  • The first Moment is focused automatically.
  • The Movement opens in READ-ONLY mode.
  • The Library remains open until you close it manually.

You can now navigate, play, or analyze the Movement.

4.1.2 Preview the first two measures

Accessible: All modes.

You can listen to the beginning of a Movement before opening it.

Steps

  1. Open the Library.
  2. Locate the Movement you want to preview.
  3. Tap or click the Play button next to the Movement name.

What happens next

  • The first two measures of the Movement are played at the tempo (beats-per-minute or BPM) specified by the Movement’s composer or publisher.
  • You hear the Movement’s beginning 2 measures
  • The Play button changes to a Stop button while preview is active.

You can stop the preview at any time by pressing Stop.

4.1.3 Switch the Mode of a Movement

Accessible: All modes.

Switch how you interact with the current Movement by changing its mode.

Steps

  1. Locate the mode buttons in the center of the Toolbar.
  2. Select one of the available modes:
    • PLAY
    • READ-ONLY
    • REPORT

What happens next

  • The Movement remains the same.
  • The workspace adjusts to match the selected mode.
  • The available panels and controls update accordingly.
  • PLAY mode automatically opens in Play Express. You can switch to Play Ground via the controllers on the left.

In the PLAY mode, you gain access to interactive piano environments. In the READ-ONLY mode, you can view and play the Movement in structured notation. In the REPORT mode, you can apply filters to generate a filtered version of the Movement.

You can switch modes at any time without losing your current Movement.

Play Express mode always opens using the current state of the Momenta panel. This allows you to play either a specifically created report or the original movement. Note that you can exit Play Express only to the mode you came from — either READ-ONLY or REPORT.

4.2.1 Use the Go-to Indicator

Accessible: All modes.

Other than manually scrolling the Momenta panel vertically, navigate precisely to any point in the Movement by specifying a particular  (measure #, moment #) address. 

Steps:

  1. Click/Tap the Go-to Indicator
  2. Select a measure # from the measure pick-list.
  3. Select a moment # within that measure from the moment pick-list

What happens next:

  • The system moves focus to the selected Moment.
  • The Movement panel scrolls automatically to keep the selected Moment visible and centered.
  • The Go-to Indicator updates to reflect the new position.

In the REPORT mode, only measures and Moments included in the active report are available in the Go-to lists.

4.3 Focus & selection

4.3.1 Moment Focus

Accessible: READ-ONLY, REPORT.

By default, when a Movement is opened, the focus is placed at the beginning, on moment (1,1). You can change the focus to any other Moment. Note that only one Moment can be focused at a time.

Steps:

  1. Click (or tap) the Moment you want to focus on.

What happens next:

  • The selected Moment becomes focused.
  • The Go-to Indicator updates to reflect the new position.
  • If playback is started, it will begin from the focused Moment.

4.3.2 Note Focus

Accessible: READ-ONLY, REPORT.

Isolate a single note within a Moment for closer inspection. Again, only one note can be focused at a time.

Steps:

  1. Click and hold a note (on iPad, perform a long tap.)

What happens next:

  • The selected note becomes focused.
  • The system switches to note focus.
  • Playback will begin from the focused note if started.

4.3.3 Switch between Moment and note focus

Via Shift key

Accessible: READ-ONLY, REPORT, PLAY → Play Express.

Quickly switch between moment focus and note focus using a physical keyboard.

Steps (Mac or iPad with connected keyboard):

  1. Press the Shift key.

On devices without a physical keyboard, you can change focus type by selecting a Moment (tap) or selecting a note (long tap). The Shift key focus switching works even for a moment-measure sequence.

Via Focus control on the Player panel

Accessible: PLAY → Play Express.

Steps:

  1. Locate the Focus controller on the Player panel.
  2. Select focus type - Moment or Note.

What happens next:

  • If a note was focused, focus shifts to its parent Moment.
  • If a Moment was focused, focus shifts to the first note inside that Moment.

The focus type affects how manual and automatic playback highlights and follows notes or Moments.

4.3.4 Select a Sub-Stream

Accessible: READ-ONLY, REPORT.

Select a sub-stream, a continuous range of moments across one or multiple measures. This is useful for defining a playback range for focused practicing and looping.

Steps:

  1. Click (or tap) the Moment where you want the selection to begin.
  2. Drag across the Movement to define the end of the selection.
  3. Release to confirm the selected range.

What happens next:

  • All moments within the selected range become highlighted.
  • The system recognizes the selection as a measure-moment sequence or substream.
  • The selection remains active until you click outside the selected area or create a new selection.
  • If you switch into Play Express, the System will fill in the Sequence drop-downs on the Sections to Play panel with the beginning and end of the selected sequence.

4.4 Automatic playback

Accessible: READ-ONLY, REPORT, PLAY → Play Express.

4.4.1 Start automatic playback

Listen to your music performed at a steady tempo. The app follows your current BPM setting and always begins exactly from your focused note or Moment, making it easy to start practicing from any point in the score.

Steps:

  1. Make sure the desired note or Moment is focused.
  2. Click the Play button on the Player panel.

What happens next:

  • The specific details of the System behavior depend on the Piano you are using.

 But generally:

  • Playback begins from the focused position.
  • The Play button changes to a Pause button.
  • Moments are played in sequence.
  • If notes played have specified fingers - these fingers are displayed on the corresponding piano keys.
  • The Go-to Indicator updates as playback progresses.

4.4.2 Pause automatic playback

Accessible: READ-ONLY, REPORT, PLAY → Play Express.

Stop playback temporarily without losing your current position.

Steps:

  1. Click the Pause button on the Player panel.

In READ-ONLY and REPORT click Play again to resume from the current  position. In Play Express clicking Play resumes playing based on the selected Section to Play.

What happens next:

  • Playback pauses at the current Moment.
  • The focus remains on the current position.
  • The Pause button changes back to Play.

4.4.3 Stop automatic playback

Accessible: READ-ONLY, REPORT, PLAY → Play Express.

End reproduction immediately and reset your position to the beginning

Steps:

  1. Click the Stop button on the Player panel.

What happens next:

  • Playback stops immediately.
  • The system places focus on the first Moment of the played selection - whether it`s a whole movement or just a part of it.

4.4.4 Set tempo (BPM)

Accessible: READ-ONLY, REPORT, PLAY → Play Express.

Control the speed of automatic playback using the BPM selector.

Steps:

  1. Locate the BPM selector on the Player panel.
  2. Open the dropdown list.
  3. Select a value between 20 and 208 BPM.

What happens next:

  • Automatic playback follows the selected tempo.
  • Changes apply immediately.
  • If playback is already running, the tempo adjusts in real time.

Manual playback is not affected by BPM — you control the speed yourself.

4.4.5 Adjust playback settings

Accessible: READ-ONLY, REPORT, PLAY → Play Express.

Manage how playback behaves using the checkboxes on the Player panel. Available settings depend on the active piano:

For Play Momenta:

  • Sound: Determines whether notes produce sound during playback.
  • Piano: Controls whether piano keys are highlighted.
  • Focus: Controls whether Moments and notes are visually focused during playback.

For Play Express:

  • Sound:  Determines whether notes produce sound during playback.
  • Dancing Levels: Controls whether Level values appear around the piano keys.

Steps:

  1. Click a checkbox to enable or disable a setting.

What happens next:

  • The selected behavior changes immediately.
  • The Dancing Levels controller affects both - automatic and manual playback. Other settings influence only automatic playback.

One control always stays active for Play Momenta.

4.4.6 Playback in the REPORT mode

Accessible: REPORT.

Isolate and listen to only the specific elements you have filtered, such as a single hand or a specific voice. This is ideal for focused analysis, as it keeps the rhythmic timing of the piece perfectly intact while "muting" everything else.

Steps:

  1. Switch to the REPORT mode.
  2. Apply the desired filters.
  3. Click Play on the Player panel. 

What happens next:

  • Only the notes and Moments that match your active filters are played.
  • If there are gaps where notes were filtered out, the app remains silent for that exact duration. This ensures the rhythm of the piece stays consistent.
  • If an entire measure contains no included notes, the measure number remains visible. The focus will rest on that number during the silent period before automatically continuing to the next available note.
  • The underlying structure of the Movement remains unchanged — the filters only affect what is currently visible and audible.

4.4.7 Loop a selected sequence

Accessible: READ-ONLY, REPORT, PLAY → Play Express.

Repeatedly play a selected sequence for practice.

In Play Momenta (READ-ONLY, REPORT)

Step 

  1. Select a Moment–measure sequence.
  2. Click Play on the Player panel. .

What happens next

  • The selected sequence is played repeatedly (up to 10 times) unless stopped manually.
  • The sequence remains highlighted.
  • Focus shifts inside the selection to indicate the currently played Moment.

In Play Express

Steps

  1. Define a playback range in the Sections to Play panel.
  2. Enable the Play Loop option.
  3. Click Play.

What happens next

  • The defined range plays repeatedly (up to 10 times) unless stopped manually.
  • Focus shifts inside the selection to indicate the currently played Moment.

4.5 Manual playback

Accessible: READ-ONLY, REPORT, PLAY → Play Express.

Move through the Movement step by step at your own pace.

Steps:

  • Click the Right Arrow on the Player panel or press the Right Arrow key on a physical keyboard (Mac or iPad with connected keyboard).
  • Press alphanumeric keys or the Space bar to move forward more quickly  (Mac or iPad with connected keyboard).

What happens next:

  • Focus shifts to the next Moment or note.
  • The Go-to Indicator updates to reflect the new position.
  • Manual playback is not controlled by BPM — you decide the speed.

Accessible: READ-ONLY, REPORT, PLAY → Play Express.

Move backward through the Movement step by step to review a passage.

Steps:

  • Click the Left Arrow on the Player panel.
  • Press the Left Arrow key on a physical keyboard.

What happens next:

  • Focus shifts to the previous Moment or note.
  • The Go-to indicator updates.

Accessible: READ-ONLY, REPORT, PLAY → Play Express (only with physical keyboard).

Move between lines of the Movement when applicable.

Steps:

  1. Press the Up Arrow key.
  2. Press the Down Arrow key.

What happens next:

  • Focus shifts to the closest Moment or note on the upper or lower line.
  • The system keeps your horizontal position when possible.

4.6 Playback range & looping

4.6.1 Play the whole Movement

Accessible: PLAY → Play Express.

Always start playback from the beginning of the Movement till its end.

Steps:

  1. Open the Sections to Play panel.
  2. Select Play whole movement.
  3. Click Play on the Player panel.

What happens next:

  • Playback always starts from the beginning of the movement.
  • The playback continues until the end unless you stop it.
  • The Sequence drop-downs are automatically filled in with the first and last moments of the movement.

4.6.2 Play from the current Moment

Accessible: PLAY → Play Express.

Always start playback from your current position in the Movement.

Steps:

  1. Open the Sections to Play panel.
  2. Select Play from current moment.
  3. Click Play on the  Player panel.

What happens next:

  • Playback always begins from the focused position.
  • The Movement continues forward until it reaches the end or is stopped manually.

4.6.3 Define a custom Moment–measure sequence

Define a specific range of measures and Moments for playback.

Accessible: PLAY → Play Express.

Steps:

  1. Open the  Sections to Play panel.
  2. Locate the Sequence drop-downs.
  3. Select your starting point: Measure from and Moment from.
  4. Select your end point: Measure to and Moment to.
  5. Click Play.

What happens next:

  • The defined range becomes the active playback section.
  • Automatic playback is limited to that range.
  • Playback stops when the defined end is reached (unless looping is enabled).
  • If Play Express was opened from the REPORT mode, available values are limited to the filtered sequence.
  • If Play Express was opened from the mode which had a selected sequence - the Sequence drop-downs are filled in automatically.

4.7 Play Express сonfiguration

4.7.1 Configure Dancing Levels

Accessible: PLAY → Play Express.

Select which note-related information appears around the piano keys. This creates a direct visual link between your hand position and the musical data.

Steps:

  1. Open the Dancing Levels panel.
  2. Select the Levels you want to display.
  3. Choose whether each Level should appear: above or below the piano keys.

You can select up to three Levels above and three Levels below the keys.

What happens next:

  • During playback, selected Level values appear around the corresponding piano keys.
  • The display updates immediately.
  • If Dancing Levels is disabled in the Player panel, the Levels will not appear even if selected.

4.8 Level display customization

4.8.1 Collapse a Level

Accessible: READ-ONLY, REPORT.

Remove a Level from view across the entire Movement.

Steps:

  1. Open the Leveling Table.
  2. Locate the Level you want to adjust.
  3. Check the Collapse checkbox for that Level.

What happens next:

  • The selected Level disappears from all Moments in the Momenta panel.
  • The layout adjusts automatically.
  • The Level remains part of the Movement structure, but is no longer visible.
  • You can uncheck the box to restore the Level.

4.8.2 Submerge a Level

Accessible: READ-ONLY, REPORT.

Hide a Level while preserving its vertical space.

Steps:

  1. Open the Leveling Table.
  2. Check the Submerge checkbox for the desired Level.

What happens next:

  • The Level values are hidden.
  • Empty space remains where the Level would normally appear.
  • Other Levels keep their position.
  • You can uncheck to restore visibility.

4.8.3 Outline a Level

Accessible: READ-ONLY, REPORT.

Temporarily hide a Level while keeping it accessible.

Steps:

  1. Open the Leveling Table.
  2. Check the Outline checkbox for the desired Level.

What happens next:

  • The Level is covered by a filled rectangle.
  • On Mac: moving the cursor over the rectangle reveals the Level.
  • You can uncheck to return the Level to normal view.

4.8.4 Collapse / submerge / outline all but this

Accessible: READ-ONLY, REPORT.

Quickly hide all Levels except one to focus on a specific parameter. This allows you to isolate a single Level for focused work.

Steps:

  1. Open the Leveling Table.
  2. Click the digit of the Level you want to focus on.
  3. Select one of the options:
    • Collapse all but this
    • Submerge all but this
    • Outline all but this

What happens next:

  • The system applies the selected action to all other Levels.
  • The chosen Level remains fully visible.

4.8.5 Clear all switches

Accessible: READ-ONLY, REPORT.

Reset your visibility settings for all Levels. This is useful when you want to restore the default view.

Steps:

  1. Open the Leveling Table.
  2. Double-click one of the reset icons at the top:
    • Collapse
    • Submerge
    • Outline

What happens next:

  • All checkboxes of the selected type are cleared.
  • All affected Levels return to normal display.

4.8.6 Change Level color

Accessible: READ-ONLY, REPORT.

Personalize the color of specific data values for better recognition.

Steps:

  1. Open the Leveling Table.
  2. Click the Level’s style controller for the desired Level.
  3. Select a color from the palette.
  4. Close the Style form.

For Fingering, right and left hand colors can be set separately.

What happens next:

  • All values of that Level change to the selected color.
  • The change applies across the entire Movement.

4.8.7 Change Level font

Accessible: READ-ONLY, REPORT.

Update the typeface of a Level to improve readability.

Steps:

  1. Open the Leveling Table.
  2. Click the Level’s style controller for the desired Level.
  3. Select a font from the dropdown.
  4. Close the Style form.

For Fingering, right and left hand fonts can be set separately. 

What happens next:

  • All values of that Level use the selected font.

4.8.8 Change font style

Accessible: READ-ONLY, REPORT.

Adjust the font style for a Level to emphasize specific data.

Steps:

  1. Open the Leveling Table.
  2. Click the Level’s style controller for the desired Level.
  3. Select a font style (Regular, Bold, Italic).
  4. Close the Style form.

What happens next:

  • All values of that Level update to the selected style.

4.8.9 Change font height

Accessible: READ-ONLY, REPORT.

Adjust the size of Level values to fit your screen or vision needs.

Steps:

  1. Open the Leveling Table.
  2. Use the “+” and “−” buttons next to the Level in the Leveling Table.

Or

  1. Click the Level’s style controller for the desired Level.
  2. Choose level`s height via the font height drop-down (values from 1-8).
  3. Close the Style form.

What happens next:

  • The change applies immediately.
  • The font height updates for the entire Level.
  • Font height adapts automatically to the selected panel scale (S / M / L).

4.9 Filtering & reports

4.9.1 Apply filters

Accessible: REPORT.

Create a custom report by filtering the Movement using Level values.

Steps:

  1. Open the Toolbox.
  2. Select one or more values from any available Level.

You can apply filters from multiple Levels at the same time.

What happens next:

  • The Momenta panel updates automatically.
  • Only notes and Moments matching the selected filters remain visible.
  • The rest of the Movement becomes hidden.
  • The Go-to Indicator updates to reflect only accessible measures and Moments.
  • The Clear all button appears below the Leveling Table.

4.9.2 Combine filters within the same Level (OR logic)

Accessible: REPORT.

Select multiple values from the same Level. For example, if you select Soprano and Alto, the report includes Soprano or Alto.

Steps:

  1. Open the Toolbox.
  2. Select more than one value from a single Level.

What happens next:

  • The system includes entries that match any of the selected values.
  • This follows OR logic.

4.9.3 Combine filters across different Levels (AND logic)

Accessible: REPORT.

Narrow your focus by combining different Level criteria. For example, if you select Left Hand and Tenor, the report includes entries that are Left Hand and Tenor.

Steps:

  1. Open the Toolbox.
  2. Select a value from one Level.
  3. Select a value from another Level.

What happens next:

  • The system includes only entries that match all selected Levels.
  • This follows AND logic.

4.9.4 Combine multiple filters

Accessible: REPORT.

Mix both types of logic for advanced isolation. For example, (Soprano OR Alto) AND Right Hand.

Steps:

  1. Open the Toolbox.
  2. Select multiple values within a Level.
  3. Select additional values from other Levels.

What happens next:

  • Within the same Level → OR logic applies.
  • Across different Levels → AND logic applies.

4.9.5 Clear filters

Accessible: REPORT.

Remove all applied filters at once to see the full score.

Steps:

  1. Open the Toolbox.
  2. Apply filters.
  3. Click the Clear Filters button below the Leveling Table.

What happens next:

  • All filters are removed.
  • The full Movement becomes visible again.
  • The Go-to Indicator restores full navigation access.

4.10 Customization & advanced controls

4.10.1 Change the Movement panel scale

Accessible: READ-ONLY, REPORT.

Adjust the size of notes and Levels in the Momenta panel.

Steps

  1. Locate the Scale Controller in the Toolbar.
  2. Select one of the three options: Small (S), Medium (M), or Large (L).

What happens next

  • The Momenta panel resizes proportionally.
  • Notes, Moments, and Level values adjust automatically.
  • The layout recalculates based on the selected scale.

Note: Changing scale may take a few seconds depending on the Movement size.

4.10.2 Refresh layout

Accessible: READ-ONLY, REPORT.

Rephresh the layout to fix elements that appear misaligned after resizing or scaling.

Steps:

  1. Click the Refresh button located in the Momenta panel header.

What happens next:

  • The layout recalculates.
  • All Moments are repositioned correctly within the panel.
  • The current focus remains unchanged.

4.10.3 Change the Movement panel background color

Accessible: READ-ONLY, REPORT.

Customize the background color of the Momenta panel..

Steps:

  1. Locate the Color Picker in the Toolbar.
  2. Select a background color.

What happens next:

  • The Momenta panel background updates immediately.
  • If the app theme is switched (Light ↔ Dark), background colors are inverted automatically to preserve visibility.

4.10.4 Resize the Piano Panel

Accessible: READ-ONLY, REPORT, PLAY → Play Ground.

Adjust the vertical height of the keyboard to find the perfect balance between the piano keys and the Momenta panel.

Steps:

  1. Locate the Resize Piano button in the top-left corner of the Piano panel.
  2. Click (or tap) the Resize Piano button to enter resize mode.
  3. Drag the handle on the right horizontally to adjust piano keys width.
  4. Drag the handle on the right vertically to adjust piano keys width height.
  5. Click anywhere outside the Piano panel to exit resize mode and save your changes.

What happens next:

  • The Piano panel resizes immediately.
  • The Momenta panel automatically adjusts its height to fit the remaining screen space.
  • The app saves your preferred keyboard size.

4.11. Play Ground mode

4.11.1. Play the Piano keyboard

Access:  PLAY → Play Ground.

Use BtH to practice your piano playing anytime—even without a real instrument.

Steps:

  1. Locate the Piano panel.
  2. Click any key to play a single note.

Playing chords:

  • On iPad: Tap multiple keys at the same time to play a chord.
  • On Mac: Hold the Shift key while clicking notes. The system will group them into a chord.
    • While holding Shift, you can click the same note again to replay the chord.
    • Each repeated click increases that note’s volume by 30% within the chord.

Adjusting volume:

Use the Volume slider above the Piano panel to control the overall sound level in Play Ground mode.

5. Synchronization & offline-first model

5.1 How BtH works: offline-first

BtH uses an "offline-first" model for its database needs. This means:

  • The app does not require a constant internet connection to function.
  • You therefore can continue working with your Movements even without Wi-Fi.

This approach ensures:

  • Stable performance.
  • Faster response time.
  • No data loss if connection drops.

5.2 First login & initial download

You only need an internet connection to:

  • Create an account
  •  Log into the app for the first time on a device

When you log in for the first time:

  • The app automatically downloads all system Library Movements available to you.
  • These Movements are stored locally on your device.

After this initial download, you can work offline.

5.3 Local password per device

Each device requires its own local password. This ensures secure offline access even without an internet connection.

This means:

  • You must set a password on each device during sign-up.
  • When offline, you log in using this device-specific password.
  • You can change the password in Settings → Password.

5.4 Automatic synchronization

Automatic synchronization keeps your data up-to-date so you don’t have to worry about manual saves. As long as your device is connected to the internet, the app works in the background to ensure your progress is backed up and consistent.

No manual action is required. Synchronization happens automatically when:

  • Your device has an active internet connection.
  • New data or changes have been made on the server side.
  • The app reconnects to the internet after being offline.

What happens:

  • Any updates from the server are applied to your device automatically.
  • Your data, settings, and progress remain the same across every device you use.
  • Your local work is safely backed up to the server, ensuring nothing is lost if you switch devices.

5.5 Synchronization settings

The synchronization settings give you full control over how your device manages Movement data.

In Settings → Synchronization, you can:

  • Enable or disable synchronization.
  • Delete all locally stored data.

What happens next:

  • Deleting local data removes all Movements currently stored on your device to free up space.
  • After deleting local data, the app will automatically re-download your Movements the next time synchronization is enabled and an internet connection is available.
  • If you want to prevent the app from downloading Movements to your device entirely, you should turn off synchronization before clicking delete all local data.
  • Even if your local storage is empty, you will still be able to access, view, and play all your Movements whenever you are online.

Table of contents

Table of contents

2. Interface overview

The BtH interface is designed to keep the Movement at the center of your workspace. Each panel on the screen has a specific role in helping you view, analyze, or perform your music.

2.1 Toolbar

The Toolbar is your main control hub. It is always visible at the top of the screen and automatically adapts based on which mode you are currently using.

From here, you can:

  • Access Settings: Configure your account, piano, and language.
  • Open the Library: Browse and select your music.
  • Access Leveling table
  • Switch between modes: Move between PLAY, READ-ONLY, and REPORT
  • Adjust the Momenta panel view: Change the Scale (zoom Level) of the Momenta panel.

The center of the Toolbar contains mode controls.

PLAY mode is divided into Play Ground and Play Express workspaces. The workspace switch buttons are positioned on the left side of the Toolbar in PLAY mode.

View control is positioned toward the right side of the Toolbar.

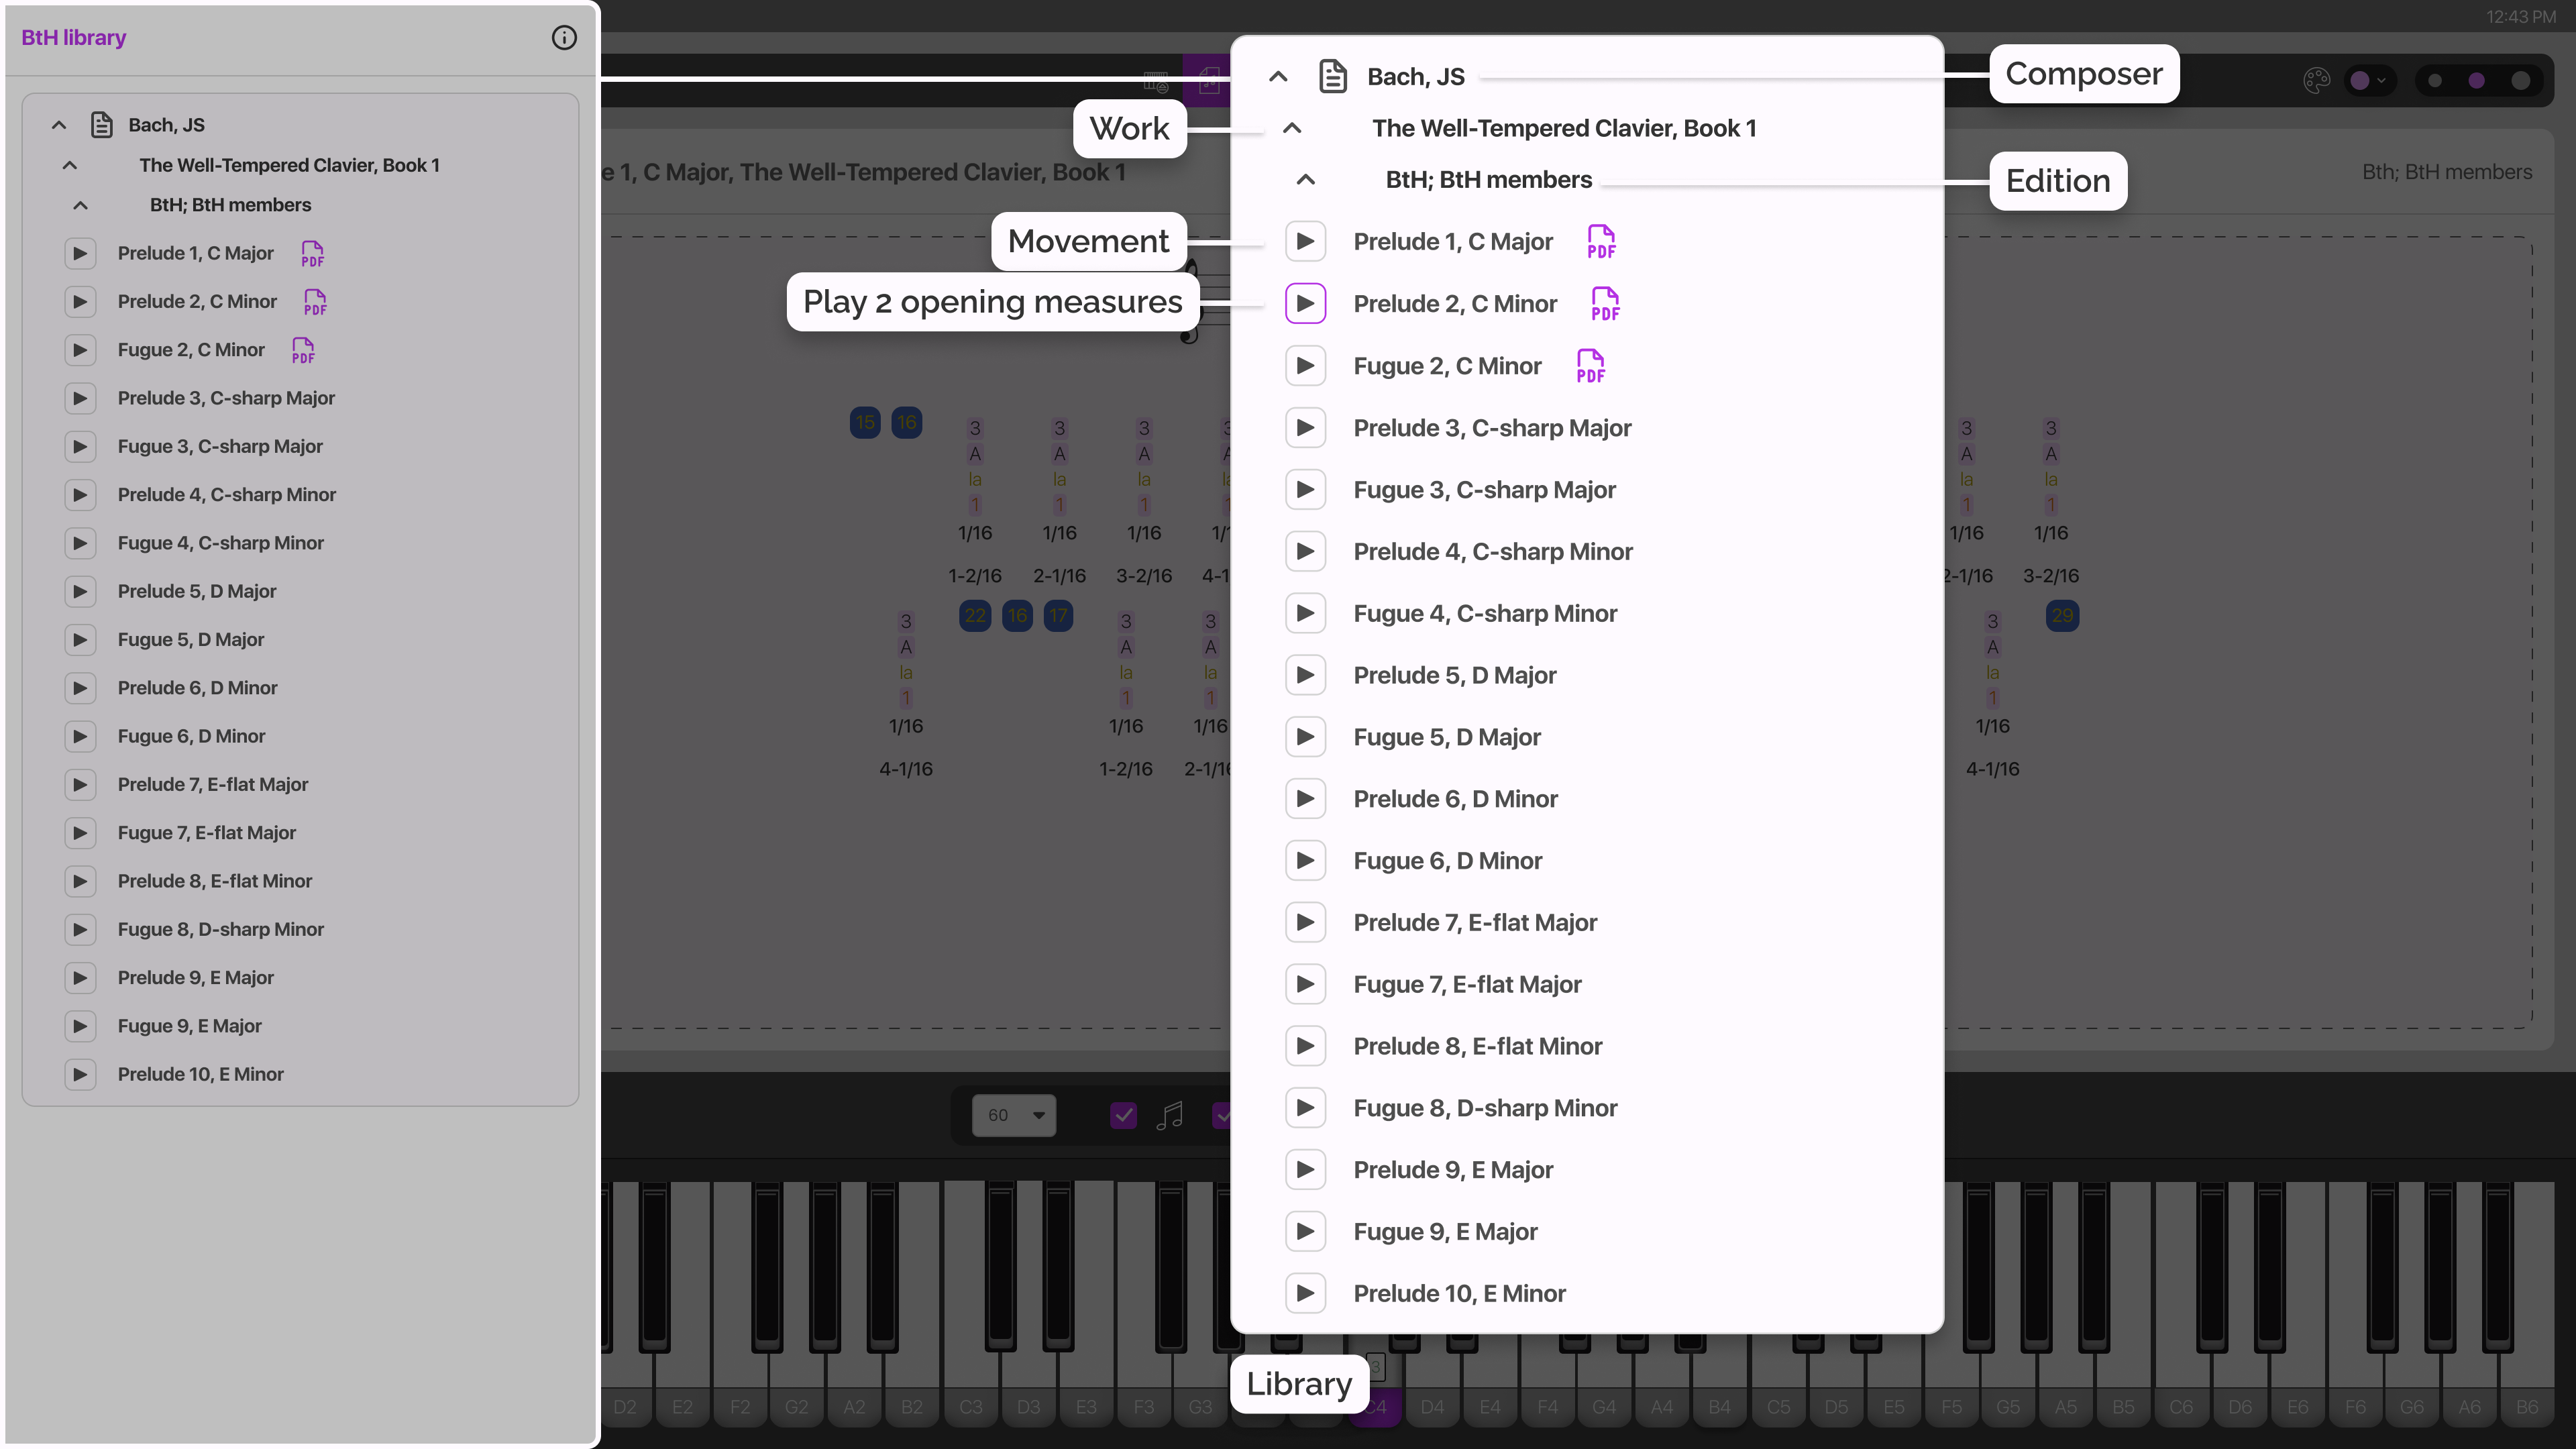
2.2 Library

The Library is your digital repertoire hub. It serves as the primary entry point for opening Movements or for simply exploring them by listening to their opening measures.

You can access the Library from the Toolbar in any mode (PLAY, READ-ONLY, or REPORT).

2.2.1 How Library is organized

To make it easy to find what you’re looking for, the Library uses a simple "folder" system that drills down from a particular composer to a specific movement drawn from one of the composer’s published compositions: 

  1. Composer: last name, first name.
  2. Work: choose by name a specific composition of the composer.
  3. Edition: choose the version of the composition by choosing a specific Publisher and Editor.
  4. Movement: choose the specific piece of music for play or study within BtH.

Each Movement entry in the Library includes an interactive Play icon. This feature generates an audio preview of a Movement’s  first two measures, which is very useful when trying to keep straight the form of complicated, multi-Movement piano compositions.
2.3 The Momenta panel

The Momenta panel is your primary workspace. This is where your Movement is displayed in Momenta notation, visualizing every measure, Moment, and Note in a single, interactive score.

Available in: the READ-ONLY mode and REPORT mode.

2.3.1 How the Momenta panel is organized 

The Momenta panel displays the music as a precise, time-ordered sequence of musical moments. The layout reflects the Time Signature and the actual structural organization of the piece:
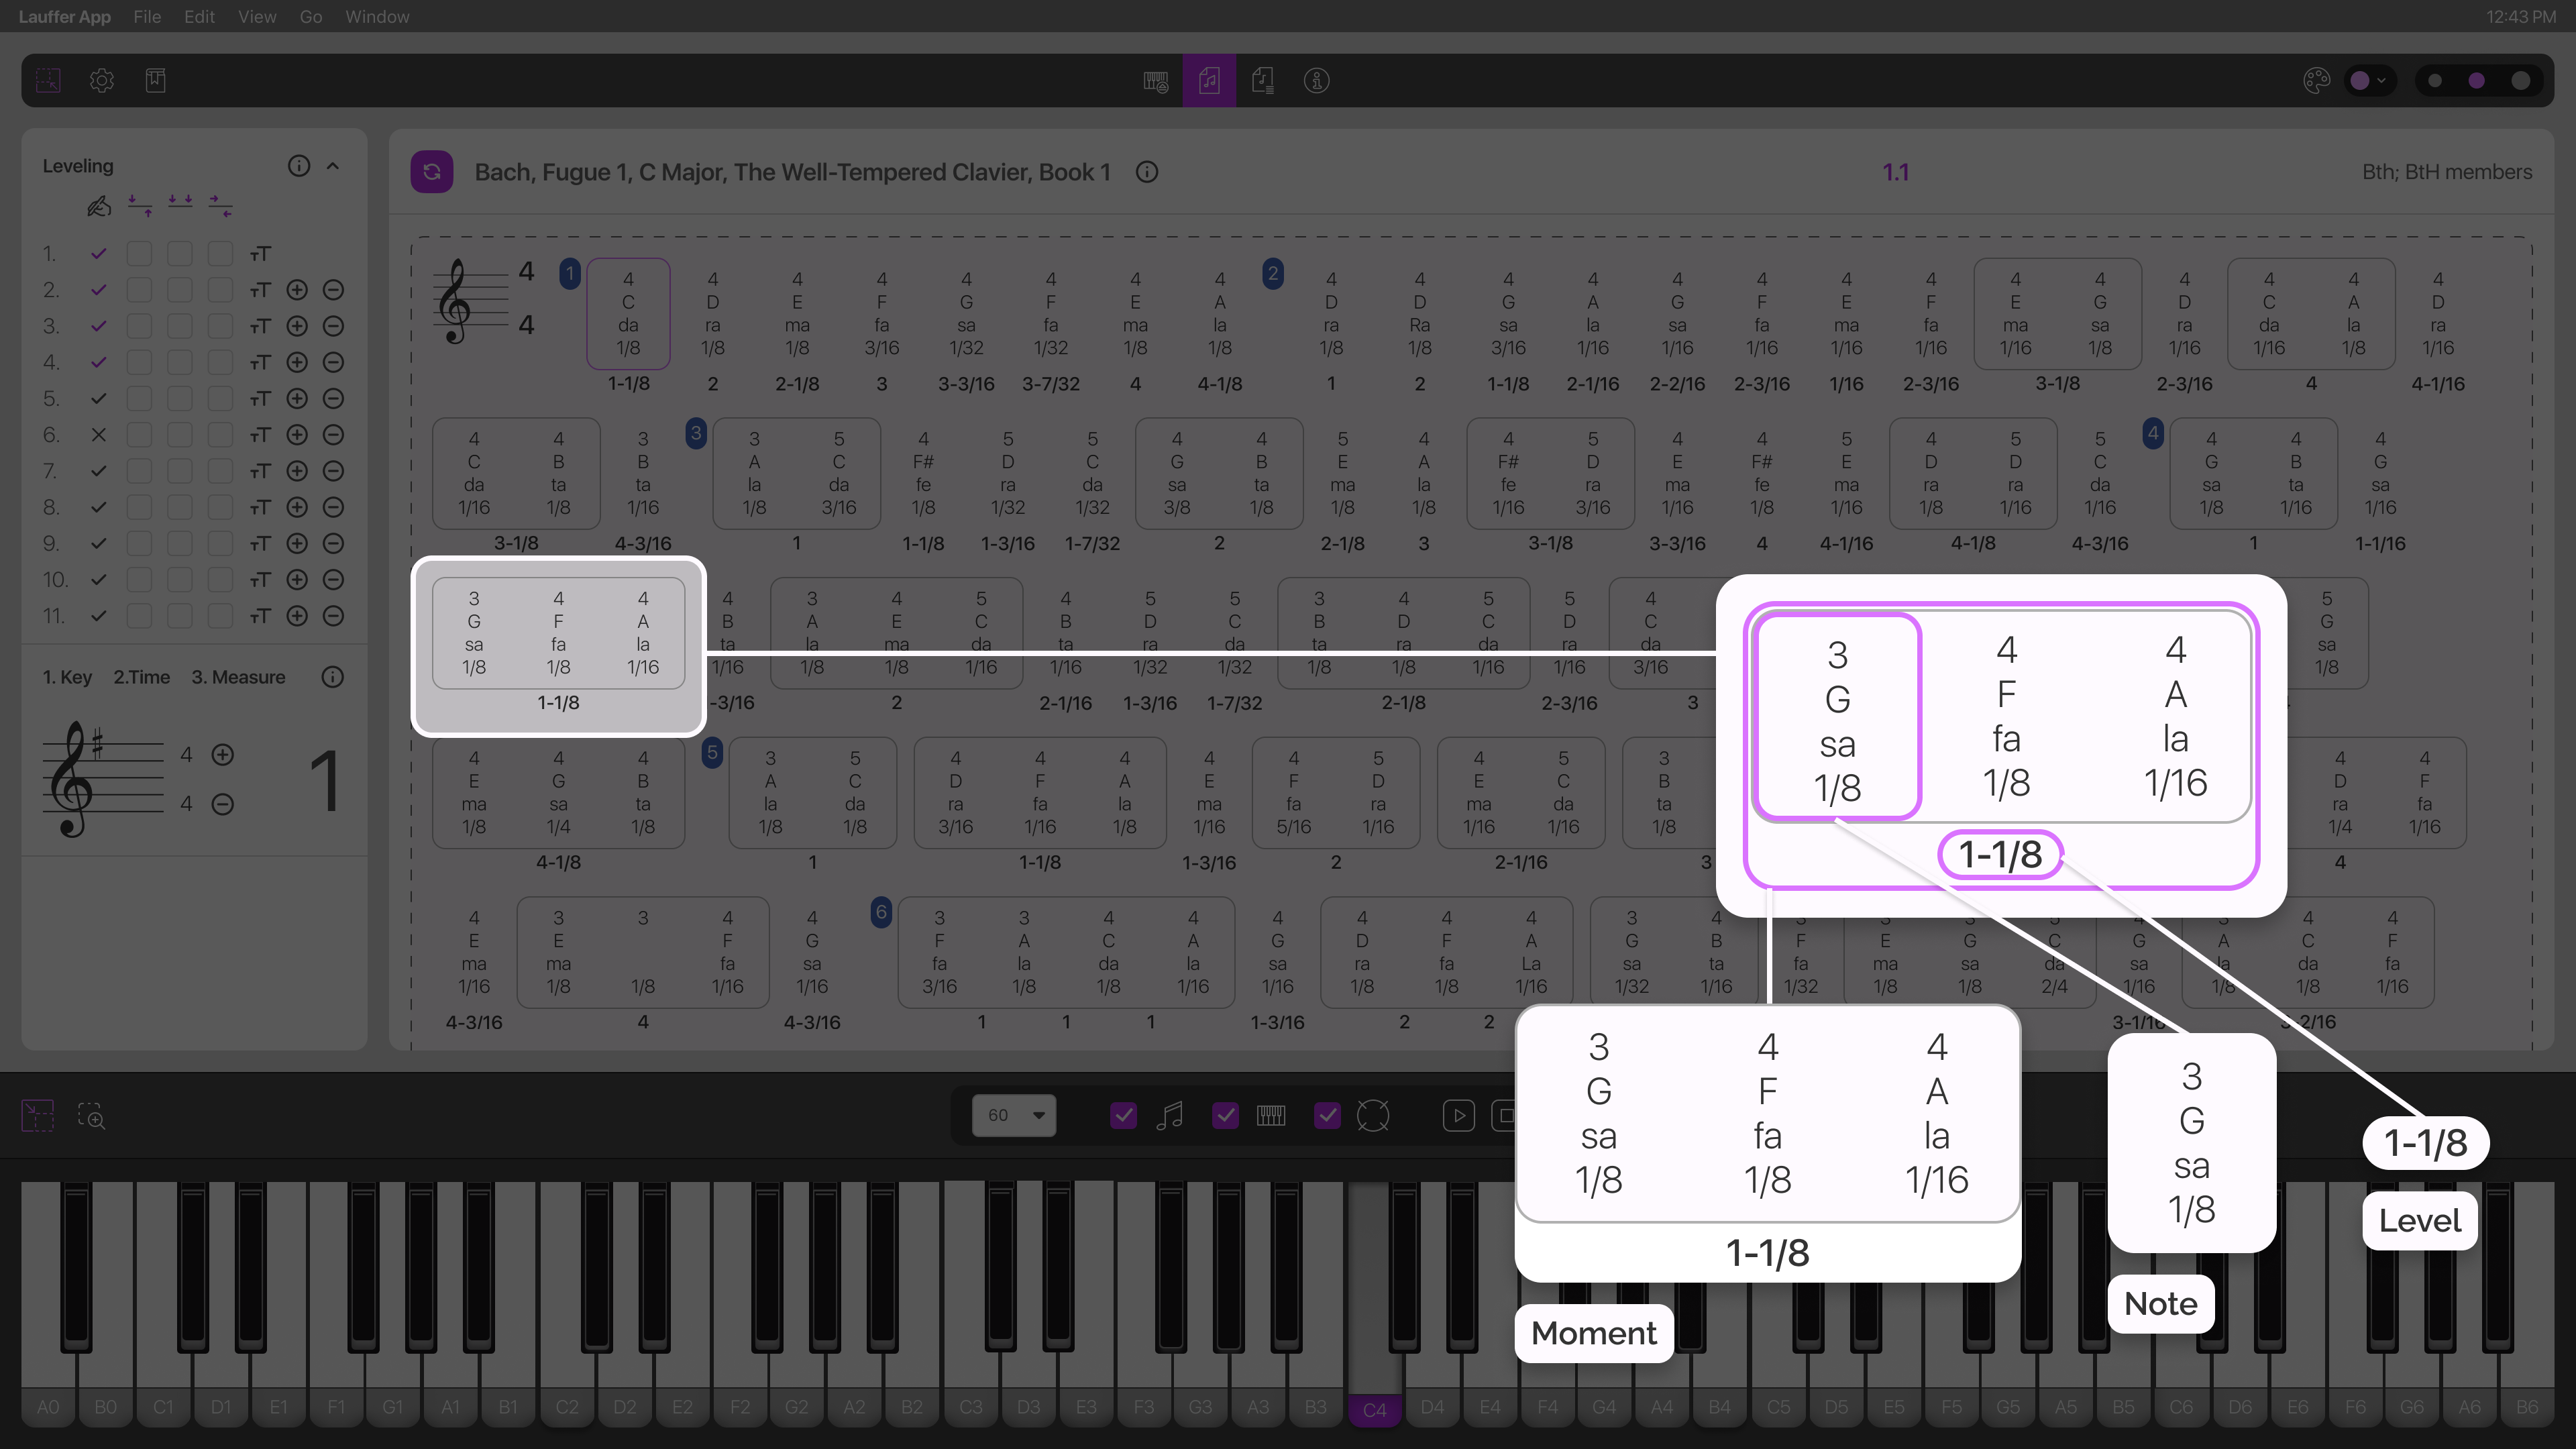
  • Measures (horizontal): As in standard notation, the music is divided into structured segments (bars) that flow from left to right. In Momenta notation, however, all measures are always very clearly numbered (see the measure Level).
  • Moments (vertical): Inside each measure, the music is organized into vertical "slices" of time. A moment includes all the notes to be sounded together. How long each note sounds depends on each note’s defined duration (See duration Level).
  • Notes (internal): Each note exists within a moment. If several notes are played together, they form a multi-note moment. Because multi-note moments paint their contained notes horizontally, sorted low to high by pitch to reflect the geometry of our hands playing a piano, a Momenta “stream” can be visually as just a series of different hand positions following gracefully one upon the other.
  • Levels (rows): Every note is aligned within structured rows of data called Levels. These rows provide specific details like fingering, note name, or note volume.

2.3.2 What you see in the header 

The header of the Momenta panel identifies the Movement currently on display directly below. It also contains a navigation control for fast, random positioning within the current Movement other than manually scrolling. The header includes:
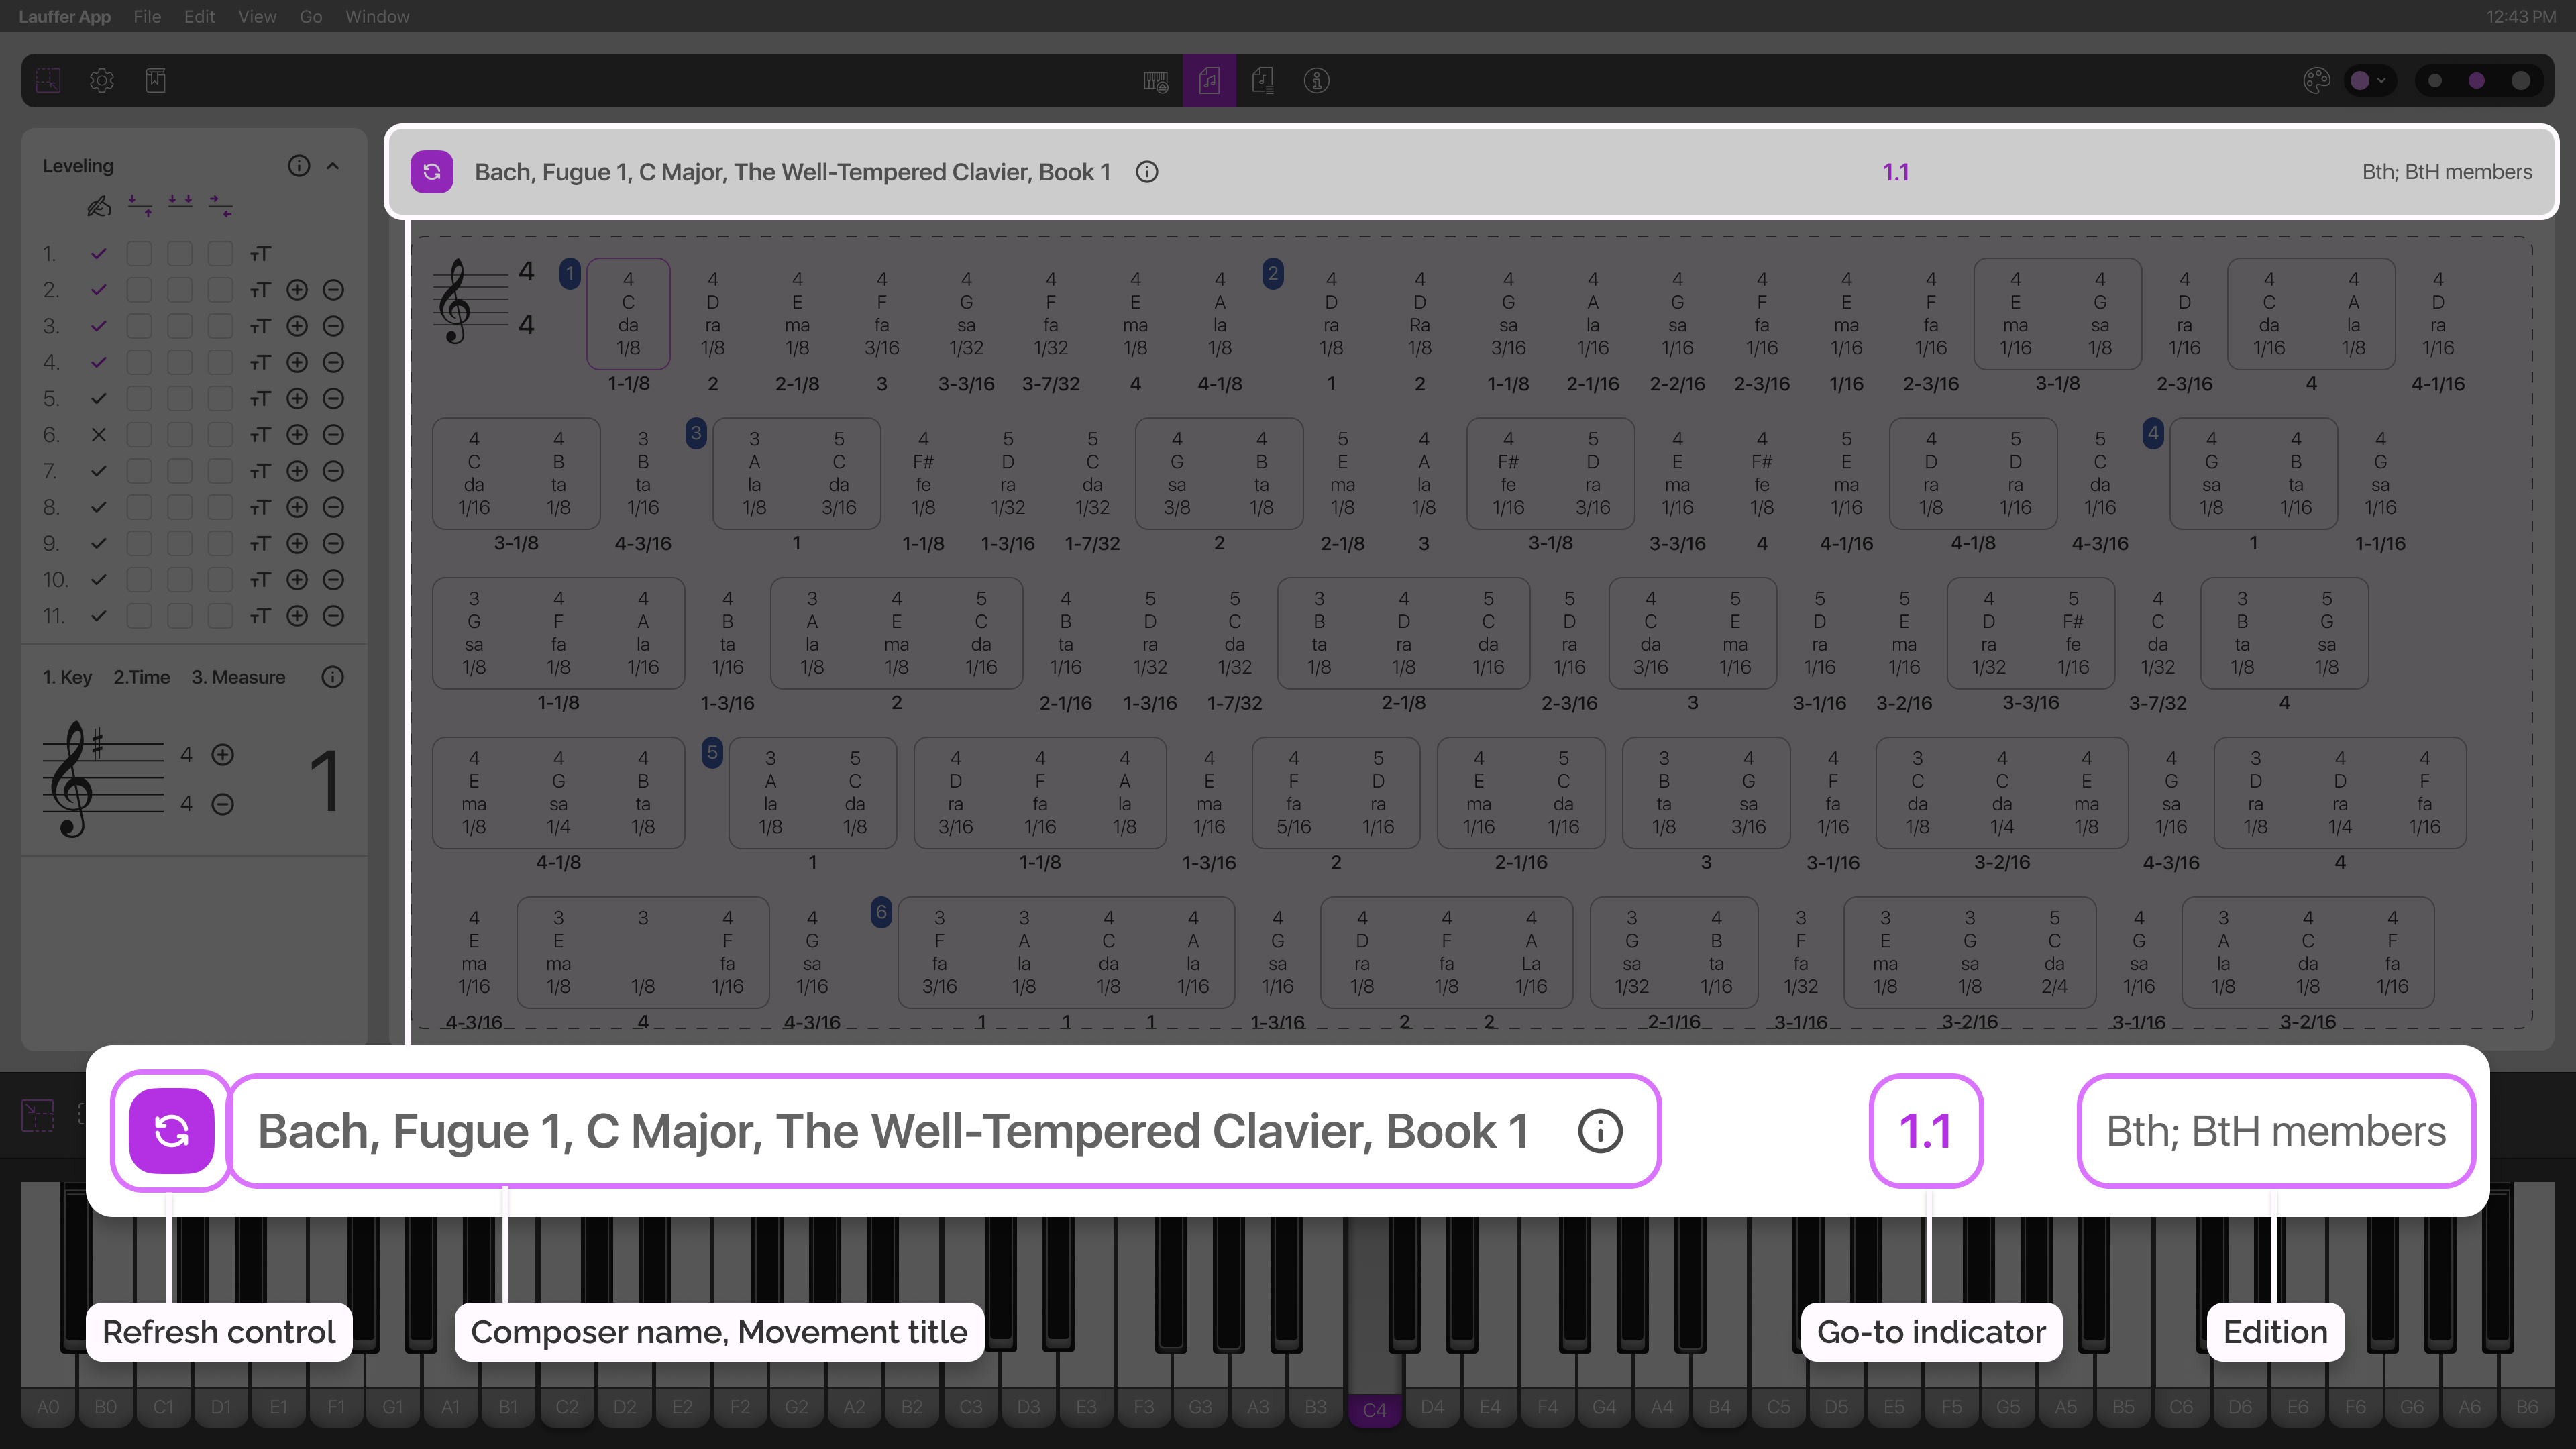
  • Full Movement name: composer name, movement name, edition name (publisher, editor name(s).

*Although the field contains a full movement name, it may not always be fully visible. Click the Movement`s name field to view all details.

  • Go-to indicator
    • Displays the  “address” of the currently-focused moment (measure #, moment # within measure).
    • Click/Tap the indicator for measure and moment pick-lists that enable fast point-to-point navigation with the Momenta panel.

  • Refresh control
    • Recalculates and adjusts layout positioning inside the Momenta panel when needed.

2.3.3 How the Momenta panel behaves

  • Move & zoom: scroll easily through long Movements and adjust the scale of its content (small to large) to fit your screen and visual preference.
  • Set Moment-Focus: click/tap any moment to highlight it and its content or drag to select a variable size “moment-stream” for repetitive play and study.
  • Smart filtering: after you apply filters from REPORT mode, filtered notes and any resulting empty moments disappear, but measure numbers stay visible so you don't get lost.

For operation details see:

2.4 The Leveling Table

The Leveling Table provides access to the structural Levels (musical parameters like Fingering or Volume assigned to notes and Moments) and allows visual control over how they are displayed and used.

You can access the Leveling Table from the Toolbar in any mode (PLAY, READ-ONLY, or Canned REPORTS).

2.4.1 How the Leveling Table is organized

The Leveling Table displays every data layer defined for the Movement in a clear, numbered list:

  • Each Level occupies its own numbered row, corresponding directly to a row in the Momenta panel.
  • The order of Levels in the table matches their structural order in the Movement.

*Please note that a movement may not have values for all levels. In such cases, levels without values are not excluded from the Leveling Table.

2.4.2 Visual controls 

Each row includes visual control elements that affect how the Level appears in the Momenta panel. These controls allow you to:

  • Collapse, submerge, or outline a Level to customize your workspace.
  • Isolate specific data by hiding all Levels except the one you are currently studying.

Any adjustments you make here are applied consistently across the entire Movement.

2.5 The Piano panel

The Piano panel is the interactive keyboard area of the app. It acts as the visual and auditory center for every piano environment in BtH, showing you exactly which notes are being played, focused, or triggered. 

Available in: the PLAY, READ-ONLY and REPORT modes.

2.5.1 What you see on the Piano

The Piano panel displays different keyboard layouts depending on your active mode to maximize the iPhone screen:

The READ-ONLY mode

  • Displays a full piano keyboard (88 keys).
  • The keyboard fits fully on the screen.
  • Keys are not labeled.
  • The keyboard cannot be scrolled.

This layout allows you to see the entire keyboard while following structured playback in the Movement.

The PLAY-> Play Ground mode

Two keyboard views are available:

Zoomed keyboard

  • Displays labeled piano keys.
  • Designed for comfortable playing and practicing away from a real piano.
  • The keyboard does not fit entirely on the screen and can be scrolled horizontally.

Full keyboard with active area

  • Displays the full 88-key keyboard.
  • The keyboard fits fully on the screen and is not scrollable.
  • Keys are not labeled.
  • A draggable active area indicates which register is currently visible in the Zoomed Keyboard.
  • Moving the active area changes the register displayed in the Zoomed Keyboard.

This combination allows you to navigate the full keyboard while playing on a zoomed section.

The PLAY -> Play Express mode

  • Displays a full 88-key keyboard.
  • Keys are labeled.
  • The keyboard does not fit fully on the screen.
  • The keyboard can be scrolled horizontally.

This layout supports high-speed playback and interaction, while keeping the keyboard synchronized with the Movement.

The Piano panel displays:

  • Highlighted keys during playback
  • Real-time visual response to user interaction

The Piano panel reflects notes being:

  • Played automatically
  • Triggered manually
  • Selected or focused

2.5.2 How Piano behaves 

The keyboard’s behavior and sound output change depending on which "Piano" is currently active:

  • Playground Piano: Keys produce sound immediately when tapped — ideal for exploring the keyboard and testing ideas.
  • Play Momenta Piano: Keys highlight in perfect synchronization with structured, Moment-based playback.
  • Play Express Piano: Keys highlight while specific note-related Levels (like Fingering or Volume) appear around them as the music plays. 

The Piano panel remains visually synchronized with focus state, playback state, and sound output.

For operational details, see:

2.6 The Player panel

The Player panel is the central command center for music reproduction. It allows you to control exactly how a Movement is played — whether you want the app to play it automatically or you want to navigate through the notes manually. 

Available in: the PLAY, READ-ONLY, and REPORT modes.

READ-ONLY and REPORT Player panel:

PLAY -> Play Express Player panel

2.6.1 Core function

The Player panel manages the essential mechanics of your session:

  • Automatic playback for continuous listening or performance.
  • Manual step-by-step navigation for focused study.
  • Playback tempo (BPM) settings.
  • Playback visualization and sound settings.

2.6.2 How the Player panel is organized 

To provide precise control over your music, the panel is organized into five primary functional areas:
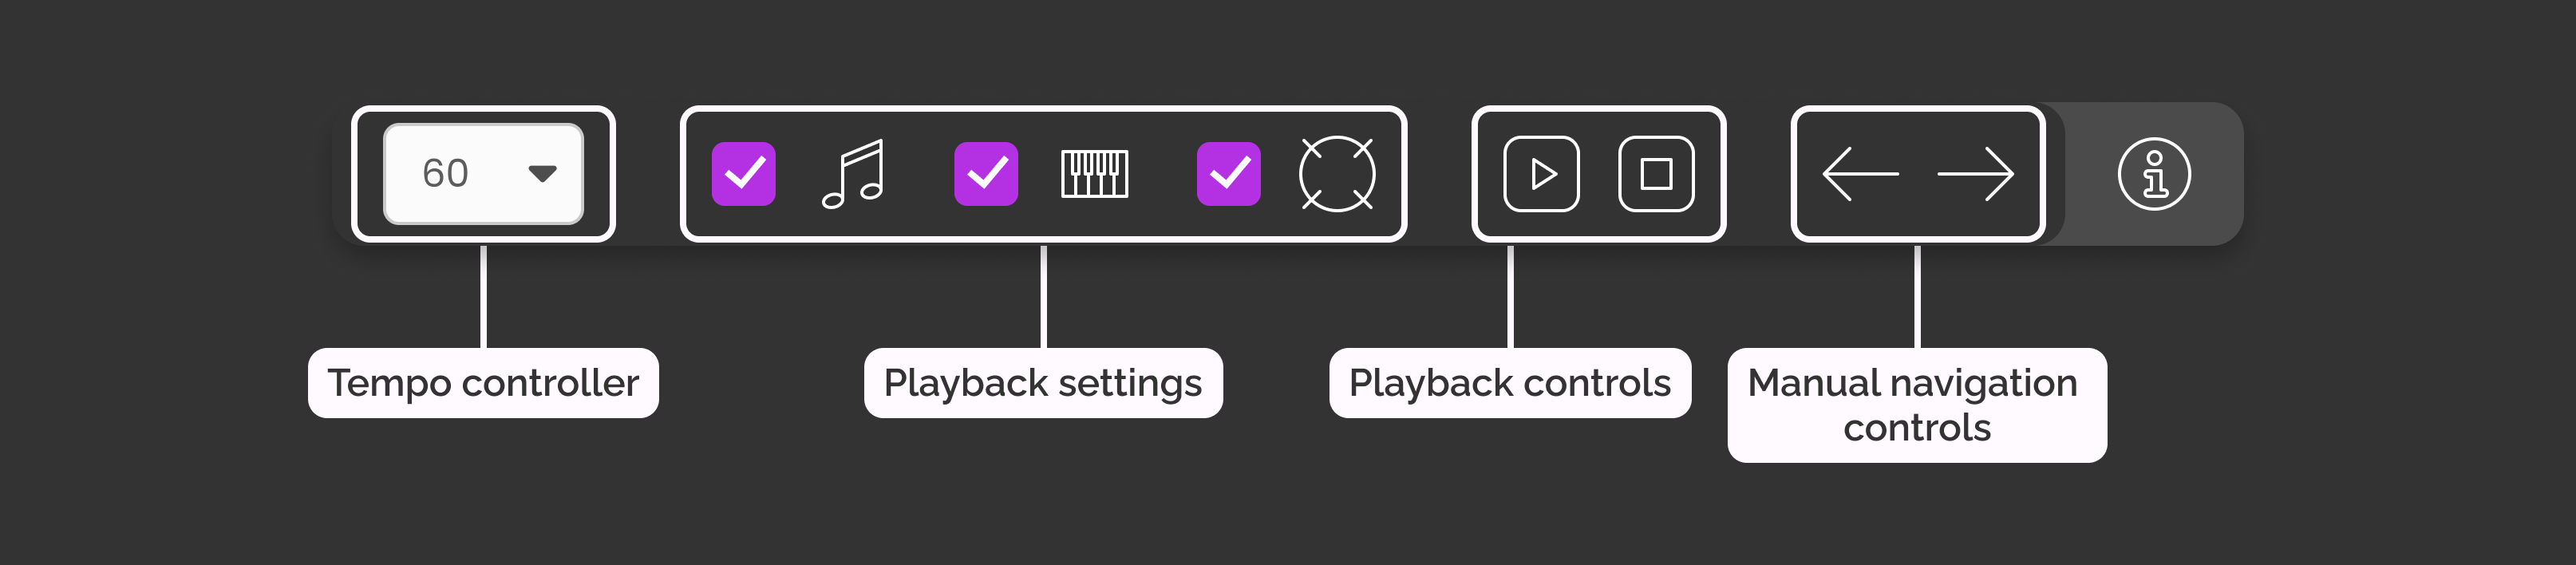
Focus controller ( Play Express only): 

Indicates whether the system is navigating by Moments (vertical slices of time) or individual notes. This setting determines how the manual arrows and automatic playback behave.

Tempo control

A BPM selector (ranging from 20–208 BPM) that defines the speed for all automatic playback. It does not affect manual navigation speed.

Playback settings

Checkboxes that control behavior. For Play Momenta, these include Sound, Piano highlighting, and Focus shifting. For Play Express, these include Sound and Dancing Levels.

Playback controls

Includes Play, Pause, and Stop. Playback starts from the currently focused note or Moment in READ-ONLY and REPORT mode. In Play Express the beginning point of the playback is defined by the selected Section to play.

Manual navigation controls

Right Arrow moves focus to the next element; Left Arrow moves focus to the previous one.

2.6.3 How the Player panel behaves 

The Player panel stays in constant communication with your workspace to ensure a seamless experience:

  • The panel automatically syncs with your current Focus in the Momenta panel, the Active Piano selection, and the selected playback range.
  • Automatic playback always begins from the currently focused Note or Moment.
  • Supports manual navigation via the on-screen buttons.

For operational details, see:

2.7 The Play Express panels

In the PLAY mode (Play Express), additional panels are available to control how playback behaves and how information is displayed around the piano.

These panels allow you to:

  • Control which musical data is visualized around the keyboard
  • Define what part of the Movement will be played automatically
  • Monitor the current position and structural values during playback

Play Express includes three dedicated panels: Dancing Levels panel, Sections to Play panel,  and Current Moment Values panel.

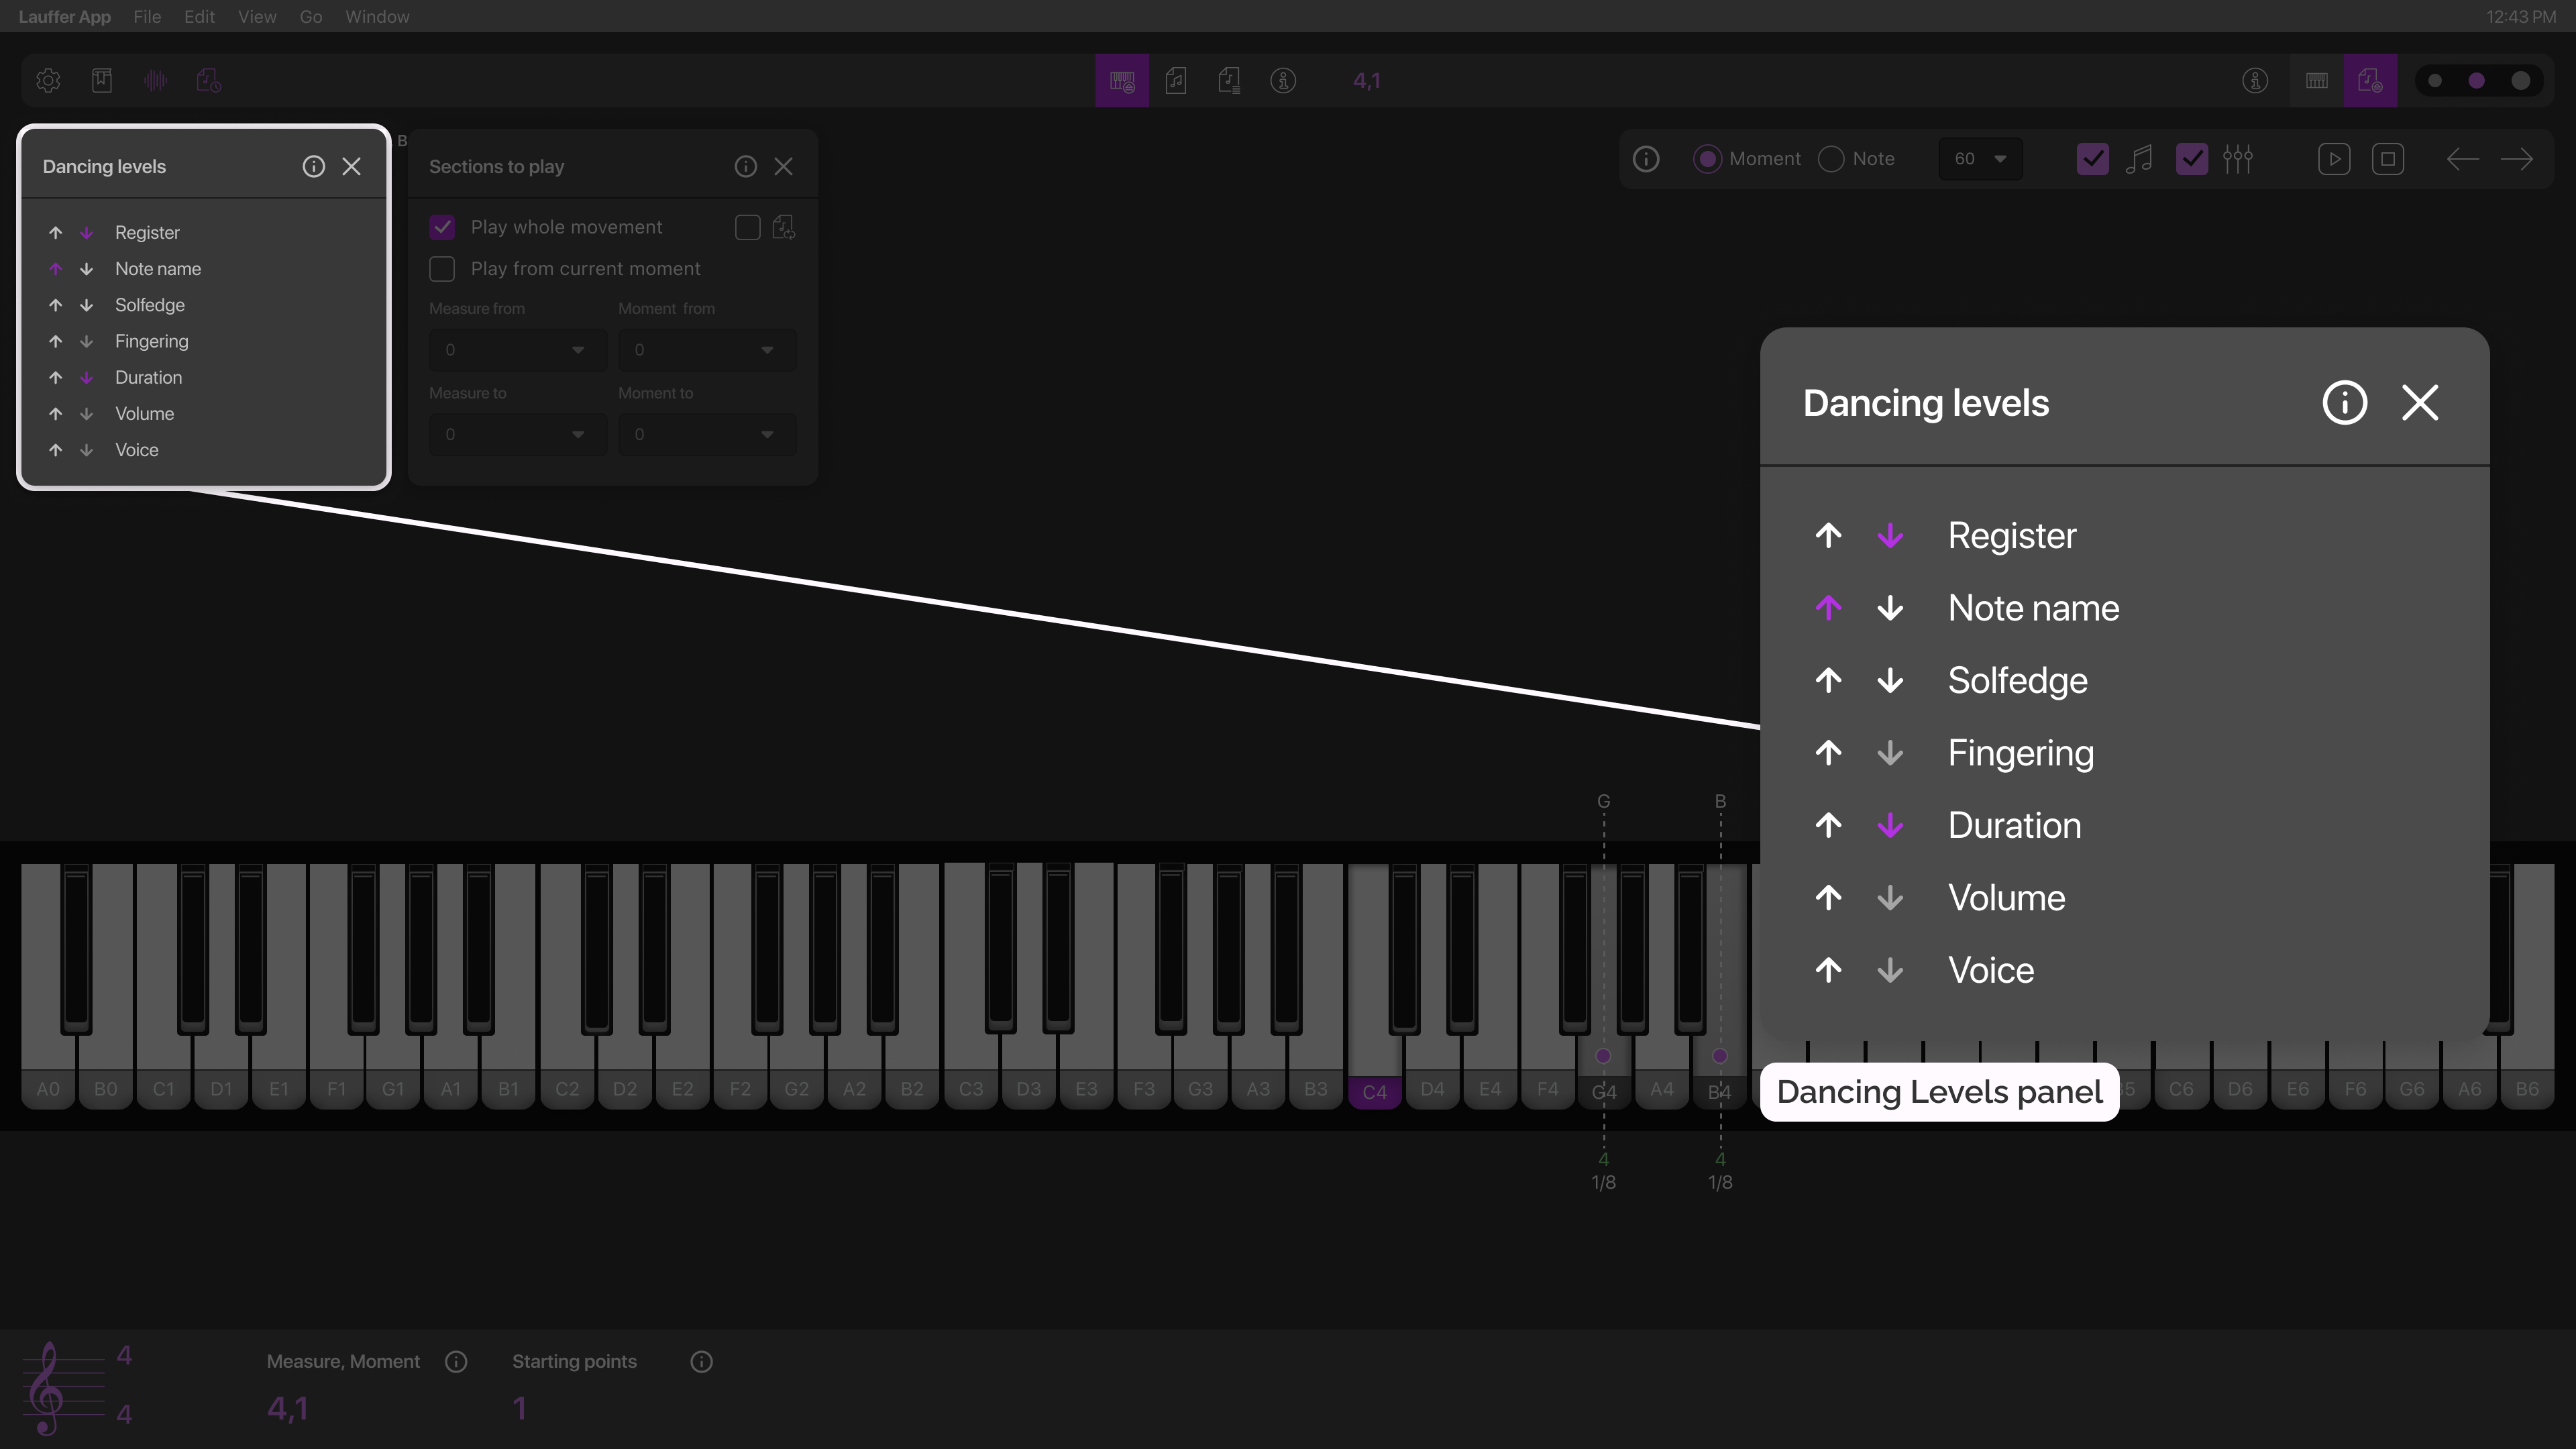
2.7.1 The Dancing Levels panel

The Dancing Levels panel controls which note-related Levels are displayed around the piano keys during Play Express playback. During playback, selected Level values appear visually above and/or below the corresponding piano keys of the notes being played.

This creates a direct connection between keyboard position, musical structure, and Level parameters.

Available Levels

You can choose from the following note-related Levels:

  • Register
  • Note name
  • Solfege
  • Fingering
  • Duration
  • Volume
  • Voice

You can assign up to three Levels above the keys and three Levels below them. This creates a direct visual link between your hand position and the musical data as the notes "dance" on the screen.
2.7.2 The Sections to Play panel

The Sections to Play panel defines the playback range for automatic playback in Play Express. It allows you to control which part of the Movement will be played.

Available playback range options include:

  • Play the whole Movement
  • Play from the currently focused Moment
  • Play a defined Moment–measure sequence

The panel also includes a Play Loop option, which enables repeated playback of the selected range.

2.7.3 The Current Moment Values panel

This panel acts as a real-time monitor, providing structural orientation so you don't have to scan the full score during playback.

It displays key information about the Moment that is currently focused or being played:

  • Current Key Signature
  • Current Time Signature
  • Moment Starting Point values

Because musical durations often overlap, the panel can display multiple Moment Starting Points simultaneously, using a visual hierarchy that highlights the currently focused Moment while subduing others to maintain clarity. This consolidated view is particularly effective during high-speed playback, allowing you to stay structurally oriented at a glance without the need to constantly scan the full Movement for your position.

3. Settings

Settings are opened from the Toolbar in Play Ground, READ-ONLY and REPORT modes. and allow you to configure application behavior, appearance, and account preferences.

Settings are organized into tabs.

Changes are saved automatically when Settings are closed.

3.1 Keyboard

The Keyboard tab controls how the Piano keyboard behaves and is displayed. It includes two toggles: Note names and Right Arrow+ (the child’s play mode).

3.1.1 Note names

Choose whether note names appear at the front of the keyboard's labeled white keys.

  • When the toggle is enabled, notes appear in the format: {note-name} sub {note register} e.g. A⁴, C⁵, etc.
  • When the toggle is disabled, only the register number is displayed for the first note of each octave.

This setting affects only the keyboard display.

3.1.2 Right Arrow+ (the child’s play mode)

Adjust how sustained notes are handled during manual navigation.

When the toggle is enabled:

  • Notes whose durations extend beyond their starting point remain visually pressed on the keyboard.
  • Sustained notes are held until their duration is completed.
  • Sound naturally fades over time, but the key remains visually pressed.

Right Arrow+ works with:

  • Right arrow navigation

This feature is designed to help users understand which notes should continue sounding at each Moment.

3.2 Note-naming language

This tab controls how note names are displayed throughout the app.

3.2.1 Note-Naming Language

Select the language used for note names.

Your available options:

  • English
  • German
  • Russian
  • French

Changing the language updates how notes are labeled in the Momenta panel and on the Piano keyboard.

3.2.2 The Alpha-Graphic mode

Toggle how accidentals are displayed with the Alpha-Graphic checkbox. However, it does not change the Movement structure or pitch values.

  • When enabled, accidentals are shown in symbolic form: A#, Bb
  • When disabled, accidentals are written in full text: A Sharp, B Flat

3.3 Solfege system

Choose your preferred solfege naming convention. You can switch between the Classic and Siler systems. This adjustment only updates the names displayed in the Solfege Level and does not change the actual musical data.

3.4 Subscription

Manage your access and plan details here:

  • View your current subscription status
  • Access subscription management options
    • Switch to another plan
    • Restore purchases
    • Cancel subscription

This tab also hosts Privacy Policy & Terms and Conditions documents.

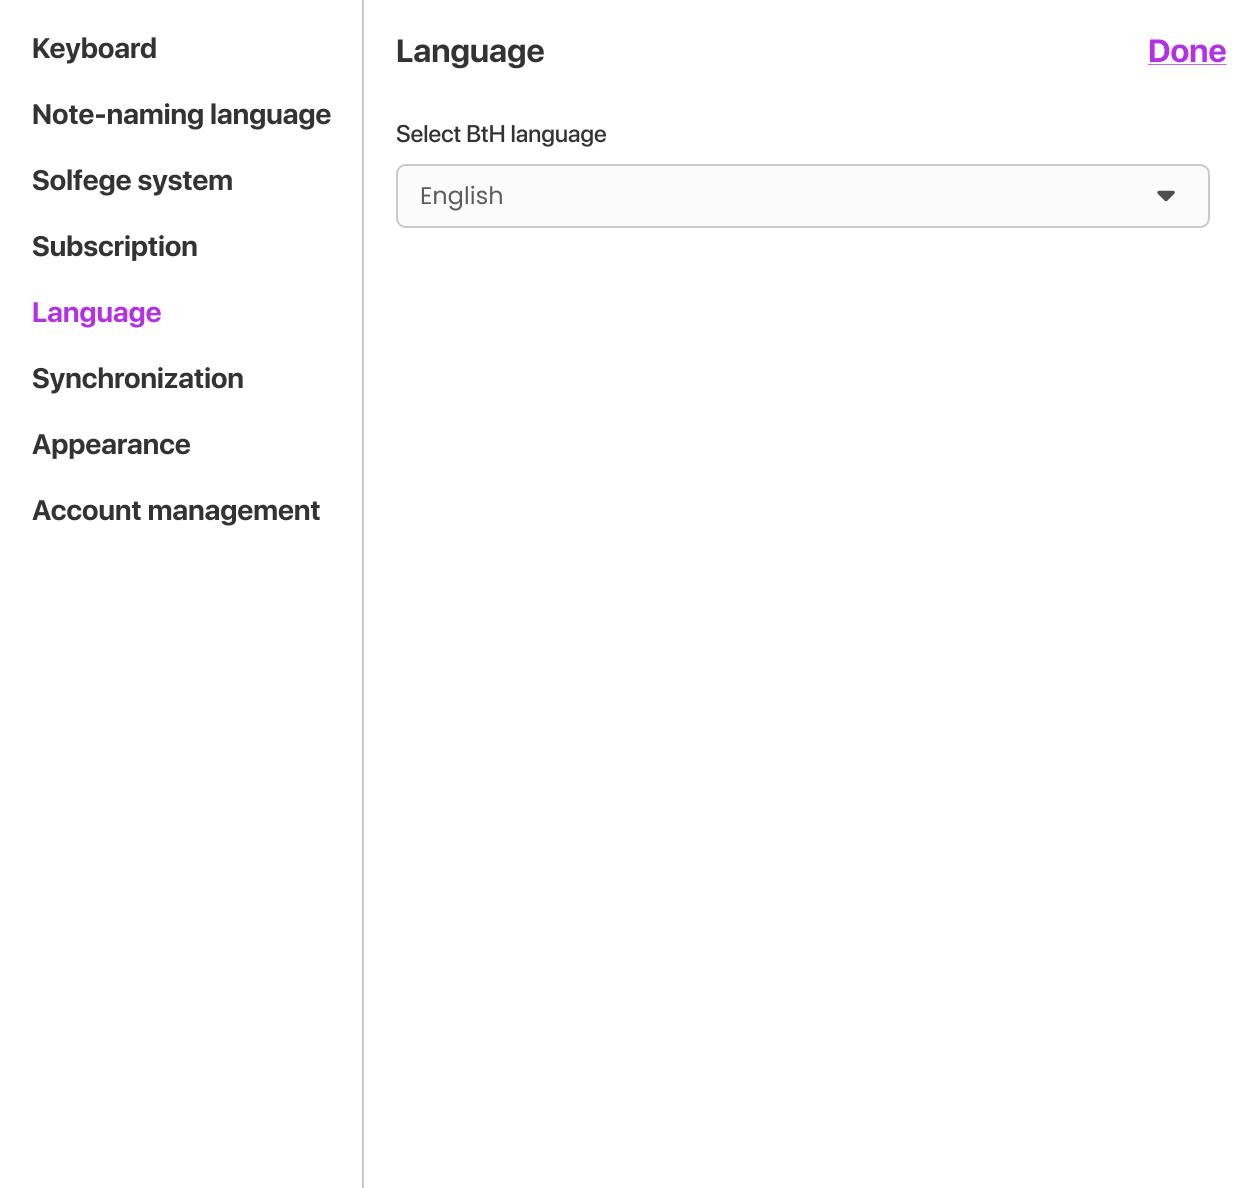
3.5 Language

* Multilingual support is coming soon.

The functionality described below is not yet available. Until translations are released, please use the English version of BtH. 

Select one of the interface languages of the application:

  • English
  • German
  • Russian
  • French
  • Italian
  • Chinese

This updates all menus, buttons, and system messages throughout the app. But you totally can have a French interface with English note names (C, D, E), for example.
3.6 Password

The Password tab allows you to change your BtH account password. This password is device-specific and is required for logging into the app on that exact device.

3.7 Synchronization

Control how the app syncs your data with our server.

It includes:

  • A toggle to enable or disable synchronization: When on, your local progress and data automatically upload to the server whenever you are online.
  • A button to delete all locally stored data: Deleting local data removes all Movement data stored on the device but does not delete the account. You are still able to access the whole Library online.

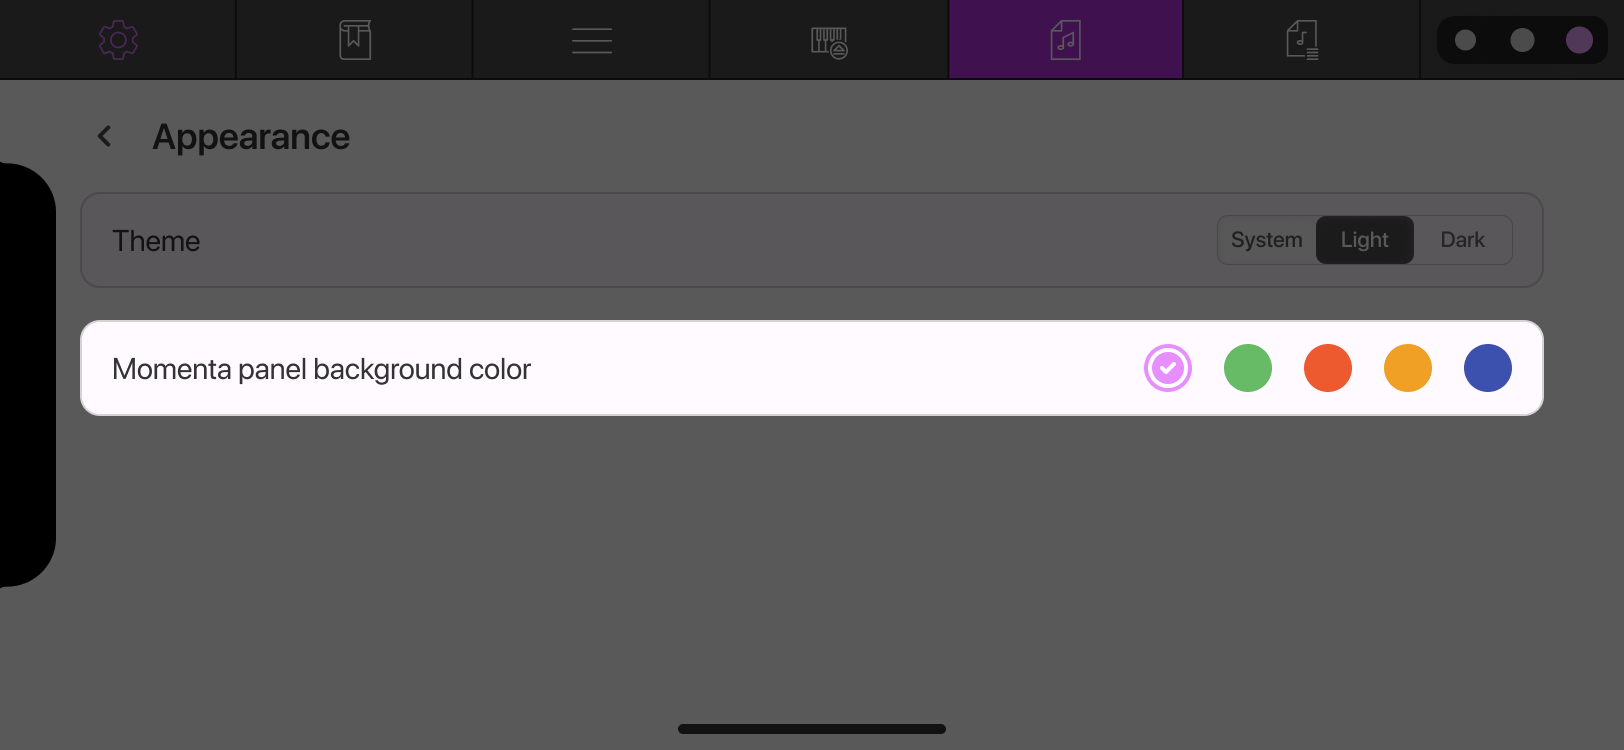
3.8 Appearance

3.8.1 Theme

Choose a visual theme that suits your environment: 

  • System
  • Light
  • Dark

The app automatically adjusts text and icon colors to ensure everything remains easy to read regardless of the theme.

3.8.2 Momenta panel`s background color

Adjust the background color of the Momenta panel.
3.9 Account management

Secure your session or manage your personal data using these high-level account tools:

  • Log out of your account: You end the current session.
  • Delete your account: You delete the account permanently with all personal data removed. You’ll be logged out automatically.

4. Movement-related use cases

This section is your guide to interacting with the music. Whether you are navigating a complex score, filtering specific voices, or customizing your practice environment, these workflows will help you get the most out of BtH.

4.1 Opening & accessing a Movement

4.1.1 Open a Movement from the Library

Accessible: READ-ONLY, REPORT, PLAY → Play Ground.

To start working with a Movement, open it from the Library.

Steps

  1. Open the Library.
  2. Find the Movement you want.
  3. Tap the Movement name.

What happens next

  • The Library remains open until you close it manually. Click the Library button to close it or tap the READ-ONLY mode button to escape there.
  • The Movement loads into the Momenta panel.
  • The first Moment is focused automatically.
  • The Movement opens in READ-ONLY mode.

You can now navigate, play, or analyze the Movement.

4.1.2 Preview the first two measures

Accessible: READ-ONLY, REPORT, PLAY → Play Ground.

Listen to the beginning of a Movement before opening it.

Steps

  1. Open the Library.
  2. Locate the Movement you want to preview.
  3. Tap the Play button next to the Movement name.

What happens next

  • The first two measures of the Movement are played at the tempo (beats-per-minute or BPM) specified by the Movement’s composer or publisher. 
  • You hear the Movement’s beginning 2 measures
  • The Play button changes to a Stop button while preview is active.

You can stop the preview at any time by pressing Stop.

4.1.3 Switch the Mode of a Movement

Accessible: All modes.

Switch how you interact with the current Movement by changing its mode.

Steps

  1. Locate the mode buttons in the center of the Toolbar.
  2. Select one of the available modes:
    • PLAY
    • READ-ONLY
    • REPORT

What happens next

  • The Movement remains the same.
  • The workspace adjusts to match the selected mode.
  • The available panels and controls update accordingly.
  • PLAY mode automatically opens in Play Express. You can switch to Play Ground via the controllers on the left.

In the PLAY mode, you gain access to interactive piano environments. In the READ-ONLY mode, you can view and play the Movement in structured notation. In the REPORT mode, you can apply filters to generate a filtered version of the Movement.

You can switch modes at any time without losing your current Movement.

Play Express mode always opens using the current state of the Momenta panel. This allows you to play either a specifically created report or the original movement. Note that you can exit Play Express only to the mode you came from — either READ-ONLY or REPORT.

4.2 Navigating a Movement

4.2.1 Use the Go-to Indicator

Accessible: PLAY → Play Express, READ-ONLY, REPORT.

Other than manually scrolling the Momenta panel vertically, navigate precisely to any point in the Movement by specifying a particular (measure #, moment #) address.

Steps

  1. Click/Tap the Go-to Indicator.
  2. Select a measure # from the measure pick-list.
  3. Select a moment # within that measure from the moment pick-list

What happens next

  • The system moves focus to the selected Moment.
  • The Momenta panel scrolls automatically to keep the selected Moment visible and centered.
  • The Go-to Indicator updates to reflect the new position.

In the REPORT mode, only measures and Moments included in the active report are available in the Go-to lists.

4.3 Focus & selection

4.3.1 Moment focus

Accessible: READ-ONLY, REPORT.

By default, when a Movement is opened, the focus is placed at the beginning, on moment (1,1). You can change the focus to any other Moment. Note that only one Moment can be focused at a time.

Steps

  1. Tap the Moment you want to focus on.

What happens next

  • The selected Moment becomes focused.
  • The Go-to Indicator updates to reflect the new position.
  • If playback is started, it will begin from the focused Moment.

4.3.2 Note focus

Accessible: READ-ONLY, REPORT.

Isolate a single note within a Moment for closer inspection. Again, only one note can be focused at a time.

Steps

  1. Tap and hold a note.

What happens next

  • The selected note becomes focused.
  • The system switches to note focus.
  • Playback will begin from the focused note if started.

4.3.3 Switch between Moment and Note Focus

Via Focus control on the Player panel

Accessible: PLAY → Play Express.

Steps:

  1. Locate the Focus controller on the Player panel.
  2. Select focus type - Moment or Note.

What happens next:

  • If a note was focused, focus shifts to its parent Moment.
  • If a Moment was focused, focus shifts to the first note inside that Moment.

The focus type affects how manual and automatic playback highlights and follows notes or Moments.

4.3.4 Select a Moment–measure sequence

Accessible: READ-ONLY, REPORT.

Select a sub-stream, a continuous range of moments across one or multiple measures. This is useful for defining a playback range for focused practicing and looping.

Steps

  1. Tap the Moment where you want the selection to begin.
  2. Drag across the Movement to define the end of the selection.
  3. Release to confirm the selected range.

What happens next

  • All moments within the selected range become highlighted.
  • The system recognizes the selection as a measure-moment sequence or substream.
  • The selection remains active until you click outside the selected area or create a new selection.
  • If you switch into Play Express, the System will fill in the Sequence drop-downs on the Sections to Play panel with the beginning and end of the selected sequence.

4.4 Automatic playback

4.4.1 Start automatic playback

Accessible: READ-ONLY, REPORT, PLAY → Play Express.

Listen to your music performed at a steady tempo. The app follows your current BPM setting and always begins exactly from your focused note or Moment, making it easy to start practicing from any point in the score.

Steps

  1. Make sure the desired note or Moment is focused.
  2. Click the Play button on the Player panel.

What happens next:

  • The specific details of the System behavior depend on the Piano you are using.

 But generally:

  • Playback begins from the focused position.
  • The Play button changes to a Pause button.
  • Moments are played in sequence.
  • The corresponding piano keys are highlighted.
  • The Go-to Indicator updates as playback progresses.

4.4.2 Pause automatic playback

Accessible: READ-ONLY, REPORT, PLAY → Play Express.

Stop playback temporarily without losing your current position.

Steps:

  1. Click the Pause button.

In READ-ONLY and REPORT click Play again to resume from the current  position. In Play Express clicking Play resumes playing based on the selected Section to Play.

What happens next:

  • Playback pauses at the current Moment.
  • The focus remains on the current position.
  • The Pause button changes back to Play.

4.4.3 Stop automatic playback

Accessible: READ-ONLY, REPORT, PLAY → Play Express.

End reproduction immediately and reset your position to the beginning.

Steps

  1. Click the Stop button on the Player panel.

What happens next

  • Playback stops immediately.
  • The system places focus on the first Moment of the played selection - whether it`s a whole movement or just a part of it.

4.4.4 Set tempo (BPM)

Accessible: READ-ONLY, REPORT, PLAY → Play Express.

Control the speed of automatic playback using the BPM (Beats Per Minute) selector.

Steps

  1. Locate the BPM selector on the Player panel.
  2. Open the dropdown list.
  3. Select a value between 20 and 208 BPM.

What happens next

  • Automatic playback follows the selected tempo.
  • Changes apply immediately.
  • If playback is already running, the tempo adjusts in real time.

Manual playback is not affected by BPM — you control the speed yourself.

4.4.5 Adjust playback settings

Accessible: READ-ONLY, REPORT, PLAY → Play Express.

Manage how playback behaves using the checkboxes on the Player panel. Available settings depend on the active piano:

For Play Momenta:

  • Sound: Determines whether notes produce sound during playback.
  • Piano: Controls whether piano keys are highlighted.
  • Focus: Controls whether Moments and notes are visually focused during playback.

For Play Express:

  • Sound:  Determines whether notes produce sound during playback.
  • Dancing Levels: Controls whether Level values appear around the piano keys.

Steps:

  1. Click a checkbox to enable or disable a setting.

What happens next:

  • The selected behavior changes immediately.
  • The Dancing Levels controller affects both - automatic and manual playback. Other settings influence only automatic playback.

One control always stays active for Play Momenta.

4.4.6 Playback in the REPORT mode

Accessible: REPORT.

Isolate and listen to only the specific elements you have filtered, such as a single hand or a specific voice. This is ideal for focused analysis, as it keeps the rhythmic timing of the piece perfectly intact while "muting" everything else.

Steps:

  1. Switch to the REPORT mode.
  2. Apply the desired filters.
  3. Click Play on the Player panel. 

What happens next:

  • Only the notes and Moments that match your active filters are played.
  • If there are gaps where notes were filtered out, the app remains silent for that exact duration. This ensures the rhythm of the piece stays consistent.
  • If an entire measure contains no included notes, the measure number remains visible. The focus will rest on that number during the silent period before automatically continuing to the next available note.
  • The underlying structure of the Movement remains unchanged — the filters only affect what is currently visible and audible.

4.4.7 Loop a selected sequence

Accessible: READ-ONLY, REPORT, PLAY → Play Express.

Repeatedly play a selected sequence for practice.

In Play Momenta (READ-ONLY, REPORT)

Step 

  1. Select a Moment-measure sequence.
  2. Click Play on the Player panel. .

What happens next

  • The selected sequence is played repeatedly (up to 10 times) unless stopped manually.
  • The sequence remains highlighted.
  • Focus shifts inside the selection to indicate the currently played Moment.

In Play Express

Steps

  1. Define a playback range in the Sections to Play panel.
  2. Enable the Play Loop option.
  3. Click Play.

What happens next

  • The defined range plays repeatedly (up to 10 times) unless stopped manually.
  • Focus shifts inside the selection to indicate the currently played Moment.

4.5 Manual playback

4.5.1 Navigate forward (manual playback)

Accessible: READ-ONLY, REPORT, PLAY → Play Express.

Move through the Movement step by step at your own pace.

Steps:

  1. Click the Right Arrow on the Player panel.

What happens next:

  • Focus shifts to the next Moment or note.
  • The Go-to Indicator updates to reflect the new position.
  • Manual playback is not controlled by BPM — you decide the speed.

4.5.2 Navigate backward

Accessible: READ-ONLY, REPORT, PLAY → Play Express.

Move backward through the Movement step by step.

Steps:

  1. Click the Left Arrow on the Player panel.

What happens next:

  • Focus shifts to the previous Moment or note.
  • The Go-to indicator updates.

4.6 Playback range & looping

4.6.1 Play the whole Movement

Accessible: PLAY → Play Express.

Always start playback from the beginning of the Movement till its end.

Steps:

  1. Open the Sections to Play panel.
  2. Select Play whole movement.
  3. Click Play on the Player panel.

What happens next:

  • Playback always starts from the beginning of the movement.
  • The playback continues until the end unless you stop it.
  • The Sequence drop-downs are automatically filled in with the first and last moments of the movement.

4.6.2 Play from the Current Moment

Accessible: PLAY → Play Express.

Always start playback from your current position in the Movement.

Steps:

  1. Open the Sections to Play panel.
  2. Select Play from current moment.
  3. Click Play on the  Player panel.

What happens next:

  • Playback always begins from the focused position.
  • The Movement continues forward until it reaches the end or is stopped manually.

4.6.3 Play a custom Moment–measure sequence

Accessible: PLAY → Play Express.

Steps:

  1. Open the  Sections to Play panel.
  2. Locate the Sequence drop-downs.
  3. Select your starting point: Measure from and Moment from.
  4. Select your end point: Measure to and Moment to.
  5. Click Play.

What happens next:

  • The defined range becomes the active playback section.
  • Automatic playback is limited to that range.
  • Playback stops when the defined end is reached (unless looping is enabled).
  • If Play Express was opened from the REPORT mode, available values are limited to the filtered sequence.
  • If Play Express was opened from the mode which had a selected sequence - the Sequence drop-downs are filled in automatically.

4.7 Play Express configuration

4.7.1 Configure Dancing Levels

Accessible: PLAY → Play Express.

Select which note-related information appears around the piano keys. This creates a direct visual link between your hand position and the musical data.

Steps

  1. Open the Dancing Levels panel.
  2. Select the Levels you want to display.
  3. Choose whether each Level should appear: above or below the piano keys.

You can select up to three Levels above and three Levels below the keys.

What happens next

  • During playback, selected Level values appear around the corresponding piano keys.
  • The display updates immediately.
  • If Dancing Levels is disabled in the Player panel, the Levels will not appear even if selected.

4.8 Level display customization

4.8.1 Collapse a Level

Accessible: READ-ONLY, REPORT.

Remove a Level from view across the entire Movement.

Steps:

  1. Open the Leveling Table.
  2. Locate the Level you want to adjust.
  3. Check the Collapse checkbox for that Level.

What happens next:

  • The selected Level disappears from all Moments in the Momenta panel.
  • The layout adjusts automatically.
  • The Level remains part of the Movement structure, but is no longer visible.
  • You can uncheck the box to restore the Level.

4.8.2 Submerge a Level

Accessible: READ-ONLY, REPORT.

Hide a Level while preserving its vertical space.

Steps:

  1. Open the Leveling Table.
  2. Check the Submerge checkbox for the desired Level.

What happens next:

  • The Level values are hidden.
  • Empty space remains where the Level would normally appear.
  • Other Levels keep their position.
  • You can uncheck to restore visibility.

4.8.3 Outline a Level

Accessible: READ-ONLY, REPORT.

Temporarily hide a Level while keeping it accessible.

Steps:

  1. Open the Leveling Table.
  2. Check the Outline checkbox for the desired Level.

What happens next:

  • The Level is covered by a filled rectangle.
  • You can uncheck to return the Level to normal view.

4.8.4 Collapse / submerge / outline all but this

Accessible: READ-ONLY, REPORT.

Quickly hide all Levels except one to focus on a specific parameter. This allows you to isolate a single Level for focused work.

Steps:

  1. Open the Leveling Table.
  2. Tap the name of the Level you want to focus on.
  3. Select one of the options:
    • Collapse all but this
    • Submerge all but this
    • Outline all but this

What happens next:

  • The system applies the selected action to all other Levels.
  • The chosen Level remains fully visible.
  • The Leveling Table closes automatically.

4.8.5 Clear all switches

Accessible: READ-ONLY, REPORT.

Reset your visibility settings for all Levels. This is useful when you want to restore the default view.

Steps:

  1. Open the Leveling Table.
  2. Double-tap one of the reset icons at the top:
    • Collapse
    • Submerge
    • Outline

What happens next:

  • All checkboxes of the selected type are cleared.
  • All affected Levels return to normal display.

4.9 Filtering & reports

4.9.1 Apply filters

Accessible: REPORT.

Create a report by filtering the Movement using preset Level filters.

*On MAC and iPad you can create a fully custom report with a highly sensitive system of filtering.

Steps:

  1. Open the REPORT mode.
  2. Select one or more filters from the available list of presets or use the SELECT ALL option.
  3. Escape the REPORT mode to apply filters.

What happens next:

  • The Momenta panel updates automatically.
  • Only notes and Moments matching the selected filters remain visible.
  • The rest of the Movement becomes hidden.
  • The Go-to Indicator updates to reflect only accessible measures and Moments.

You can apply filters from multiple Levels at the same time.

4.9.2 Combine filters within the same Level (OR logic)

Accessible: REPORT.

Select multiple values from the same Level. For example, if you select Soprano and Alto, the report includes Soprano or Alto.

Steps:

  1. In the REPORT mode, select more than one value from a single Level.
  2. Escape the REPORT mode to apply filters.

What happens next:

  • The system includes entries that match any of the selected values.
  • This follows OR logic.

4.9.3 Combine filters across different Levels (AND logic)

Accessible: REPORT.

Narrow your focus by combining different Level criteria. For example, if you select Left Hand and Tenor, the report includes entries that are Left Hand and Tenor.

Steps:

  1. Open the REPORT mode.
  2. Select a value from one Level.
  3. Select a value from another Level.
  4. Escape the REPORT mode to apply filters.

What happens next:

  • The system includes only entries that match all selected Levels.
  • This follows AND logic.

4.9.4 Combine multiple filters

Accessible: REPORT.

Mix both types of logic for advanced isolation.

Steps:

  1. Open the REPORT mode.
  2. Select multiple values within a Level.
  3. Select additional values from other Levels.
  4. Escape the REPORT mode to apply filters.

What happens next:

  • Within the same Level → OR logic applies.
  • Across different Levels → AND logic applies.

4.9.5 Show Original

Accessible: REPORT.

View the original movement.

Steps:

  1. Open the REPORT mode.
  2. Click the Show original button at the bottom of the screen.

What happens next:

  • All filters are removed.
  • The full Movement becomes visible again.
  • The Go-to Indicator restores full navigation access.

4.10 Customization & advanced controls

4.10.1 Change the Momenta panel scale

Accessible: READ-ONLY, REPORT.

Adjust the size of notes and Levels in the Momenta panel.

Steps:

  1. Locate the Scale Controller in the Toolbar.
  2. Select one of the three options: Small (S), Medium (M), or Large (L).

What happens next:

  • The Momenta panel resizes proportionally.
  • Notes, Moments, and Level values adjust automatically.
  • The layout recalculates based on the selected scale.

Note: Changing scale may take a few seconds depending on the Movement size.

4.10.2 Change the Momenta panel background color

Accessible: READ-ONLY, REPORT, PLAY → Play Ground.

Customize the background color of the Momenta panel.

Steps:

  1. Open Settings Appearance.
  2. Locate the Color Picker.
  3. Select a background color.

What happens next:

  • The Momenta panel background updates immediately.
  • Notes and Levels remain visible and adjusted for contrast.
  • If the app theme is switched (Light ↔ Dark), background colors are inverted automatically to preserve visibility.

4.10.3 Refresh layout

Accessible: READ-ONLY, REPORT.

Refresh the layout to fix elements that appear misaligned after resizing or scaling.

Steps:

  1. Click the Refresh button located in the Momenta panel header.

What happens next:

  • The layout recalculates.
  • All Moments are repositioned correctly within the panel.
  • The current focus remains unchanged.

4.11. Play Ground mode

4.11.1. Play the Piano keyboard

Access:  PLAY → Play Ground.

Use BtH to practice your piano playing anytime—even without a real instrument.

Steps:

  1. Open the Play Ground mode.
  2. Locate the Piano panel.
  3. Click any key to play a single note.

Playing chords:

  • Tap multiple keys at the same time to play a chord.

5. Synchronization & offline-first model

5.1 How BtH works: offline-first

BtH uses an "offline-first" model for its database needs. This means:

  • The app does not require a constant internet connection to function.
  • You therefore can continue working with your Movements even without Wi-Fi.

This approach ensures:

  • Stable performance
  • Faster response time
  • No data loss if connection drops

5.2 First login & initial download

You only need an internet connection to:

  • Create an account
  • Log into the app for the first time on a device

When you log in for the first time:

  • The app automatically downloads all System Library Movements available to you.
  • These Movements are stored locally on your device.

After this initial download, you can work offline.

5.3 Local password per device

Each device requires its own local password. This ensures secure offline access even without an internet connection.

This means:

  • You must set a password on each device during sign-up.
  • When offline, you log in using this device-specific password.
  • You can change the password in Settings → Password.

5.4 Automatic synchronization

Automatic synchronization keeps your data up-to-date so you don’t have to worry about manual saves. As long as your device is connected to the internet, the app works in the background to ensure your progress is backed up and consistent.

No manual action is required. Synchronization happens automatically when:

  • Your device has an active internet connection.
  • New data or changes have been made on the server side.
  • The app reconnects to the internet after being offline.

What happens:

  • Any updates from the server are applied to your device automatically.
  • Your data, settings, and progress remain the same across every device you use.
  • Your local work is safely backed up to the server, ensuring nothing is lost if you switch devices.

5.5 Synchronization settings

The synchronization settings give you full control over how your device manages Movement data. 

In Settings → Synchronization, you can:

  • Enable or disable synchronization.
  • Delete all locally stored data.

What happens next:

  • Deleting local data removes all Movements currently stored on your device to free up space.
  • After deleting local data, the app will automatically re-download your Movements the next time synchronization is enabled and an internet connection is available.
  • If you want to prevent the app from downloading Movements to your device entirely, you should turn off synchronization before clicking delete all local data.
  • Even if your local storage is empty, you will still be able to access, view, and play all your Movements whenever you are online.

Table of contents

Table of contents